The New DNS Launch Center and Cloudflare DNS Integration
You can now fully launch your DNS independently from our Cult Portal.
By Ben Butler, Founder and Lead Developer, Headless Hostman

Our DNS launch center — located within the Cult Portal — is a major functionality release that enables you to go from sign up to launch without requiring our team’s assistance.
You might be asking … Well, isn’t DNS management par for the course for a “hosting” company?
The answer is yes, for a “traditional hosting company,” but we are not a traditional WordPress hosting company.
- Building a Static Hosting infrastructure is a different animal. This feature required evaluating several variables and building automated systems to work with our customers in their unique situation.
- As opposed to singular servers, the live Static Hosting platform uses geo-replication.
It’s likely different than your normal DNS switch experience, but uses the same foundations. Read carefully and don’t hesitate to hit us up via Live Chat or email if you have any questions.
Best Launch Practices
Be prepared:
- Be sure you QA your Static Test site results carefully.
- Schedule your DNS change and push during off-peak hours.
- Make sure clients or internal stakeholders know it’s coming. Prepare them for downtime.
- Reverting is always an option if something goes wrong.
For smoother switchovers:
- We advise switching TTL to the lowest number possible on DNS changes.
And honestly, take it from me, don’t be in a huge rush at the eleventh hour. Be sure you’re calculated and have a schedule set.
- Coordinate with our team if you’d like assistance. We’re happy to, free of charge.
- We require 2 business days advanced notice to handle your request.
Change Your DNS and Prepare for Launch
1. First, Head to the Cult Portal
Our Cult Portal is our equivalent of a cPanel or normal host dashboard.
- Login
- Look for the site in question under “My Sites”
- Click Manage site
- Scroll down to the DNS section
All of our Sites Start Default with a Test Static URL
Which you’ll see boldly called out. This enables you to test your WordPress site on Static immediately.
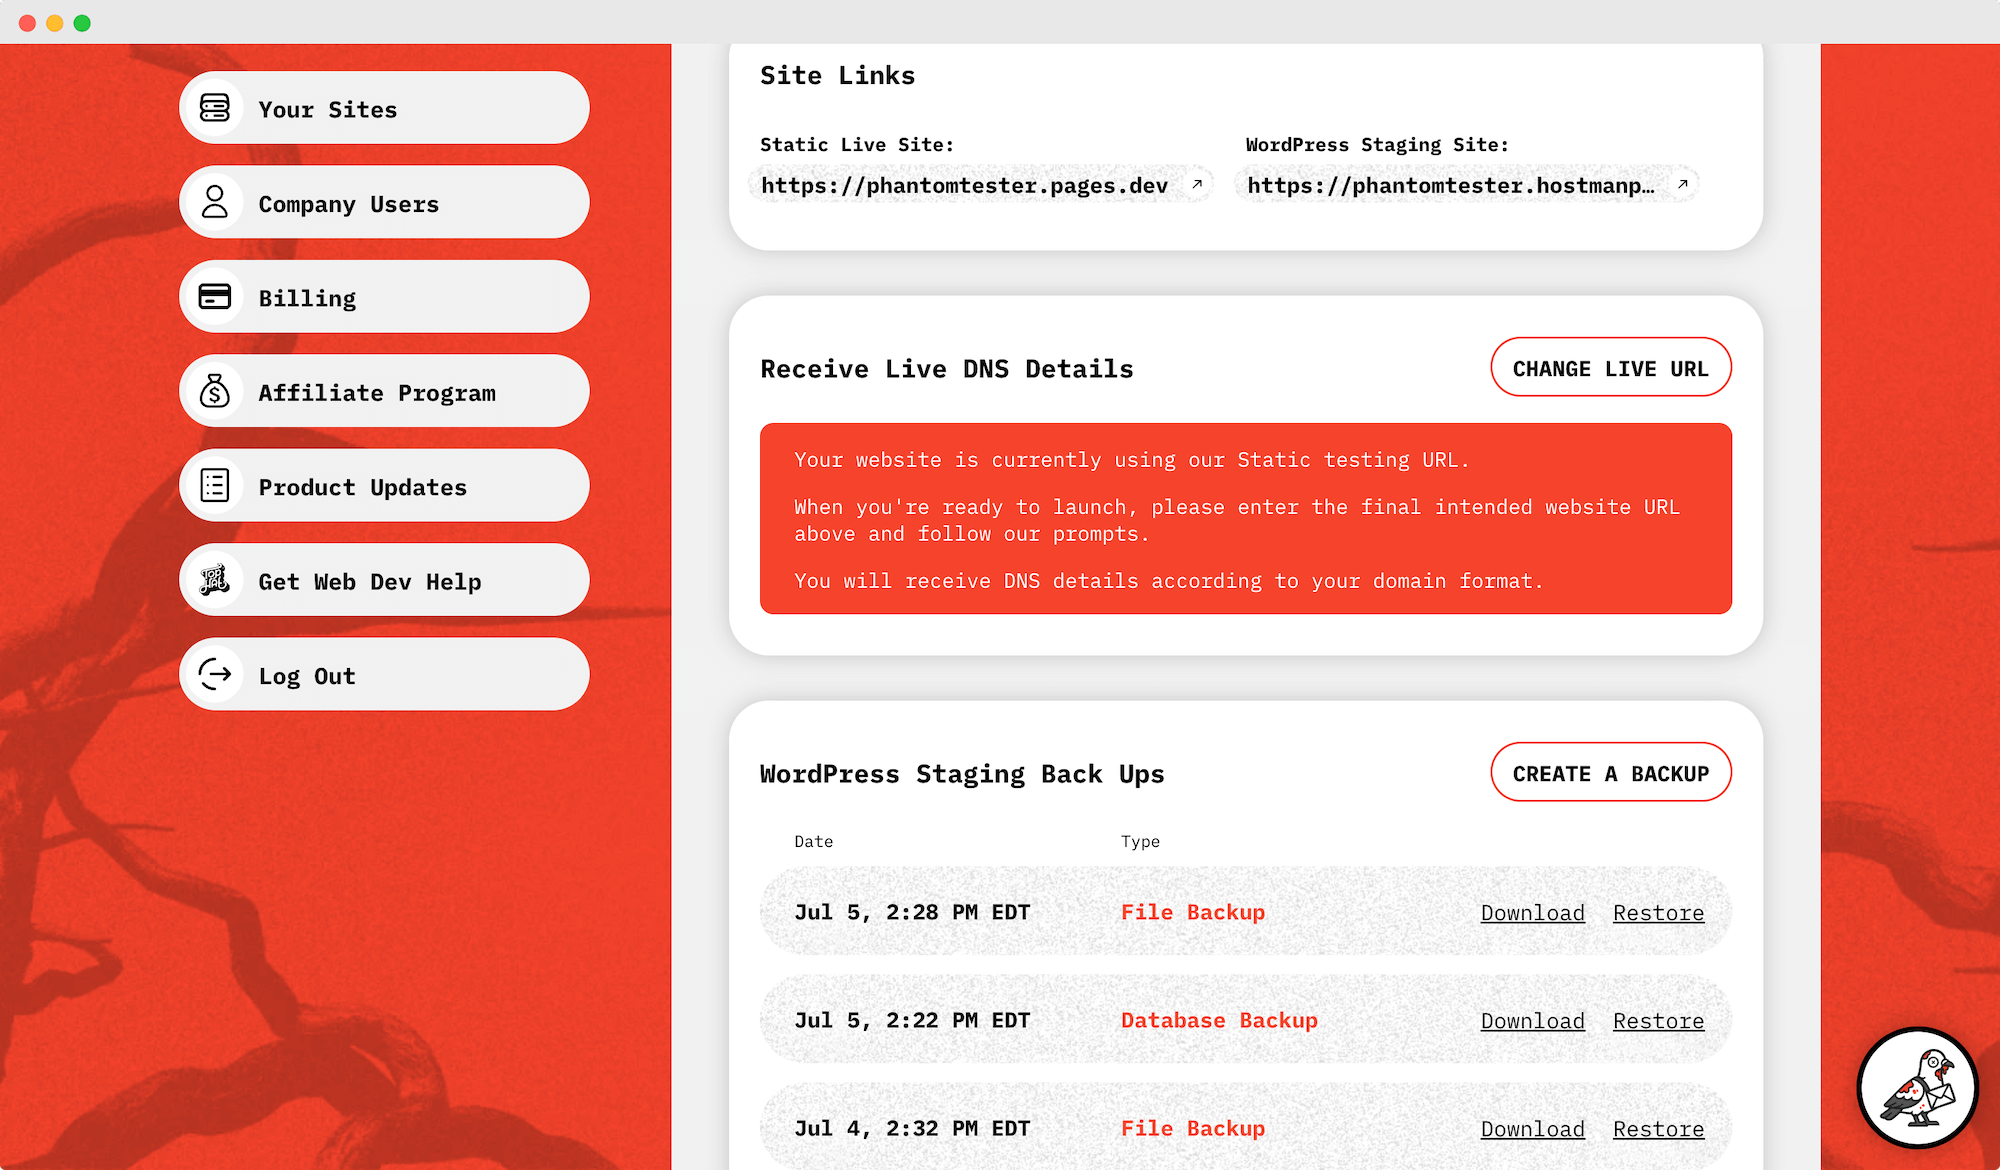
Obviously, you don’t want to use that as your live domain, so let’s fix that.
2. Change the Live URL
Under DNS, click “Change Live URL” and enter the final domain you intend for the public to use.
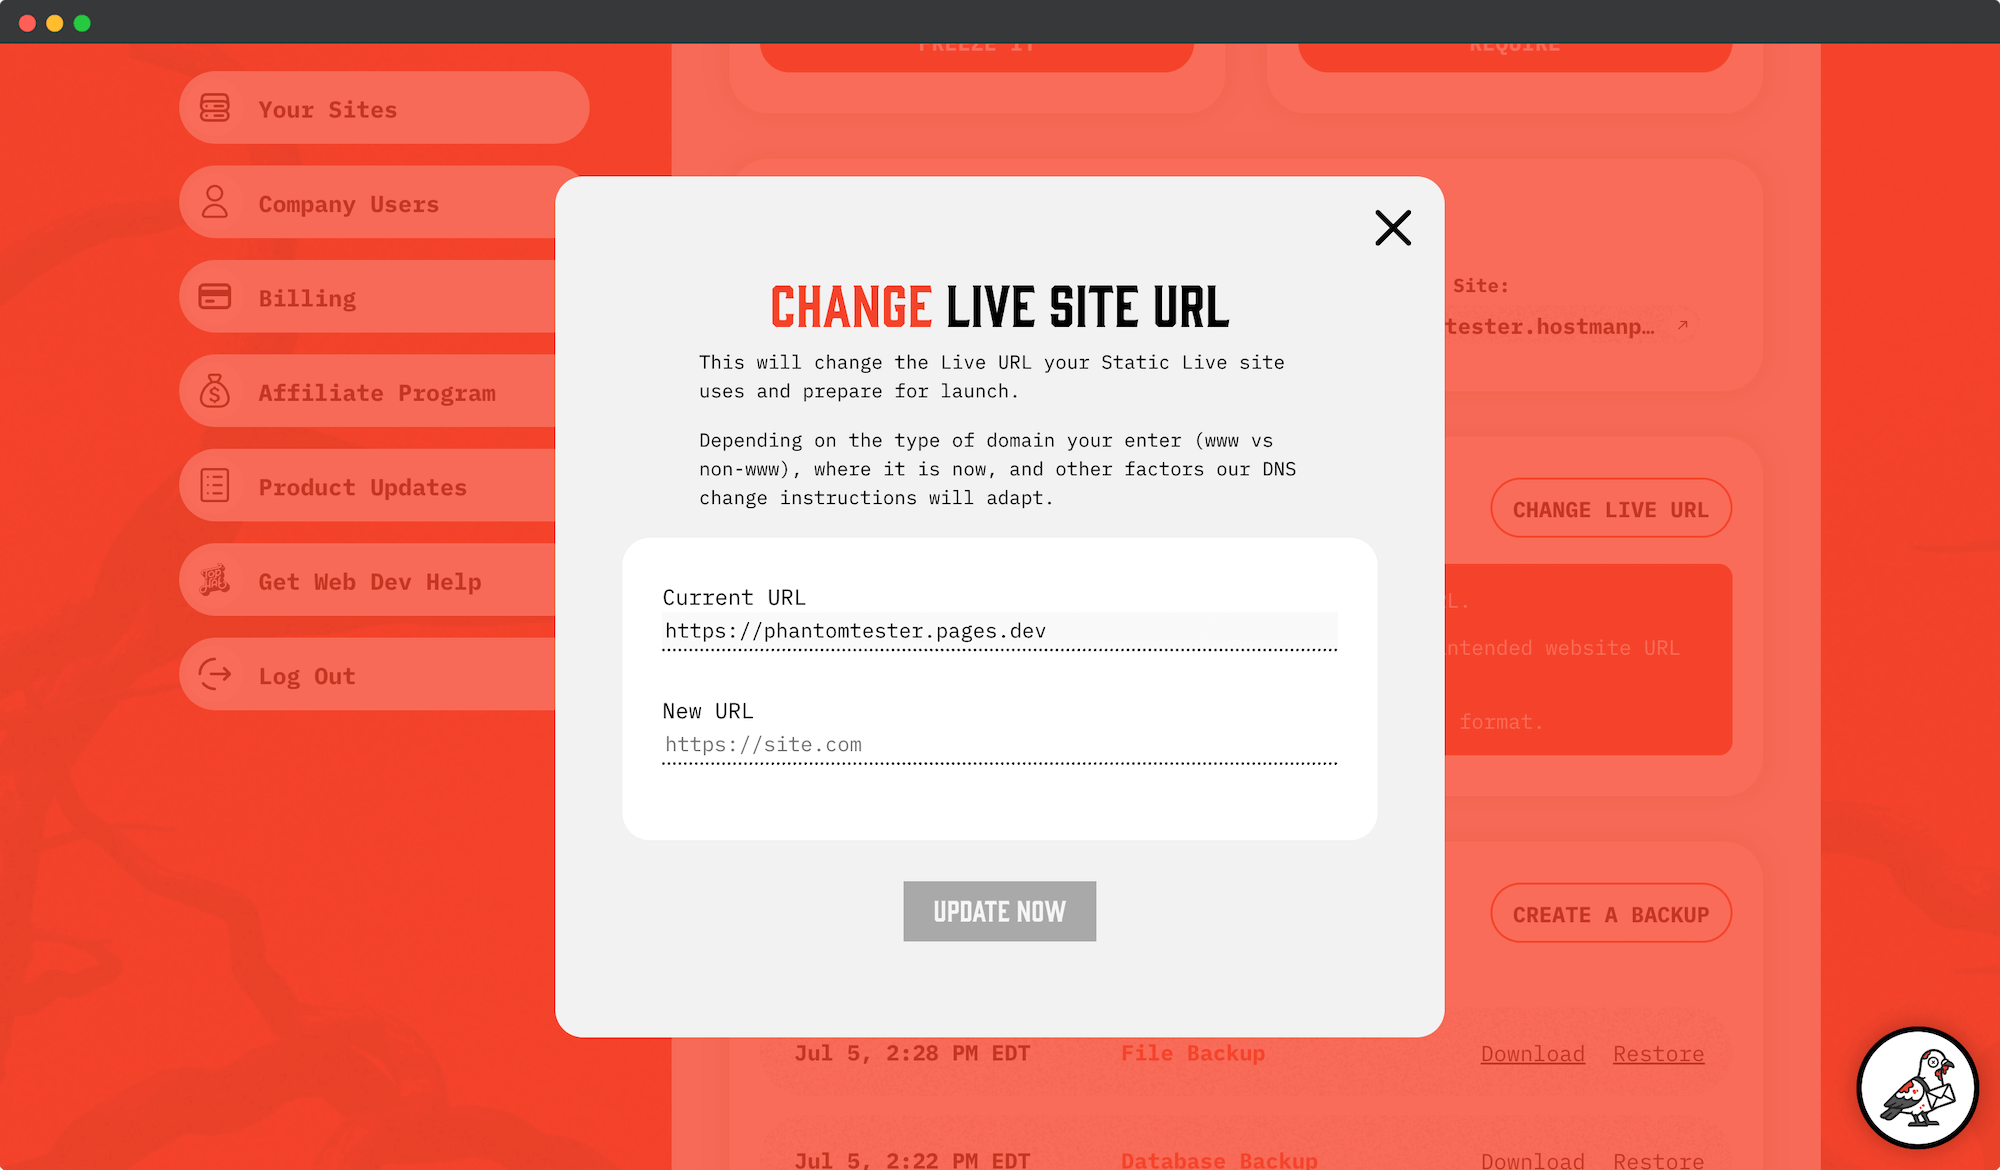
There are four situations that arise:
- Your live site is a www CNAME subdomain (ex: www.example.com)
- Your live site is a non-www CNAME subdomain (ex: dash.example.com)
- Your live site is a non-www Apex Record (ex: example.com)
- Your live domain is already managed by Cloudflare
We Auto-Detect Your Situation and Update the Prompts for You
Based on what you enter as your intended Live URL we will dynamically render the next-steps for you according to the following situations:
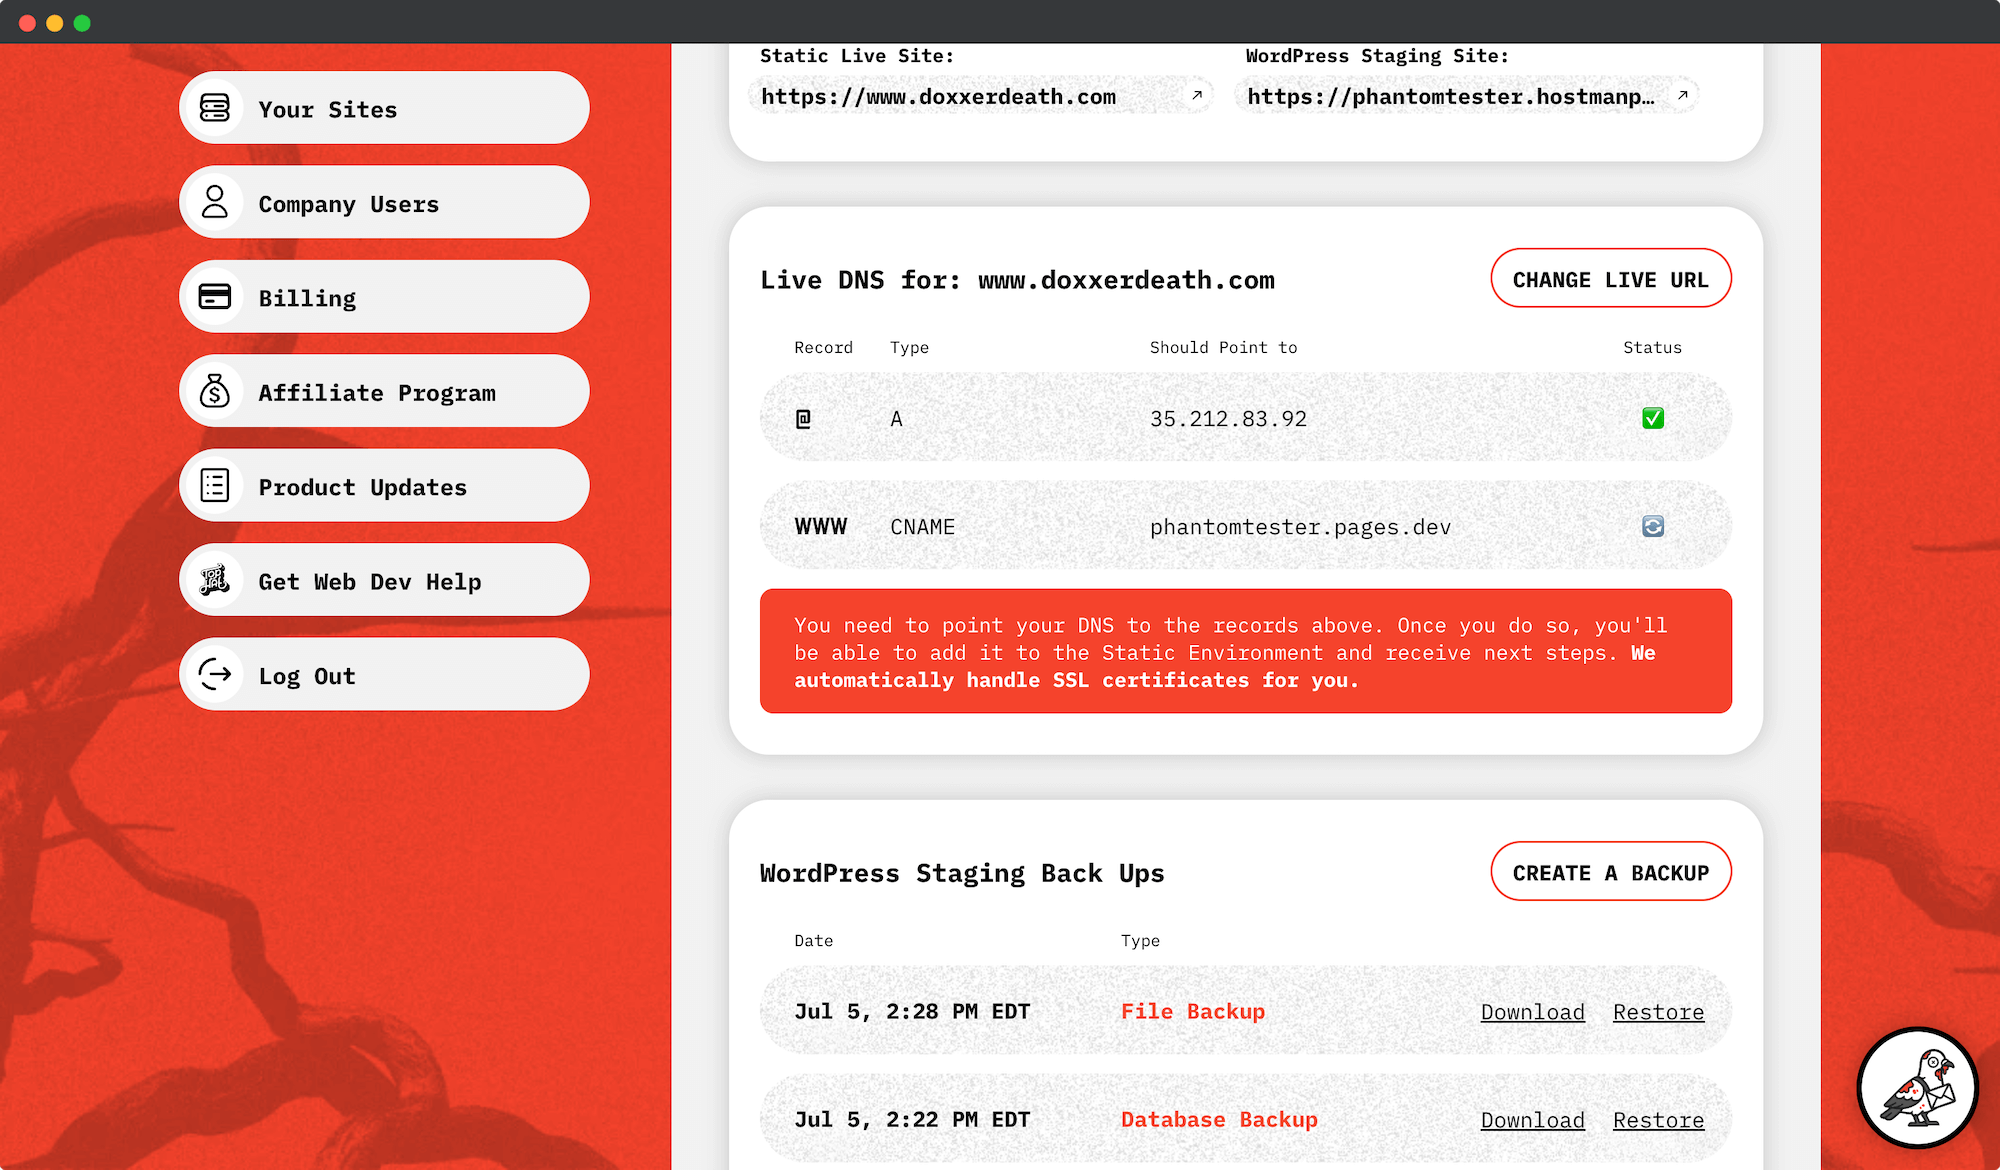
Situation 1: Your Live Site is www.example.com
This is the simplest and most familiar path to launch. This version is also known as a www CNAME subdomain.
When we detect your Live URL lives at WWW, we just need a few records updated. This can be done through any traditional DNS provider.
Enter the records as indicated and wait for them to turn green.
Situation 2: Your Live Site is at non-www CNAME subdomain (ex: dash.example.com)
This path is also pretty straight forward. All you need to do is update a single subdomain.

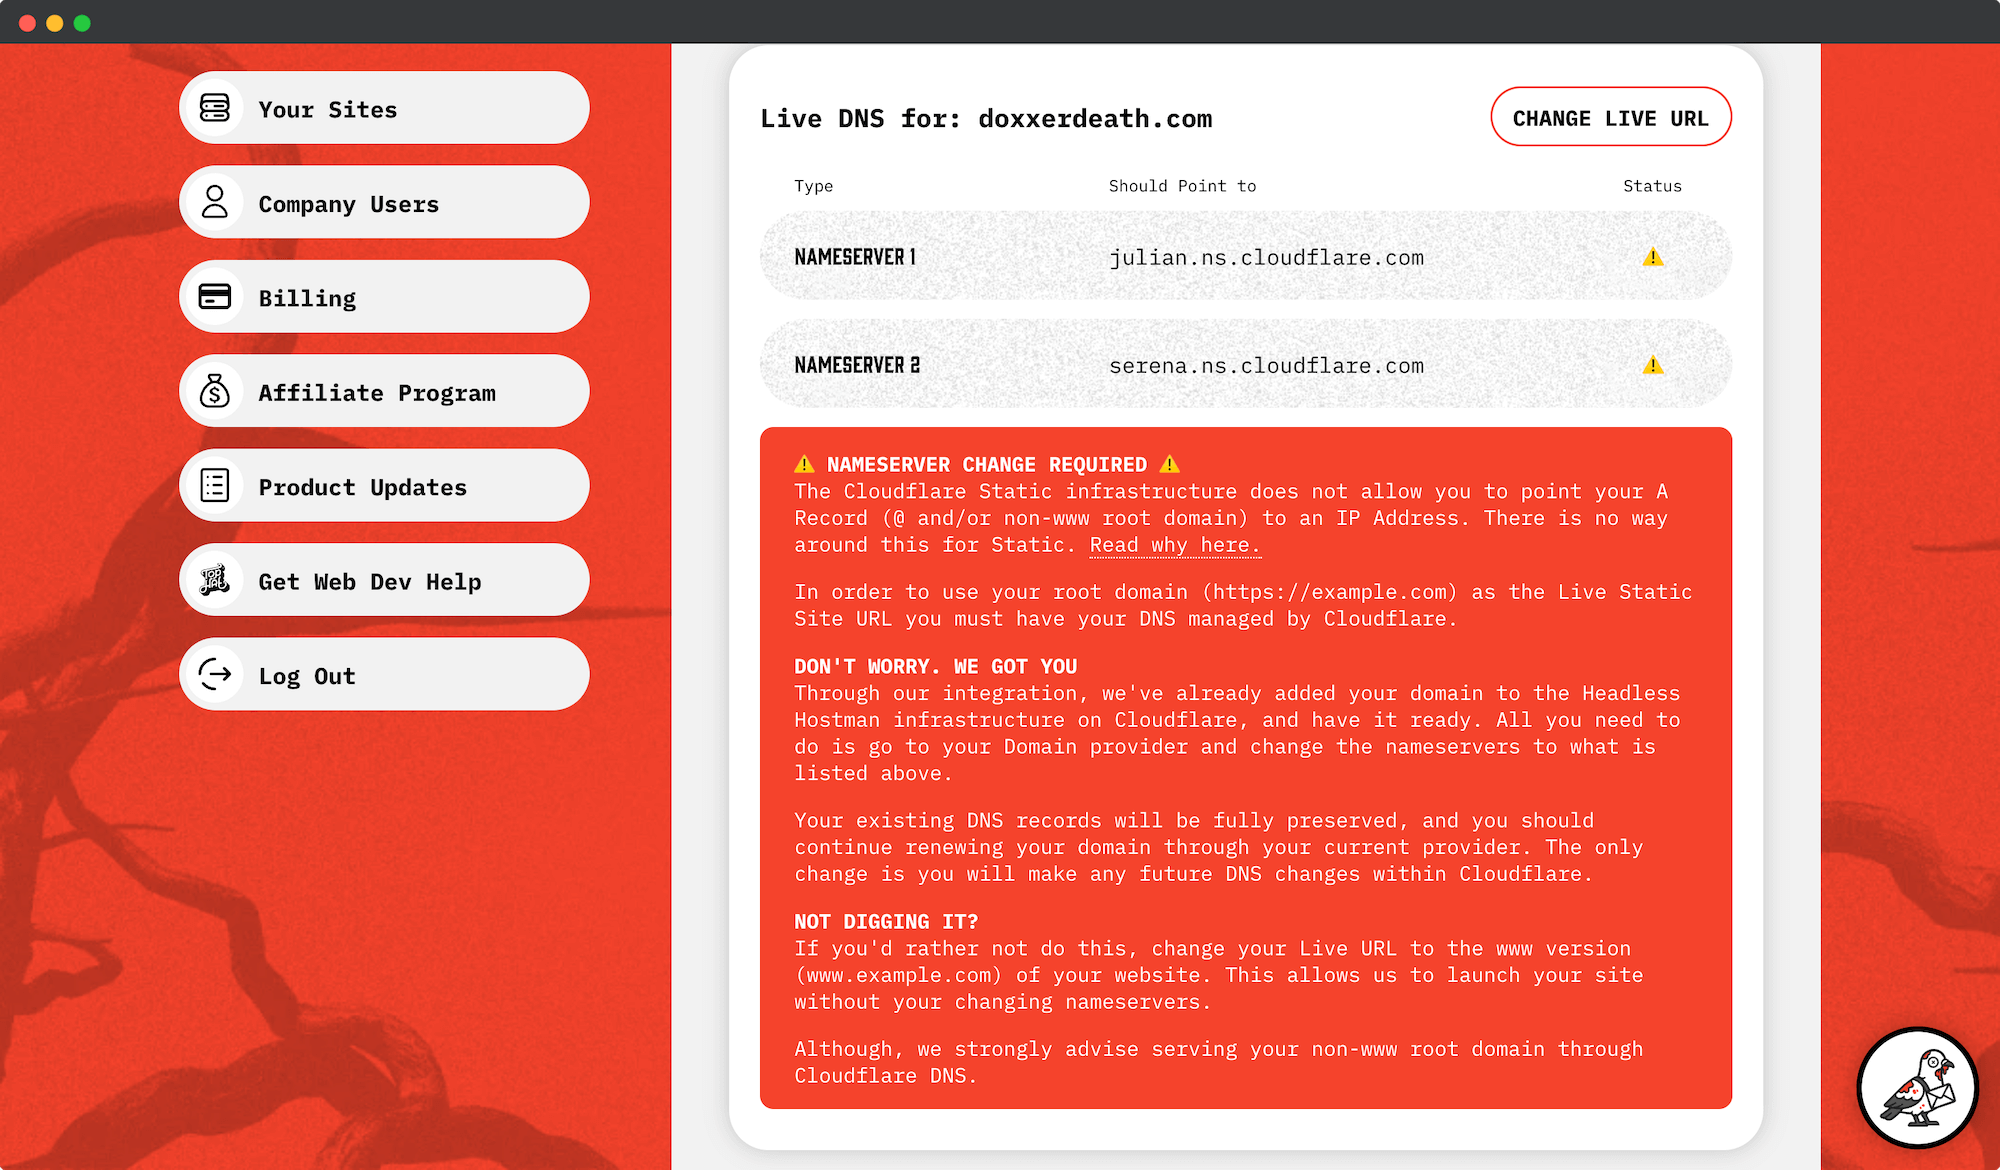
Situation 3: Your Live Site is at the Root/Apex Level (ex: example.com)
This might be a slight shock to your system, so please read this one carefully.
Cloudflare Static cannot accept an A Record (example.com is an Apex Record at @) pointed at an IP address.
It uses a Flattened A Record as a CNAME, which is a Cloudflare-only feature.
We we wrote an entire article about why this is important here
- The TL;DR is that Cloudflare Static propagates your website across 330 content delivery network servers globally.
- There is no one IP address associated with that. Traditional hosts give you an IP address because your site files live on a singular server (of course other load-balancing factors come into play at times).
- The Flattened A Record CNAME is the medium that determines where the end site is served from, which could be from a rolling and changing list of hundreds of end IP addresses.
If you’d like to use example.com, you need to switch your Nameservers to Cloudflare to get access to A Record Flattening.
- Yes, you continue renewing your domain through your normal provider. We are not transferring the registrar.
- But the DNS records will be controlled by Cloudflare
We make it easy with our premium Cloudflare integration. It’s just updating one thing.
If we auto-detect an Apex domain, not already on Cloudflare, we automatically add your domain to the Headless Hostman Cloudflare infrastructure.
All you need to do is change your Nameservers, as indicated. That’s it.
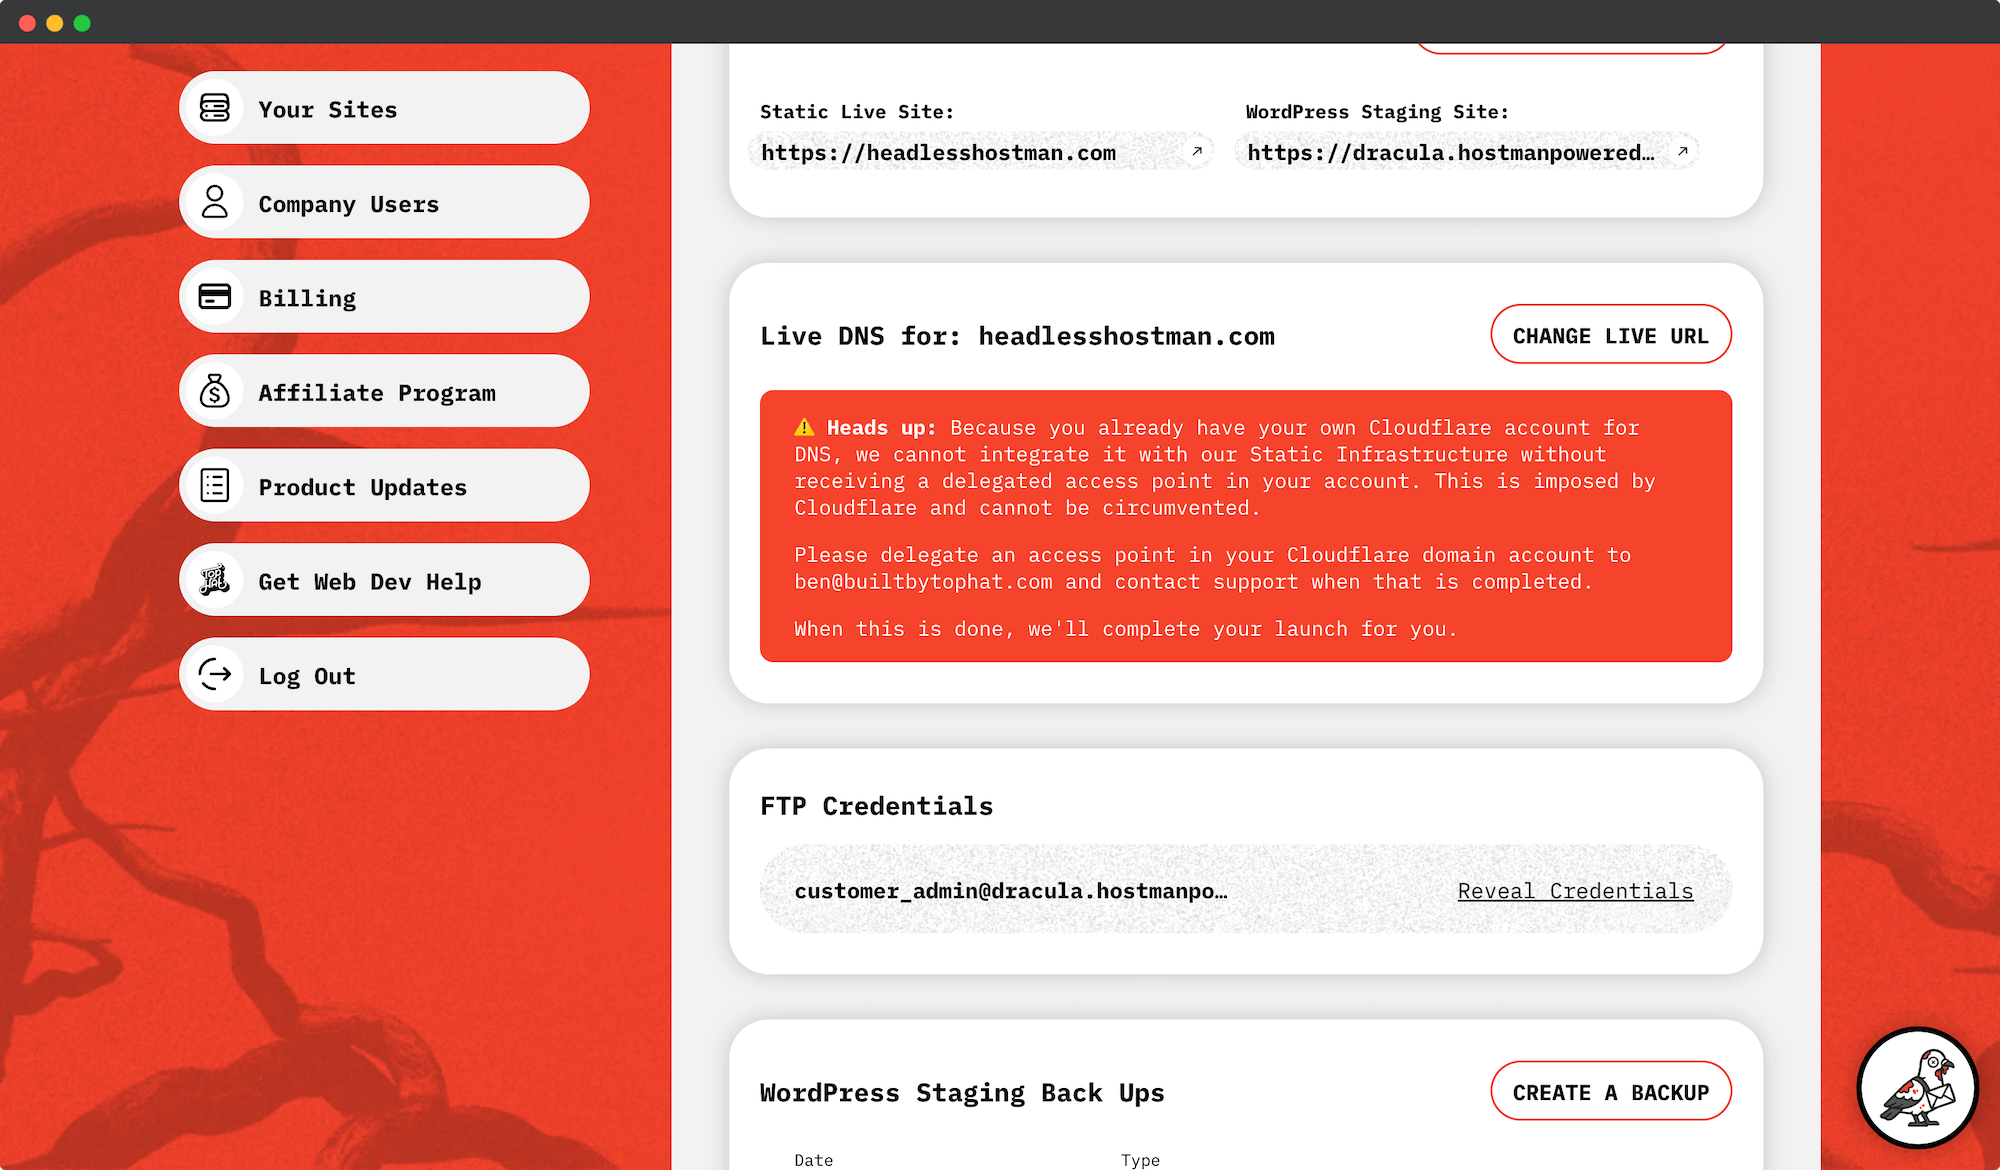
Situation 4: Your DNS is Already Managed by Cloudflare through Your Own Account
If your DNS is already on Cloudflare, we can’t auto-launch it through our system. We need a delegated access point to coordinate from first.
There is no way around this. This is a security feature imposed by Cloudflare to prevent misuse.
Once you delegate an access point to us, we will coordinate the rest of the launch for you.
Ok, Now Launch It!
The following applies to Situations 1, 2, and 3.
- Again Situation 3, we need to do it for you due to Cloudflare restrictions, as outlined above.
Step 1: Update and Prepare the Static Infrastructure
Regardless of Situation 1, 2, or 3, when it’s ready you’ll see green checkboxes and a new button that says “Update Static Site URL and Repush Static Site.”
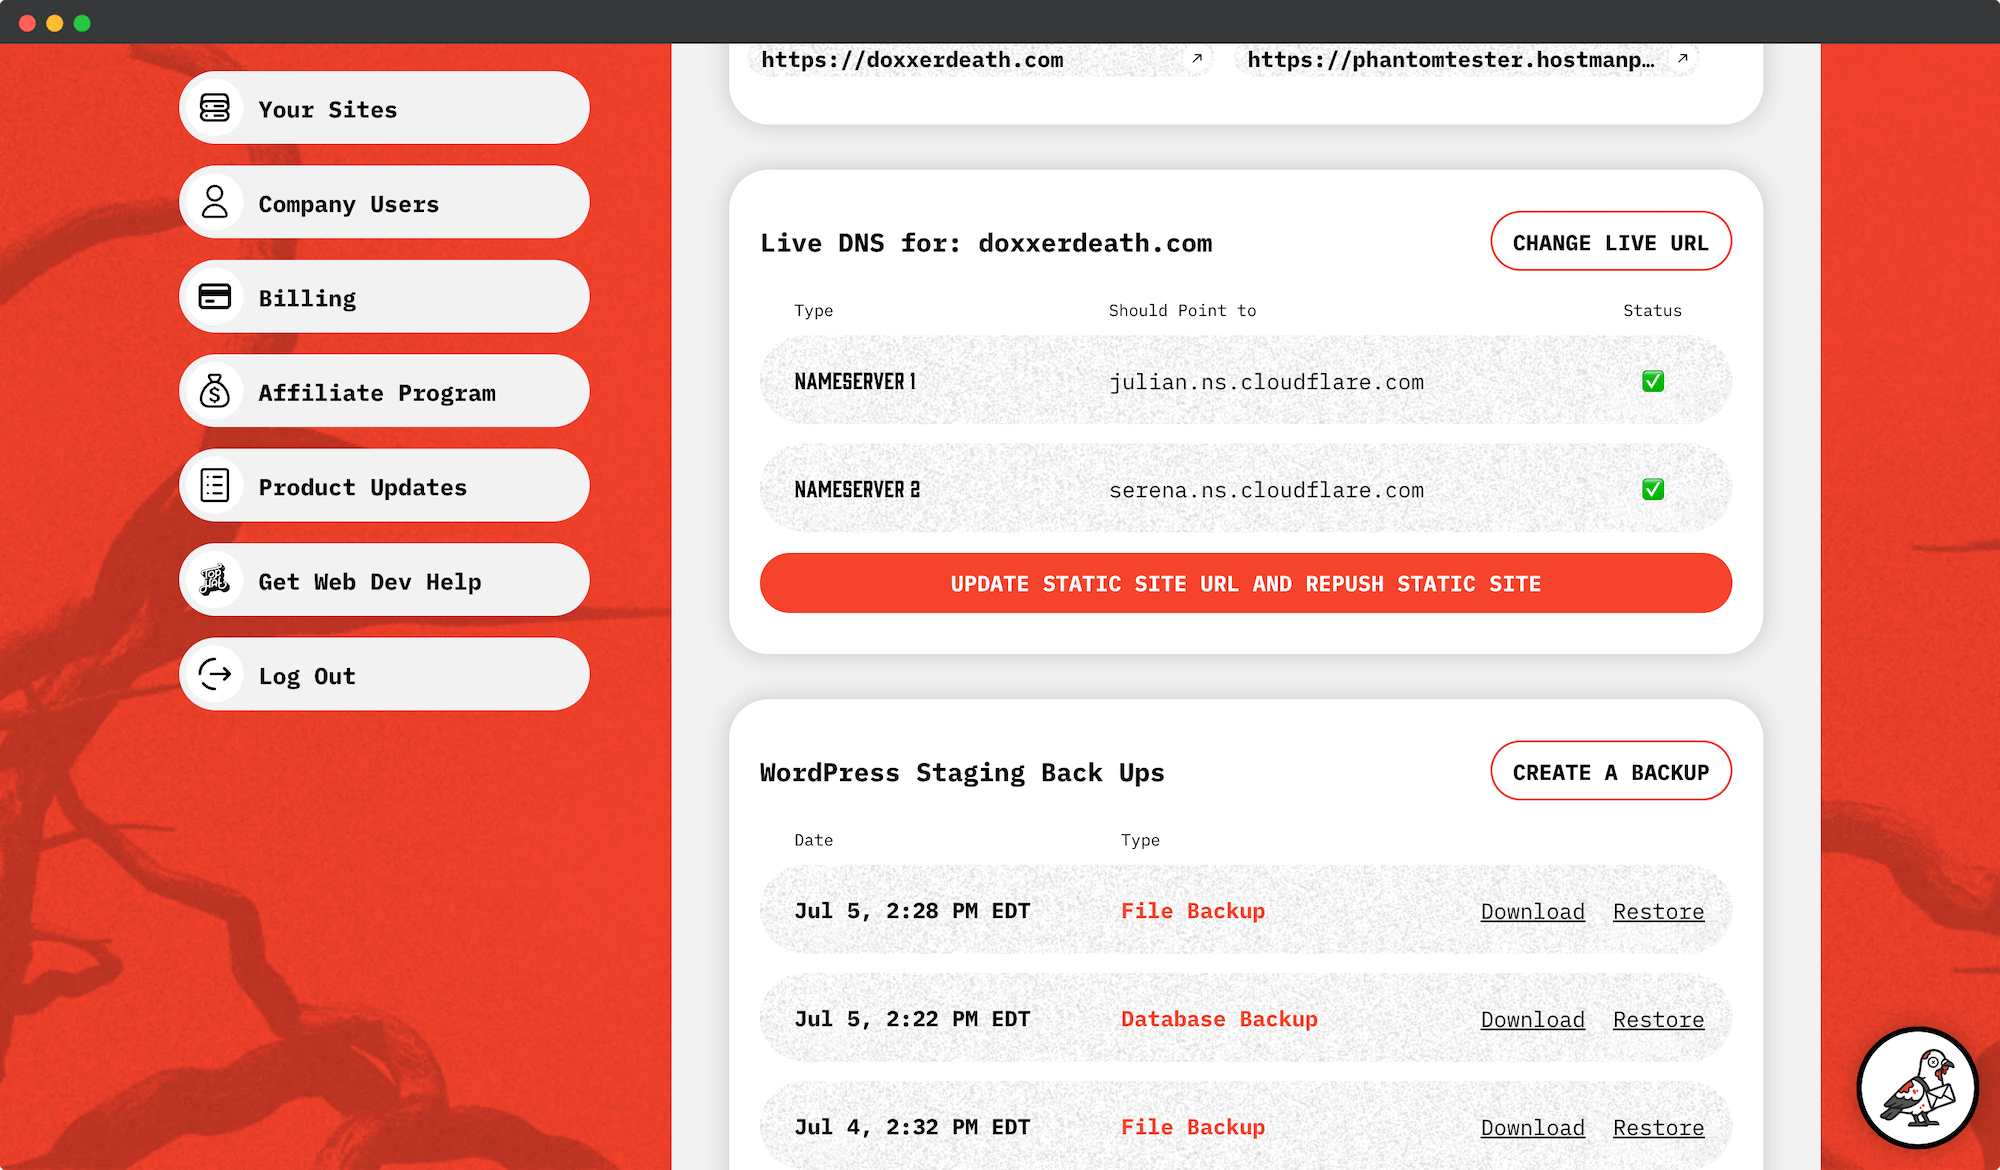
By clicking the button we:
- Update your WordPress site to use the new, live URL
- Associate your final Domain with the Static Live Site instance to prepare to route traffic.
If you are Situation 3 (the Cloudflare nameserver change), we do a few more things automatically for you.
- We automatically add the correct www and non-www DNS records
- We set up an auto-redirect from www to non-www via Page Rules
- And finally, we associate the Static Live instance with the records
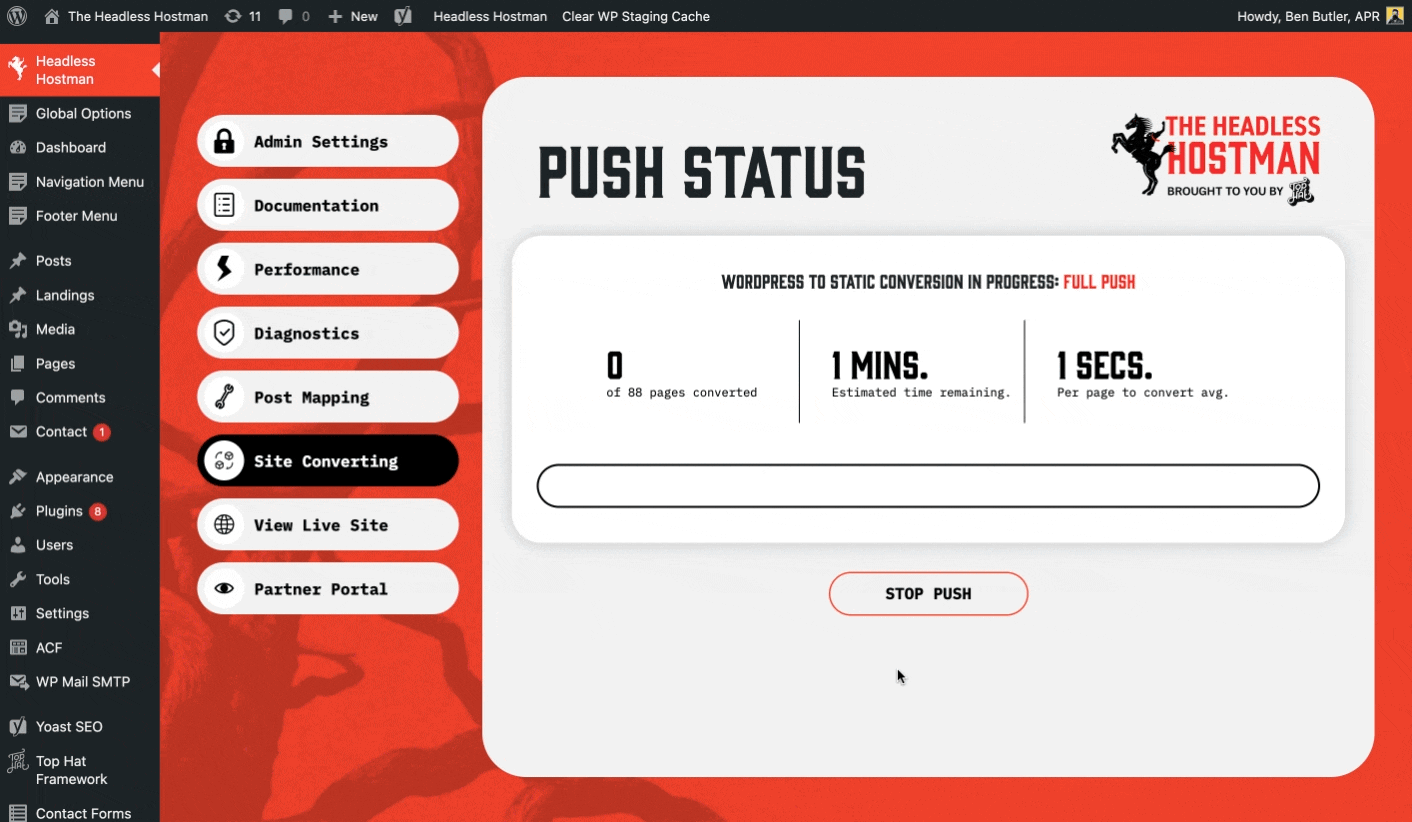
Step 2: Repush Your Static Site from WordPress
Our Static Conversion tool uses a domain search and replace during Static generation. This makes sure the Static files have the right domain in their markup.
From the steps above your WordPress site now has the Live URL, but the Static files need updated to reflect it.
Your next prompt will be to repush the website with the Live URL in use.

Until you do this, this warning will not go away.
And by this point, your DNS is set in all the right places, so things will be broken until you complete a re-push. Do this immediately.
Luckily, the final launch push shouldn’t take long.
And There You Have It
Independently change DNS and push your Static WordPress site. No intervention needed.
Again, if you’d like to coordinate launch with us we’re happy to assist with a notice of 2 business days.
Cloudflare Network Only
The DNS launcher is only for customers using our native Cloudflare network.
Enteprise users using the AWS integration must handle the switches within AWS and Cloudfront.
Deeper into the Abyss
Enhanced Critical CSS Generation and Our New Critical CSS API
Our own, brand new Critical CSS Generator for faster and enhanced first contentful paints.

Cloudflare Pages 2,100 Redirect Limit? We’ve Solved It.
Infinite redirects in Cloudflare made possible by the leader in Static WordPress.

Introducing “Cache Everything:” Our Fastest Cloudflare CDN Integration Yet
Static WordPress made, yet, even faster through HTML caching on Cloudflare's CDN.
ready to get started?
Headless Hostman takes the best of both traditional CMS systems and other static host providers to create a site that is both easy to manage, fast, and secure.