


Documentation

How It Works
What is Static WordPress?
Static WordPress is a version of your site that embeds images and files directly onto flattened pages.
These pre-rendered pages are totally separated from database servers. The combination creates a faster, more secure, and far more resilient website.
Headless Hostman takes the best of both traditional WordPress and countless Static solutions to create a site that is easy to manage, fast, and secure.
Your WordPress Site. Exactly as It Is. Made Static.
Our method of converting your WordPress site to Static doesn’t involve rebuilding your front-end in a JS framework.
We take your WordPress site, exactly as it is, and convert it to Static.
We support 99.9% of Plugins and Themes out of the gate.
WordPress + Static Hosting Under One Roof
For each individual website on our Platform, you get:
A standard WordPress website.
- Everything is the exact same, except this no longer handles live traffic. View this like your publication platform. Your “staging” area.
- Use any Theme or (nearly) any Plugin you want
- When you’re ready for the world to see, use one of our Push options (see below) from the Headless Hostman menus to send it Static and Live
A Static live site, hosted on the serverless Cloudflare network
- This serves all of your live traffic with tremendous resilience.
You also get:
A Portal to manage all of your sites including:
- Backups
- FTP
- Users
- Security controls
- DNS settings
- And rollback options
This is Not a Traditional WordPress Host
If you’re looking for another plain WordPress host, this isn’t for you.
Yes, we give you all the functionality of WordPress — in its true form — but there is one extra layer:
- Static Conversion tools, directly within WordPress
- A Static Live site, to host your production, live website
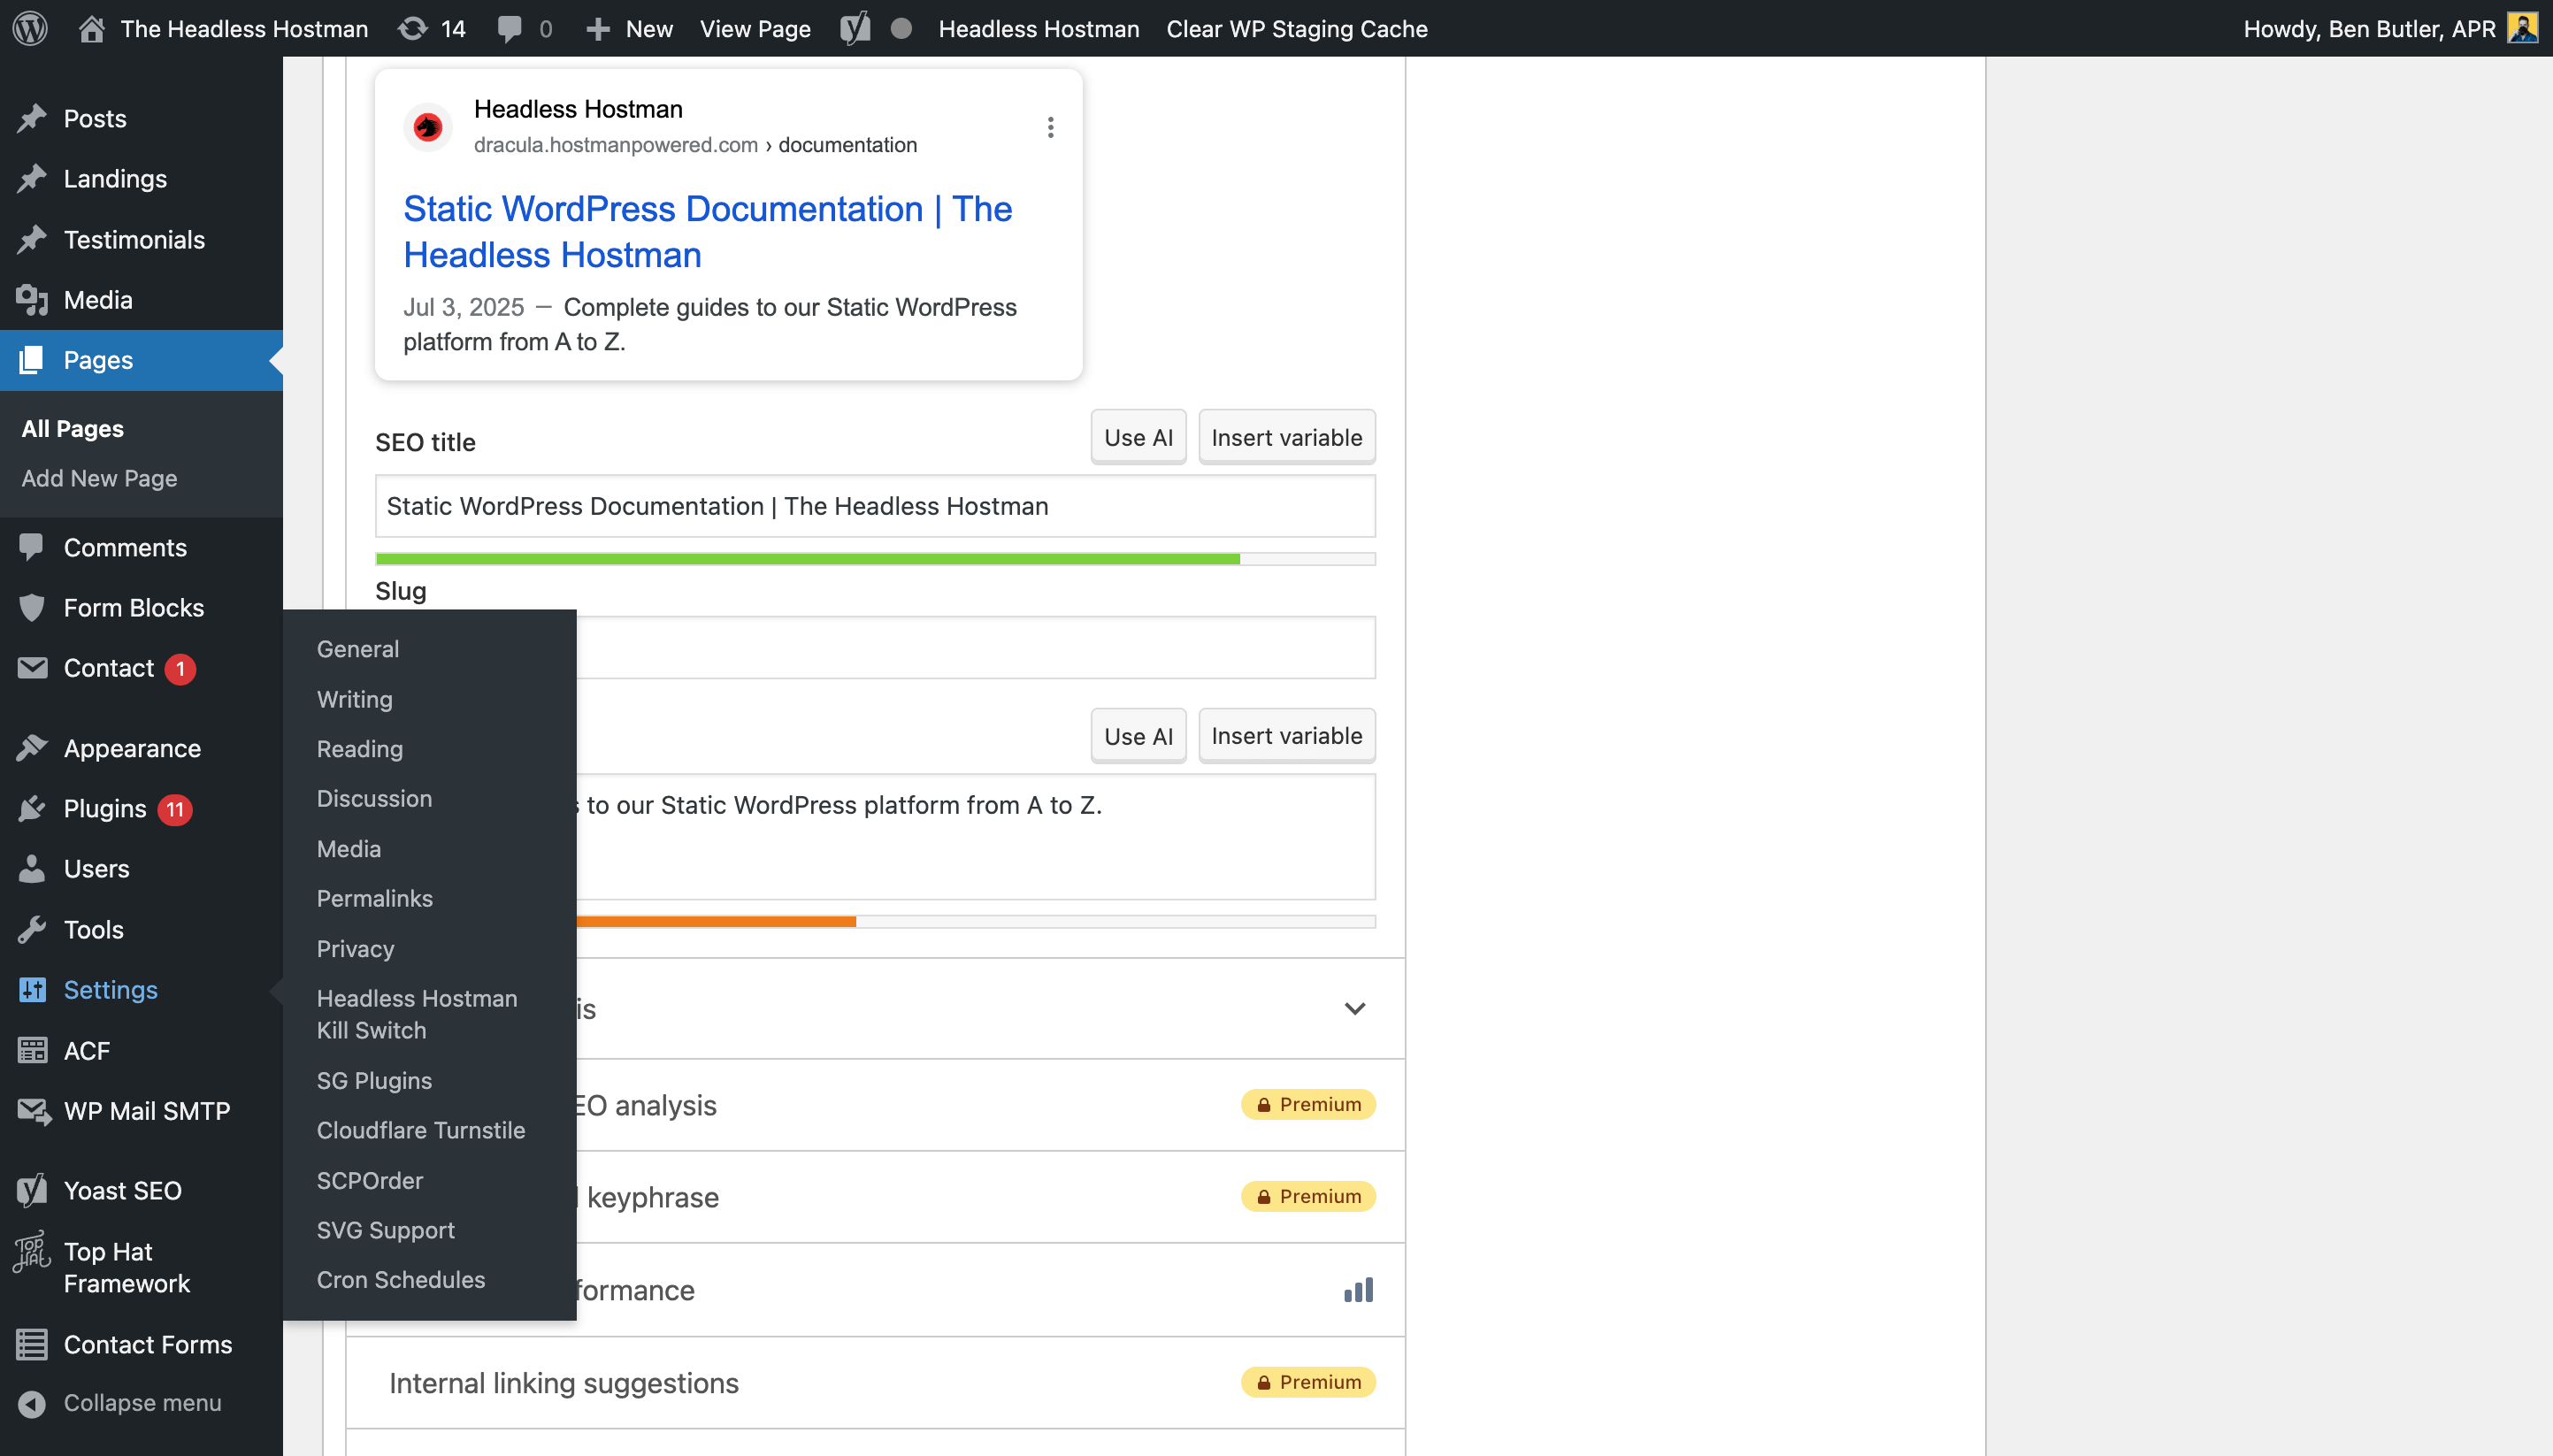
Edit your content. When you’re done, hit update, and then hit “update on Headless” or do a full/partial push and we’ll handle the rest.
It’s a slight change to your publishing process, but it is a change.
Technical Specs
Is This a Plugin?
Not in the traditional sense of the word, no.
The Headless Hostman files live outside of the public_html and cannot be found in the plugins folder, or anywhere within your site install.
The only thing you will see is our MU-PLUGIN defining the directory and holding our critical platform image assets.
How Does it Crawl and Convert?
We use native WordPress functions, heavily reliant on WP Query and Post IDs to identify pages — depending on what Push feature you use.
We don’t “crawl” your site blindly. We don’t use browserless emulators.
Does AJAX and/or WP-JSON Work on the Static Site?
Yes, they both do.
Our goal is to reduce the amount of work needed to get your site onto Static to the bare minimum.
We’ve set your Headless environment to route AJAX and WP-JSON requests back here to your Staging Site to return results to the Static Site. We obfuscate your URL so the Staging Site URL is never exposed. We also don’t allow any other sites to make those requests.
If you’re coding functions with AJAX, always make the URL reference this staging site in full. We will automatically search and replace it with your Live URL and route it back here in a secure fashion
Does WordPress Search Work?
Yes.
Again, our goal is to reduce the amount of work needed to get your site onto Static to the bare minimum. There is no need to download/use a Plugin to “bandaid” search for static. It works day one.
- Any native POST, AJAX, or regular WordPress search action works seamlessly and dynamically.
- Any Plugin utilizing those practices also works seamlessly.
Does Multisite Work?
Yes. We have a full Multisite integration. If you’re trying to buy this, you do need to go through an onboarding with our team as Multisite is a beast all of its own.
Does WooCommerce Work?
We have a working Beta we are stress testing with a small set of customers.
It will release to the public by February of 2026.
Are Dedicated Servers Available?
Yes, if your organization needs a dedicated WordPress server we can provide one within an Enterprise package.
For the Live Static site, on Cloudflare, it’s a serverless infrastructure. It’s a dedicated nameserver area, and is dedicated in the spirit of the term — although that terms doesn’t truly apply to serverless in our opinion.
If you’d like a true “dedicated static live site” you should use your own AWS S3 Static Service, which we are compatible with.
Where Does the Live Static Site Live?
Our default network is on Cloudflare serverless Static.
We do have a custom package tier with a full AWS integration. Contact us to discuss.
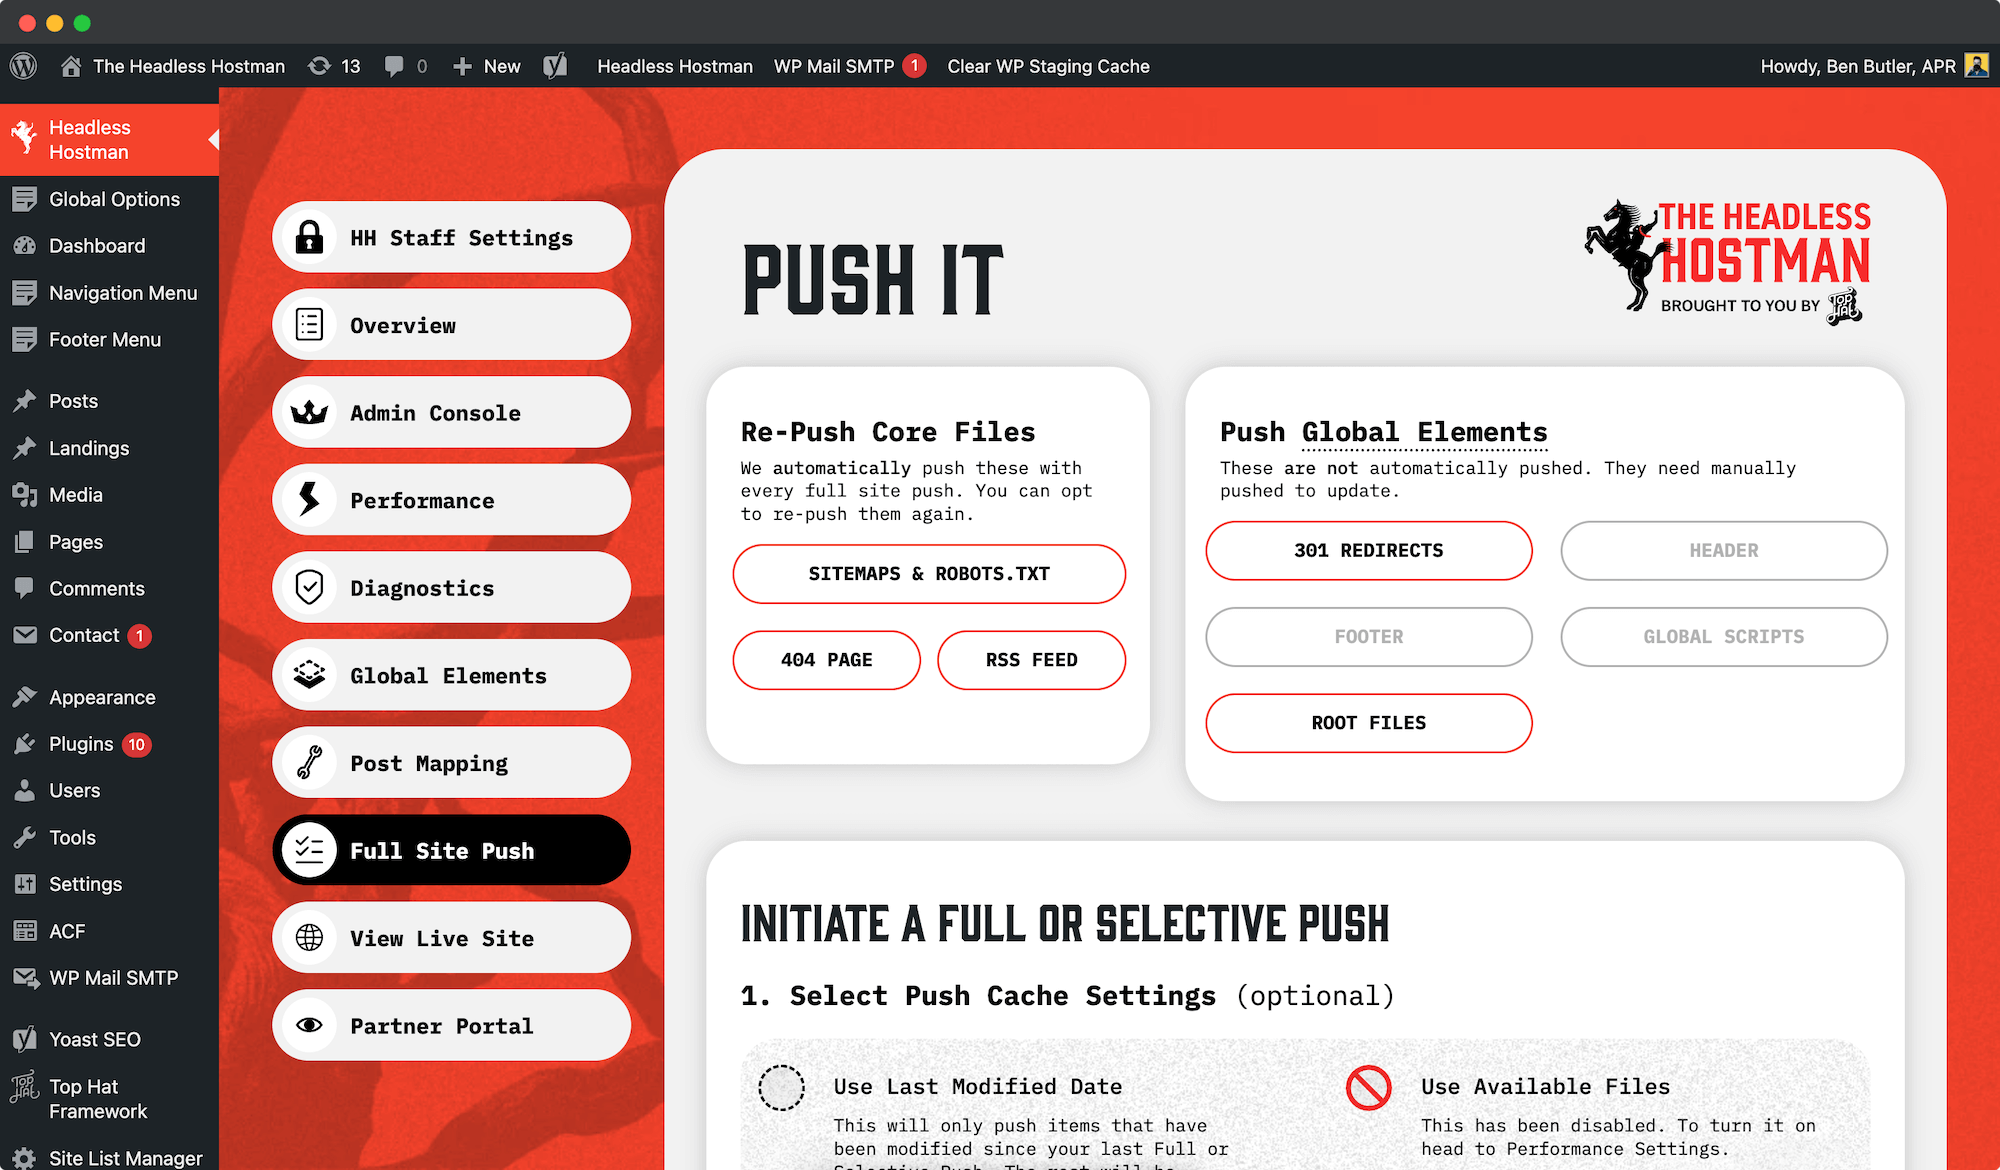
Pushing to Static
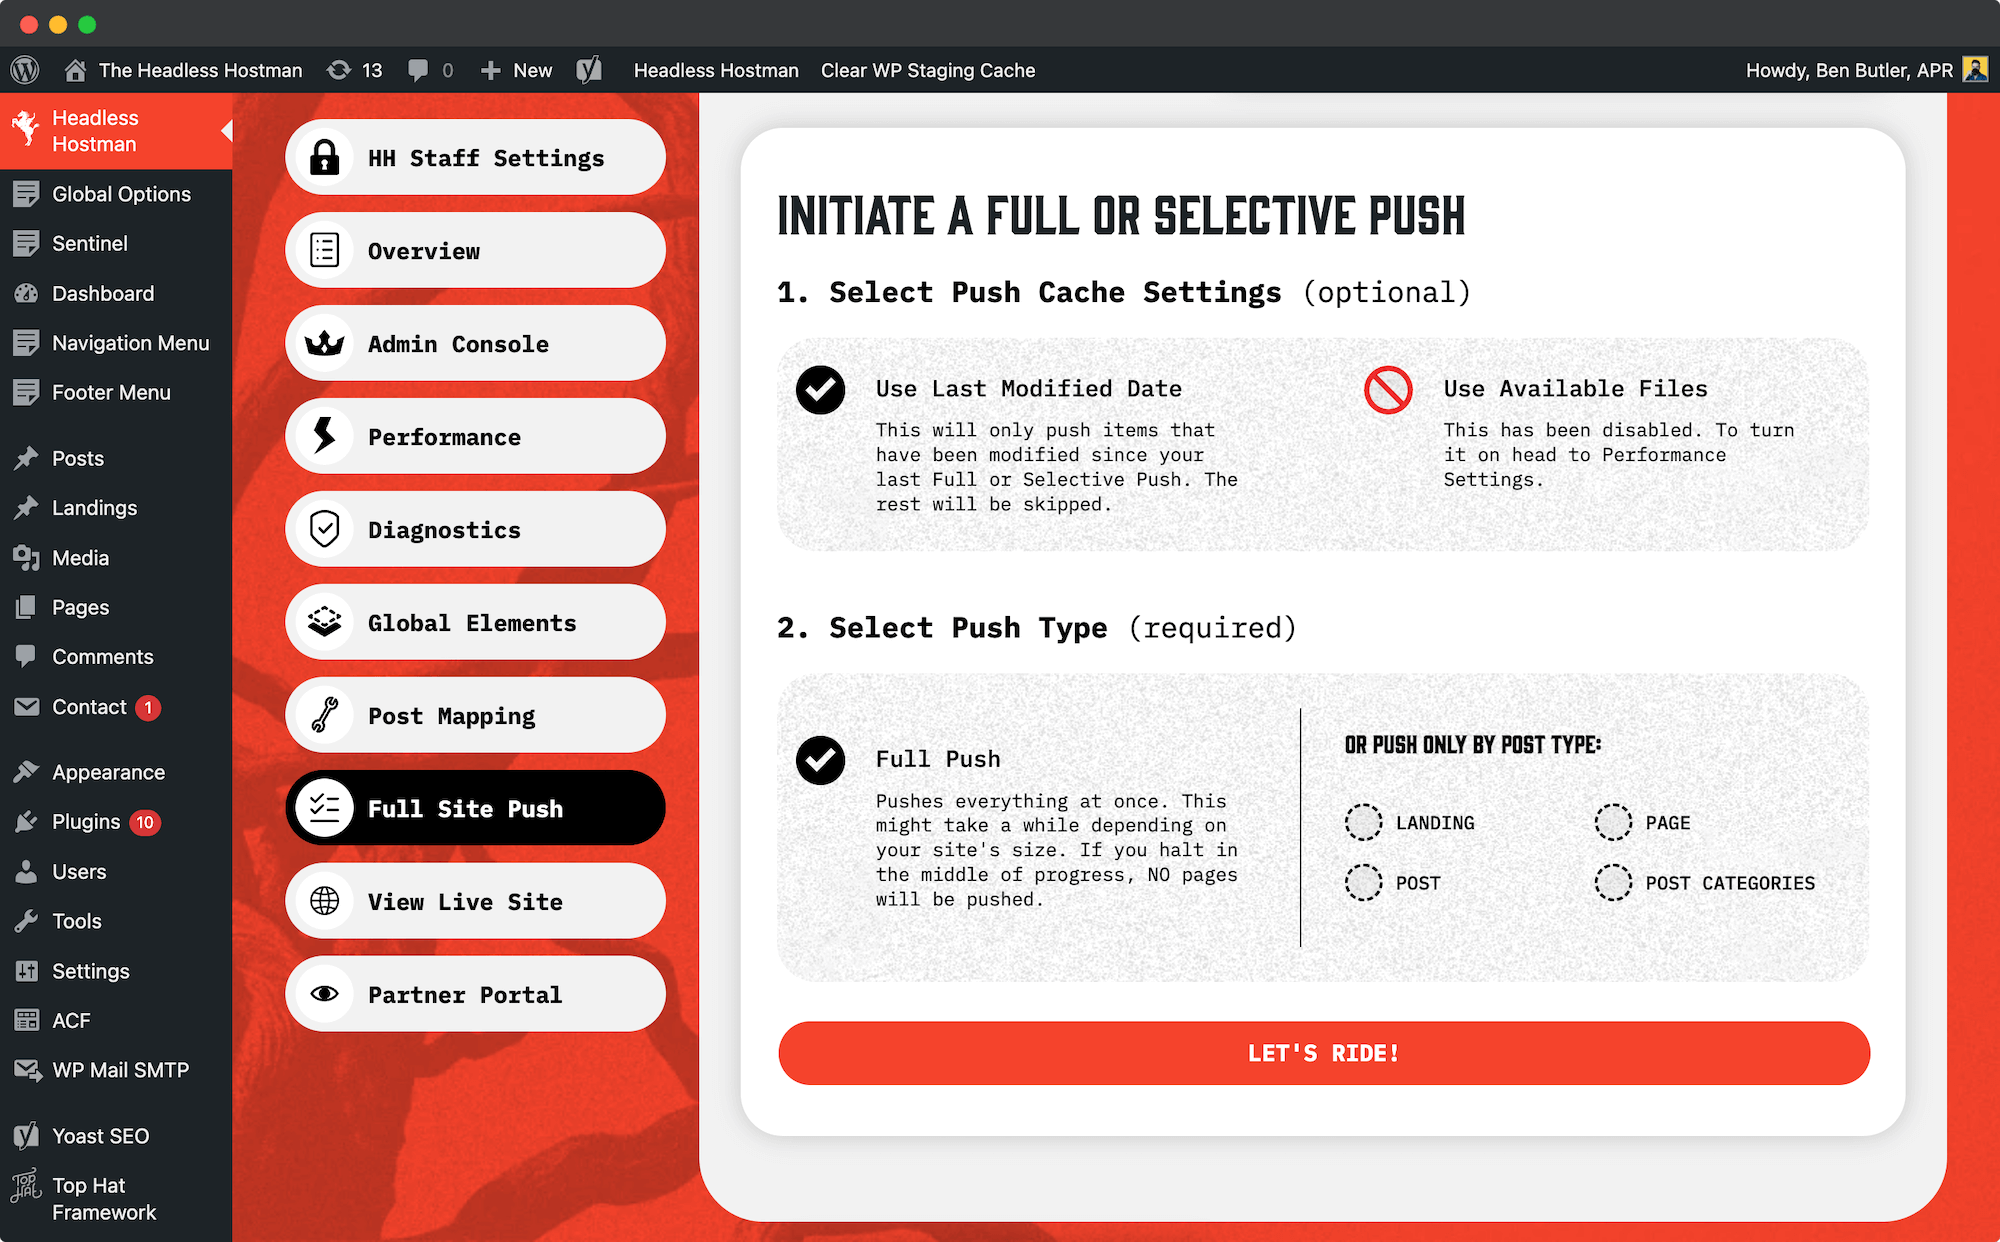
Full Site Push
Please Note: If we migrated the site for you, you can skip this step after onboarding and come back to it when you need.
If you migrated the site yourself, you’ll first want to publish everything to the test static domain.
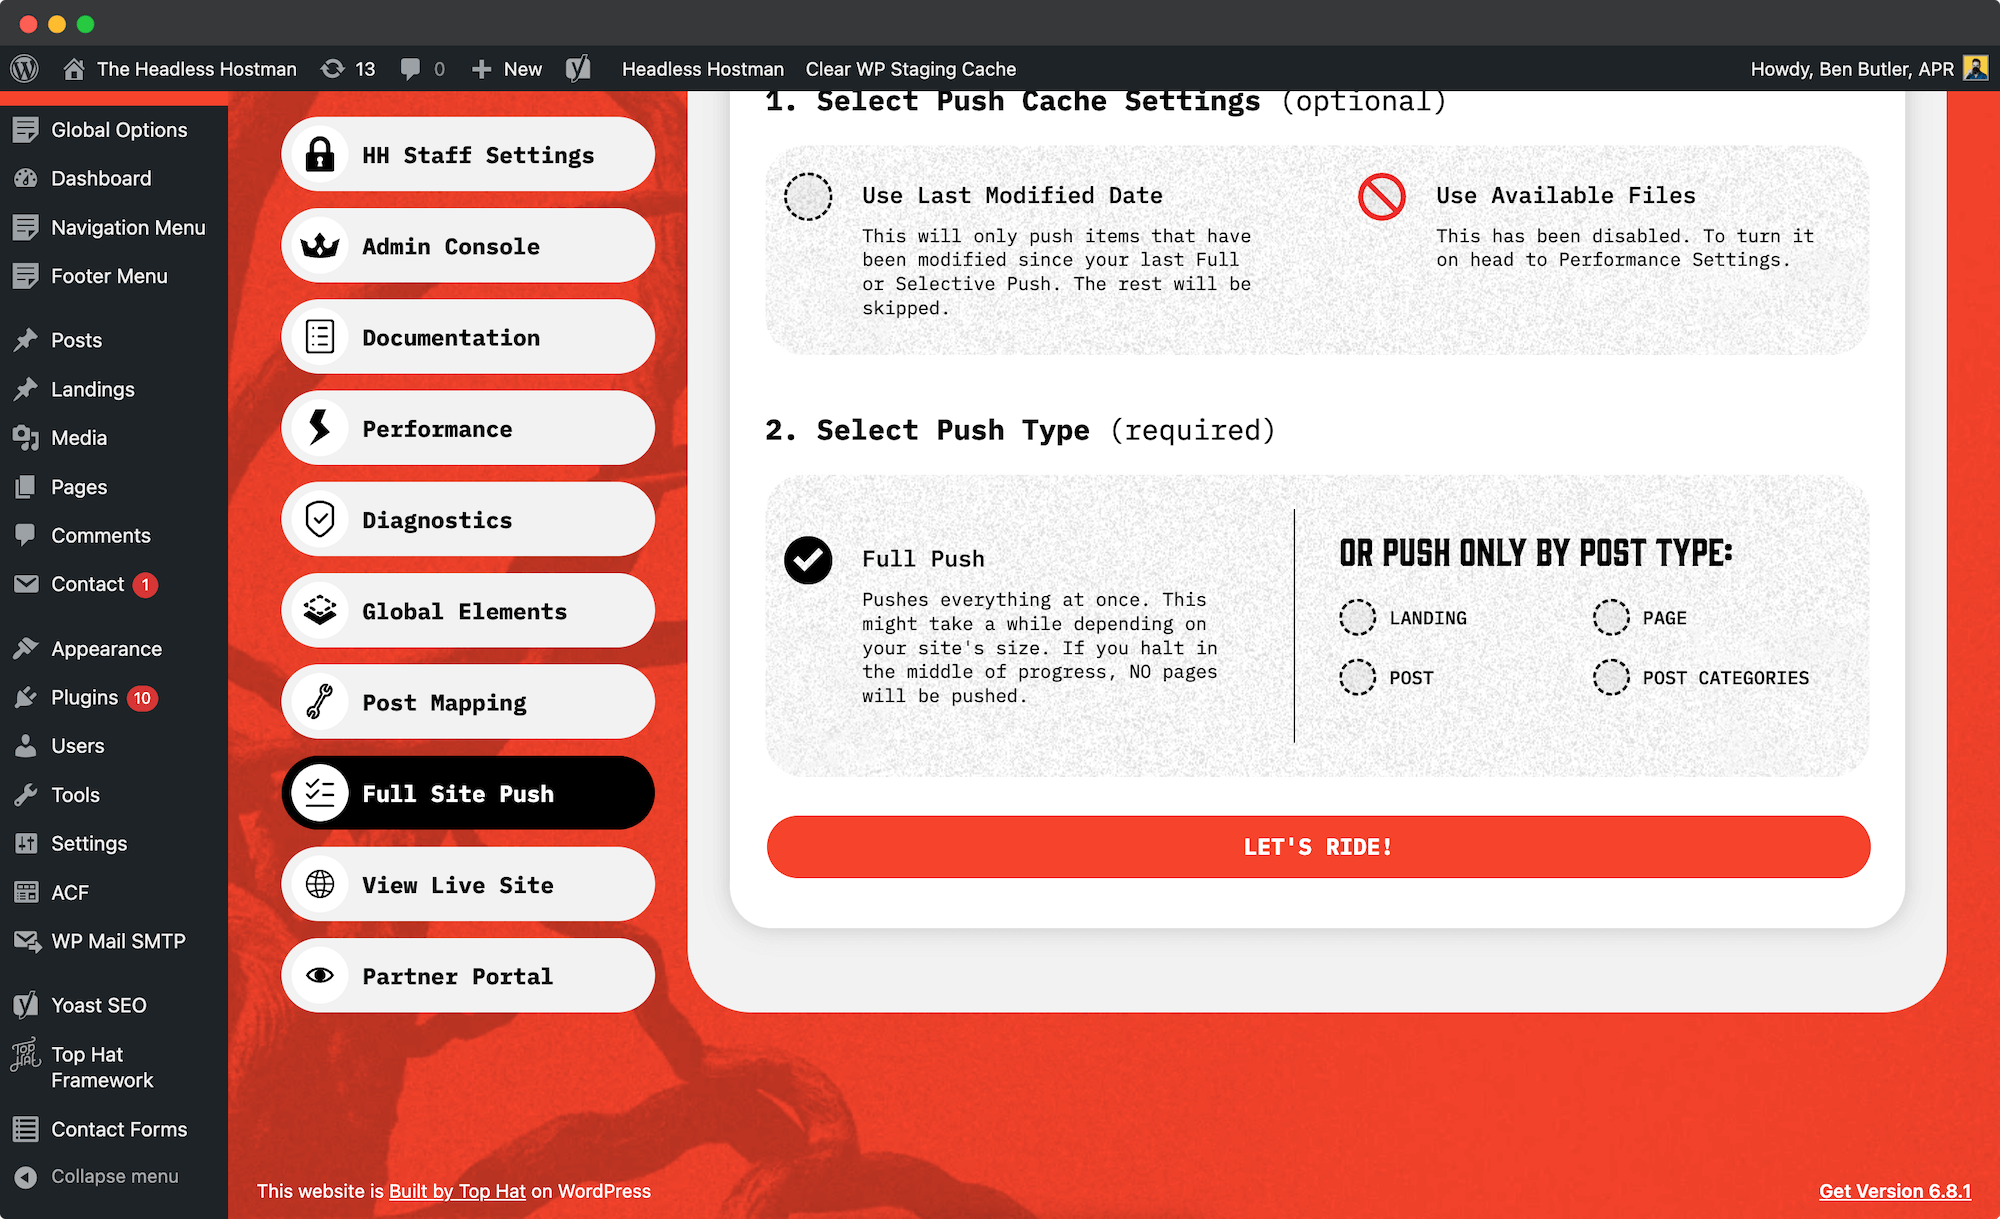
To get started, scroll down and click “Let’s Ride.”
This will take every published page on your WordPress site and publish it statically. The first time may take longer as the system absorbs, pushes, and caches all assets. Future pushes are faster after this big ingestion.
- Note: Any push takes at least 2 minutes to be visible live after it “completes” within our platform
Once the push is complete, click “View Live Site” to preview the static staging site before changing DNS. Be sure to QA everything before going live.
Push by Last Modified Date
If you’d like to only push content modified since your last Full or Partial push, select the Use Last Modified Date toggle.
This will only push pages/posts that were updated … well since your last push.
This will speed up your push times substantially and avoid unnecessary work.
Note: this doesn’t apply to sitewide changes. If you installed a new Plugin that needs to be on every page, or made a Nav/Footer/Script change (without our Global Elements turned on) you will still need a full push
Push by Single Post, Page, Category, or Custom Post Type
After your first, big push you shouldn’t necessarily need to do a Full Push very often.
Especially with Global Elements (scroll down). We’d recommend picking only what needs to be updated from the options below.
Single Page Push/Deletion
After the first full push, you can push individual pages when making updates. On the page editor sidebar, click “Update this page on Headless”. The system will confirm success and update the date stamp.
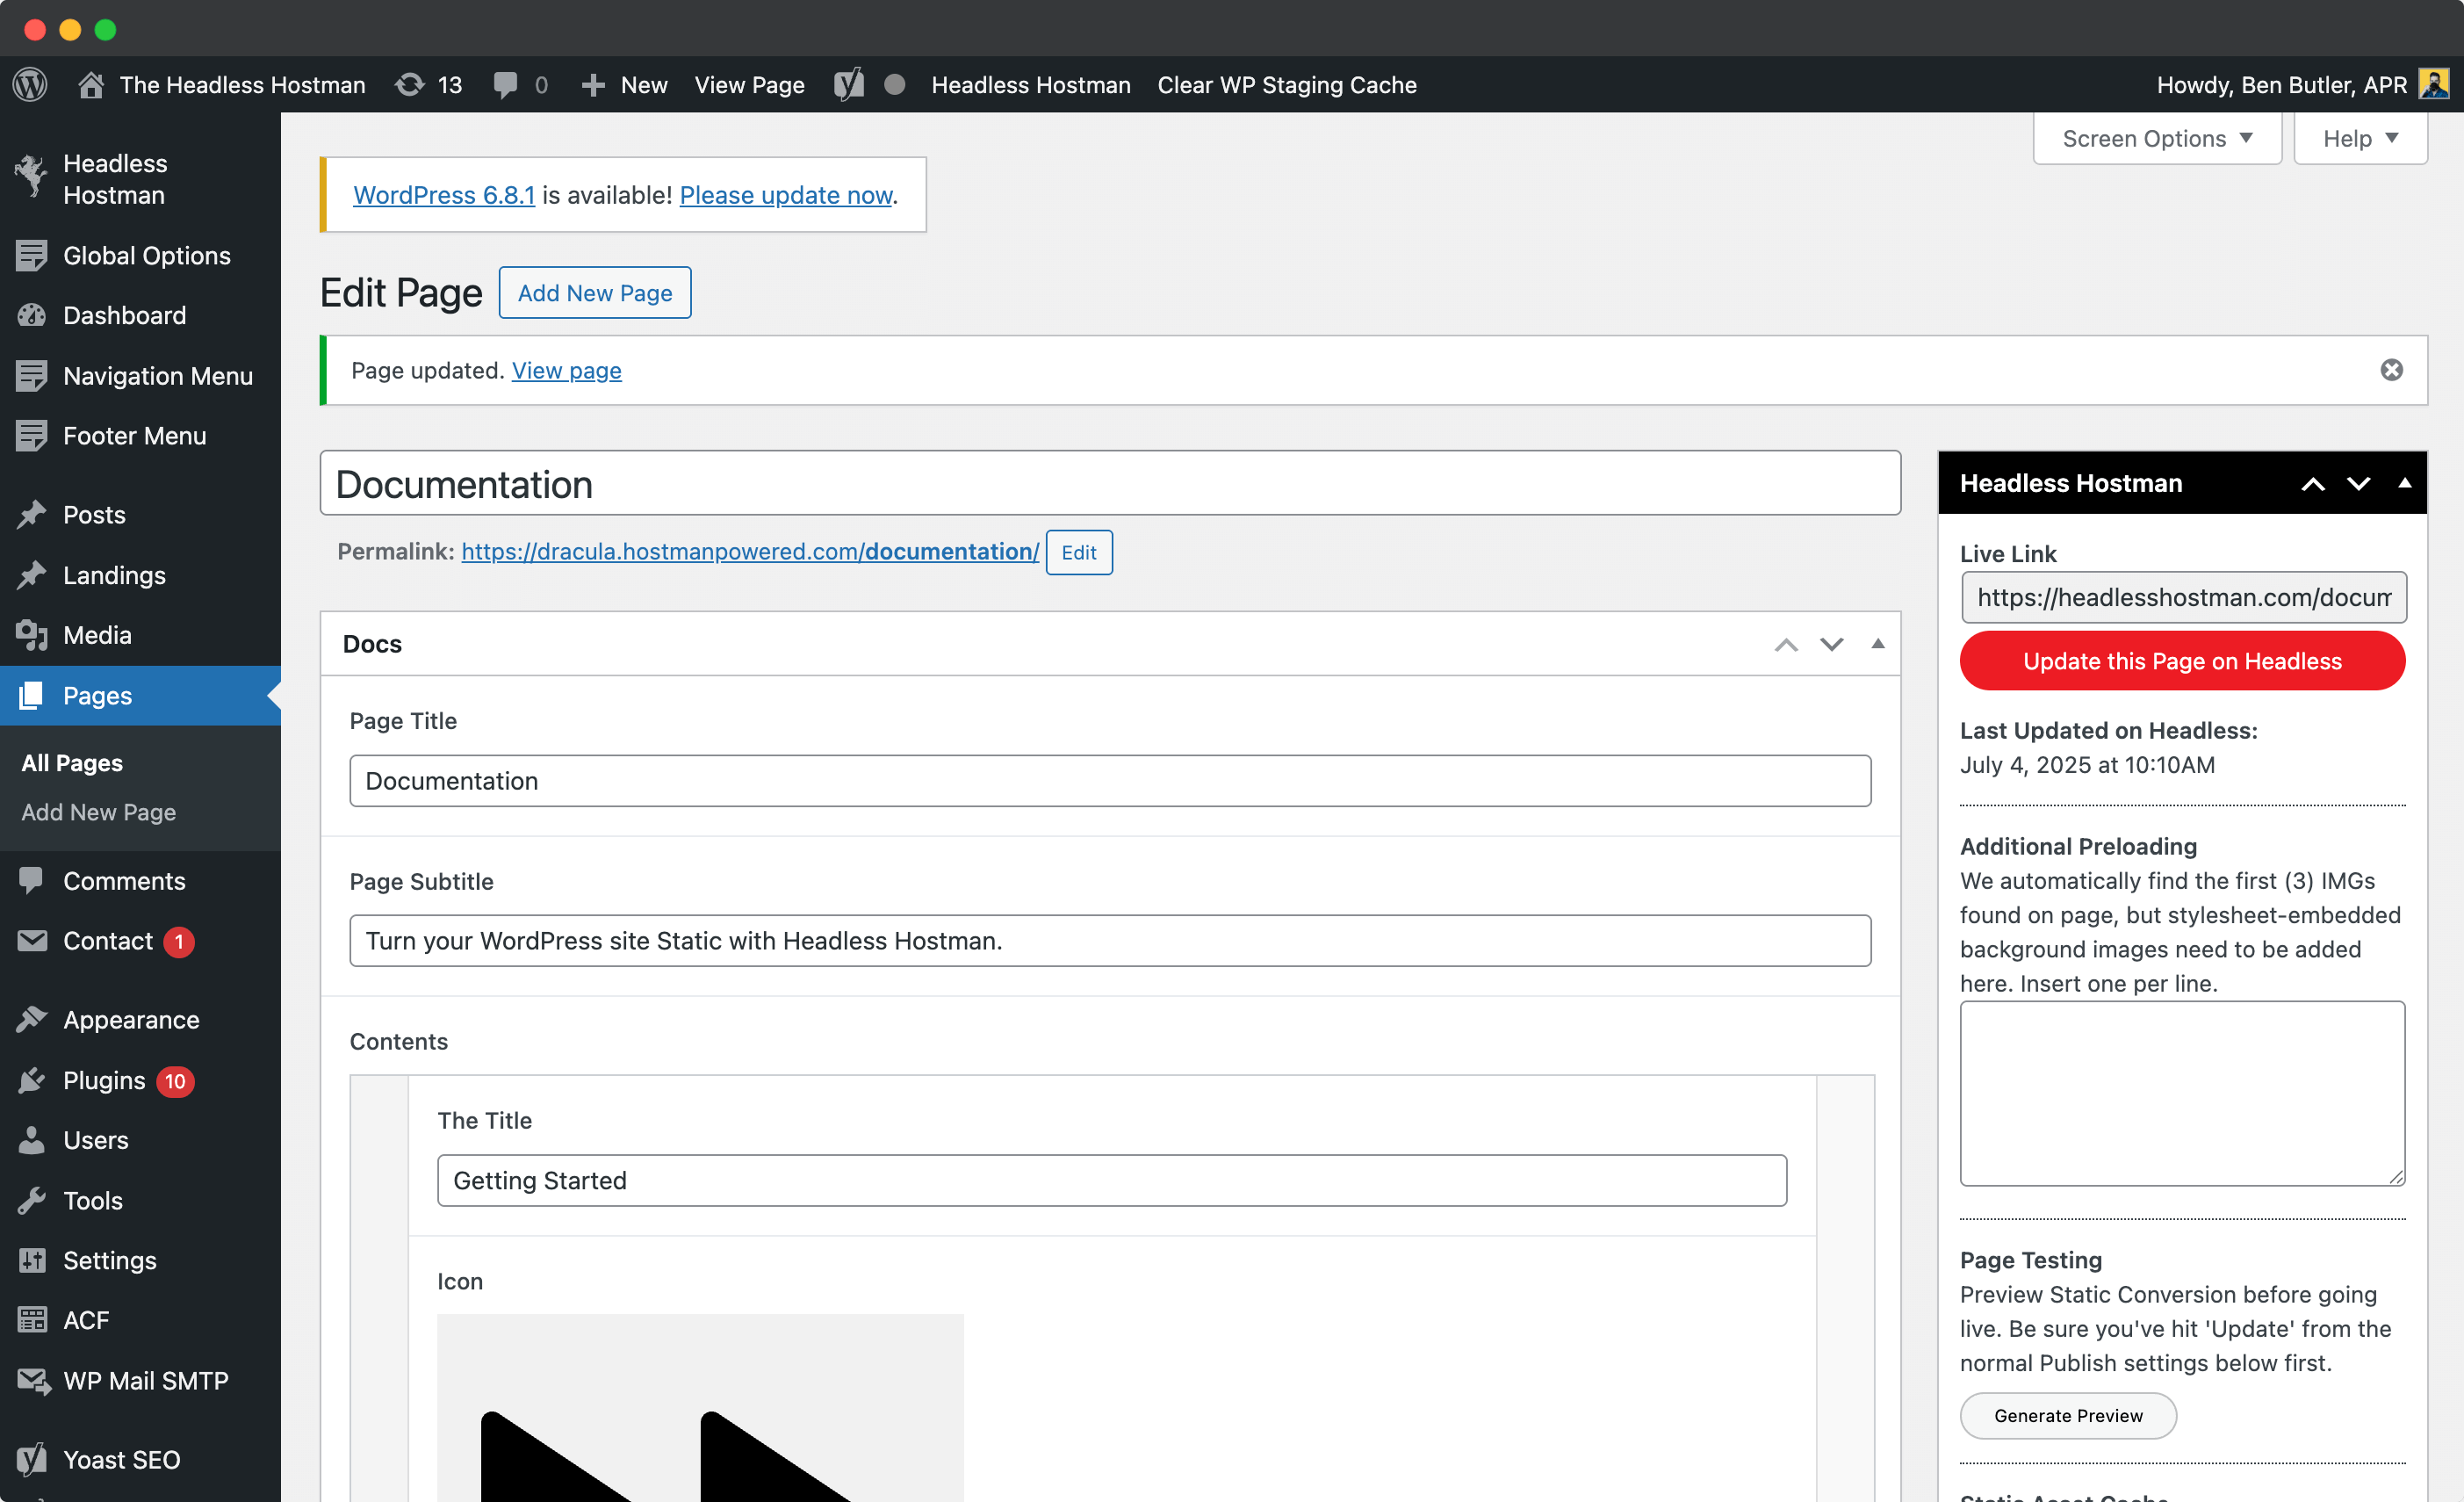
You can also delete pages from the static site. Click “Delete” and the page will be removed from the static environment. WordPress will mark it as a draft, ensuring only published content is live.
Having issues with page assets? Use “Clear Assets” on that page, then re-push to re-ingest all images and files.
Partial Push (by Post Type)

In the Full Push menu, you can also select to do a partial push by selecting the Post Type.
- These target page or post types
- They’re faster and laser targeted
Post Update Mapping (If this, then that)
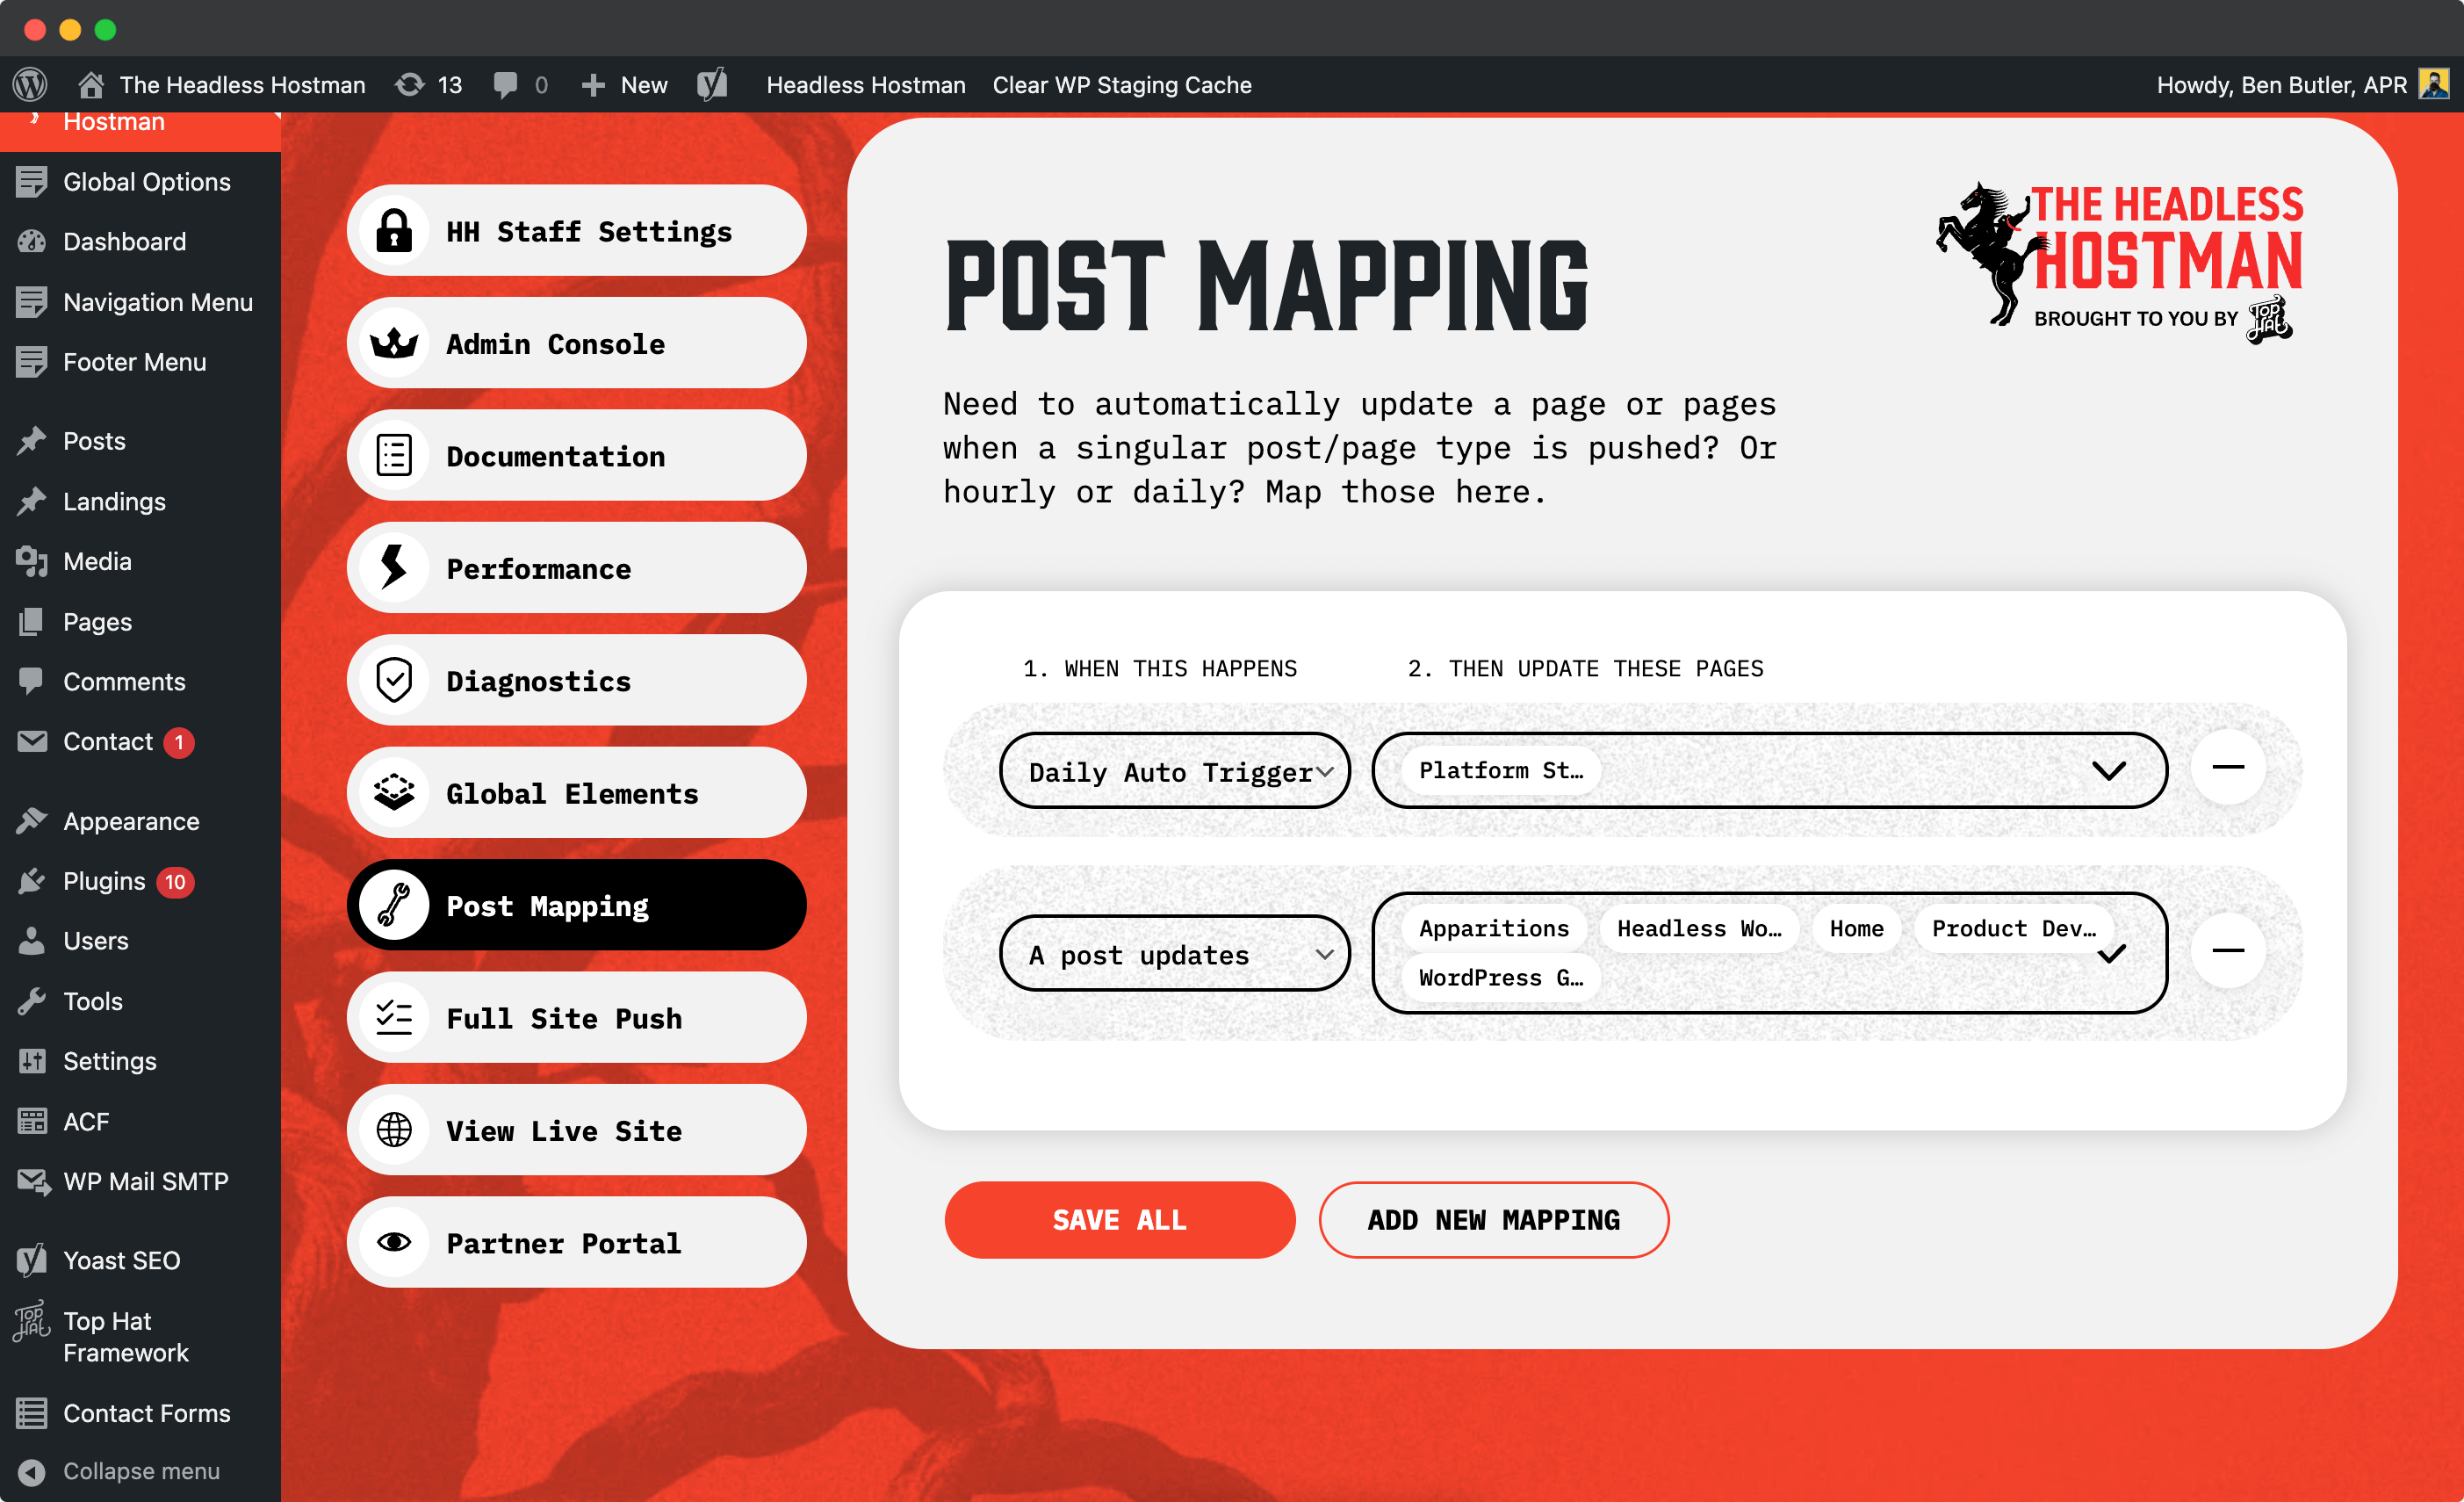
Post-mapping allows you to automate pushes using conditions. For example, auto-update a status page every 24 hours using cron triggers.
More commonly, when you publish a blog post, you can map related pages (like blog indexes or the homepage) to update automatically. This keeps listing pages synced without manual effort.
301 Redirects
We support Redirection, Yoast SEO, and RankMath.
Redirects need to be manually pushed each time you update them (within their associated Plugin menus) to avoid pushing unverified rules live prematurely.
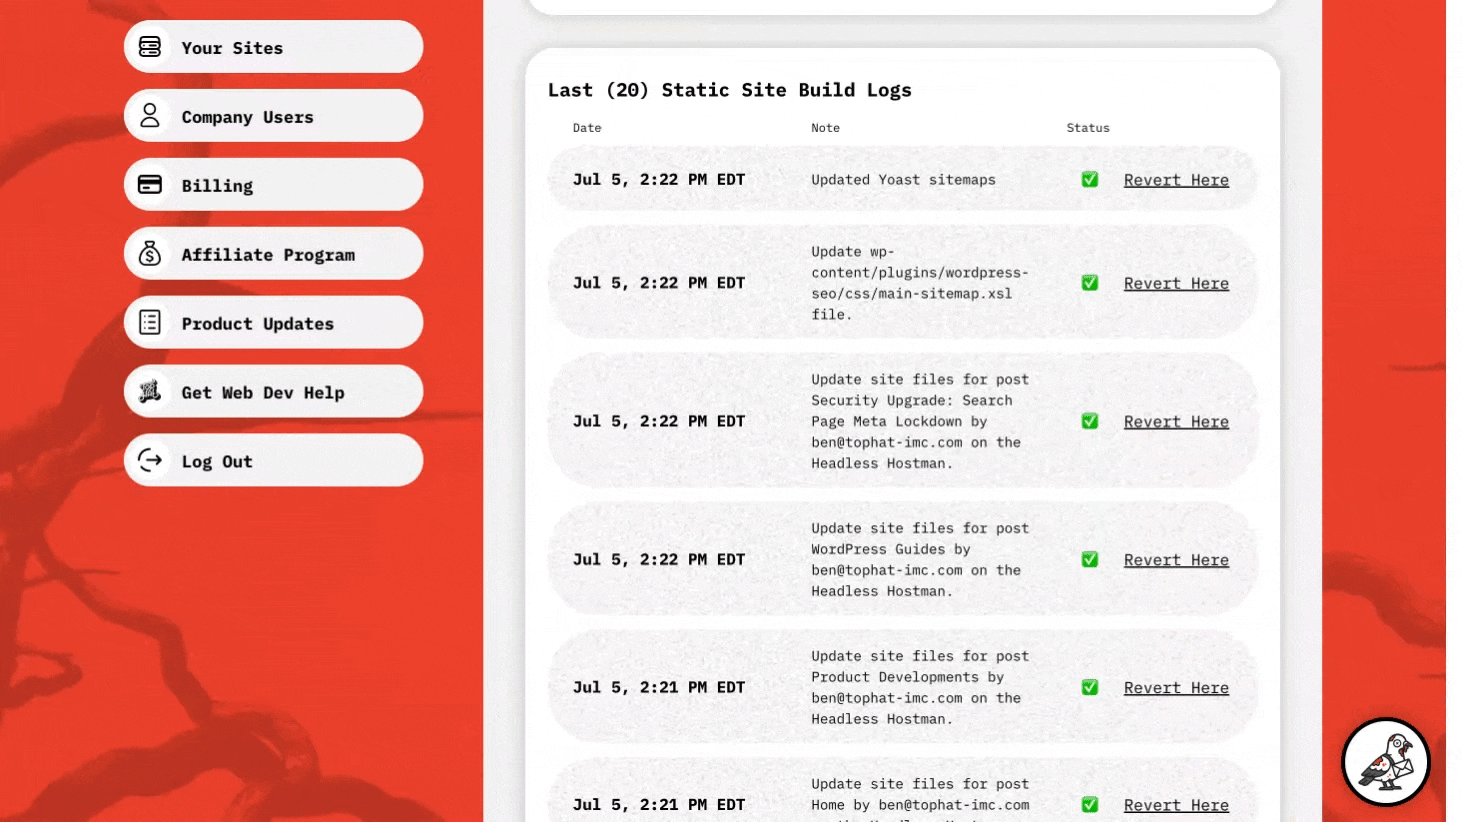
Revert to a Previous Static Live Site Deploy
Every Static deployment is logged in Cloudflare and available in the Cult Portal on a site-by-site basis.
These represent completed Static conversions, available live to your Live users.
Toggle a Revert
If you need to revert to a previous deployment, it’s nearly instant.
Head to the Site in Question, and Scroll Down to Deployment Logs
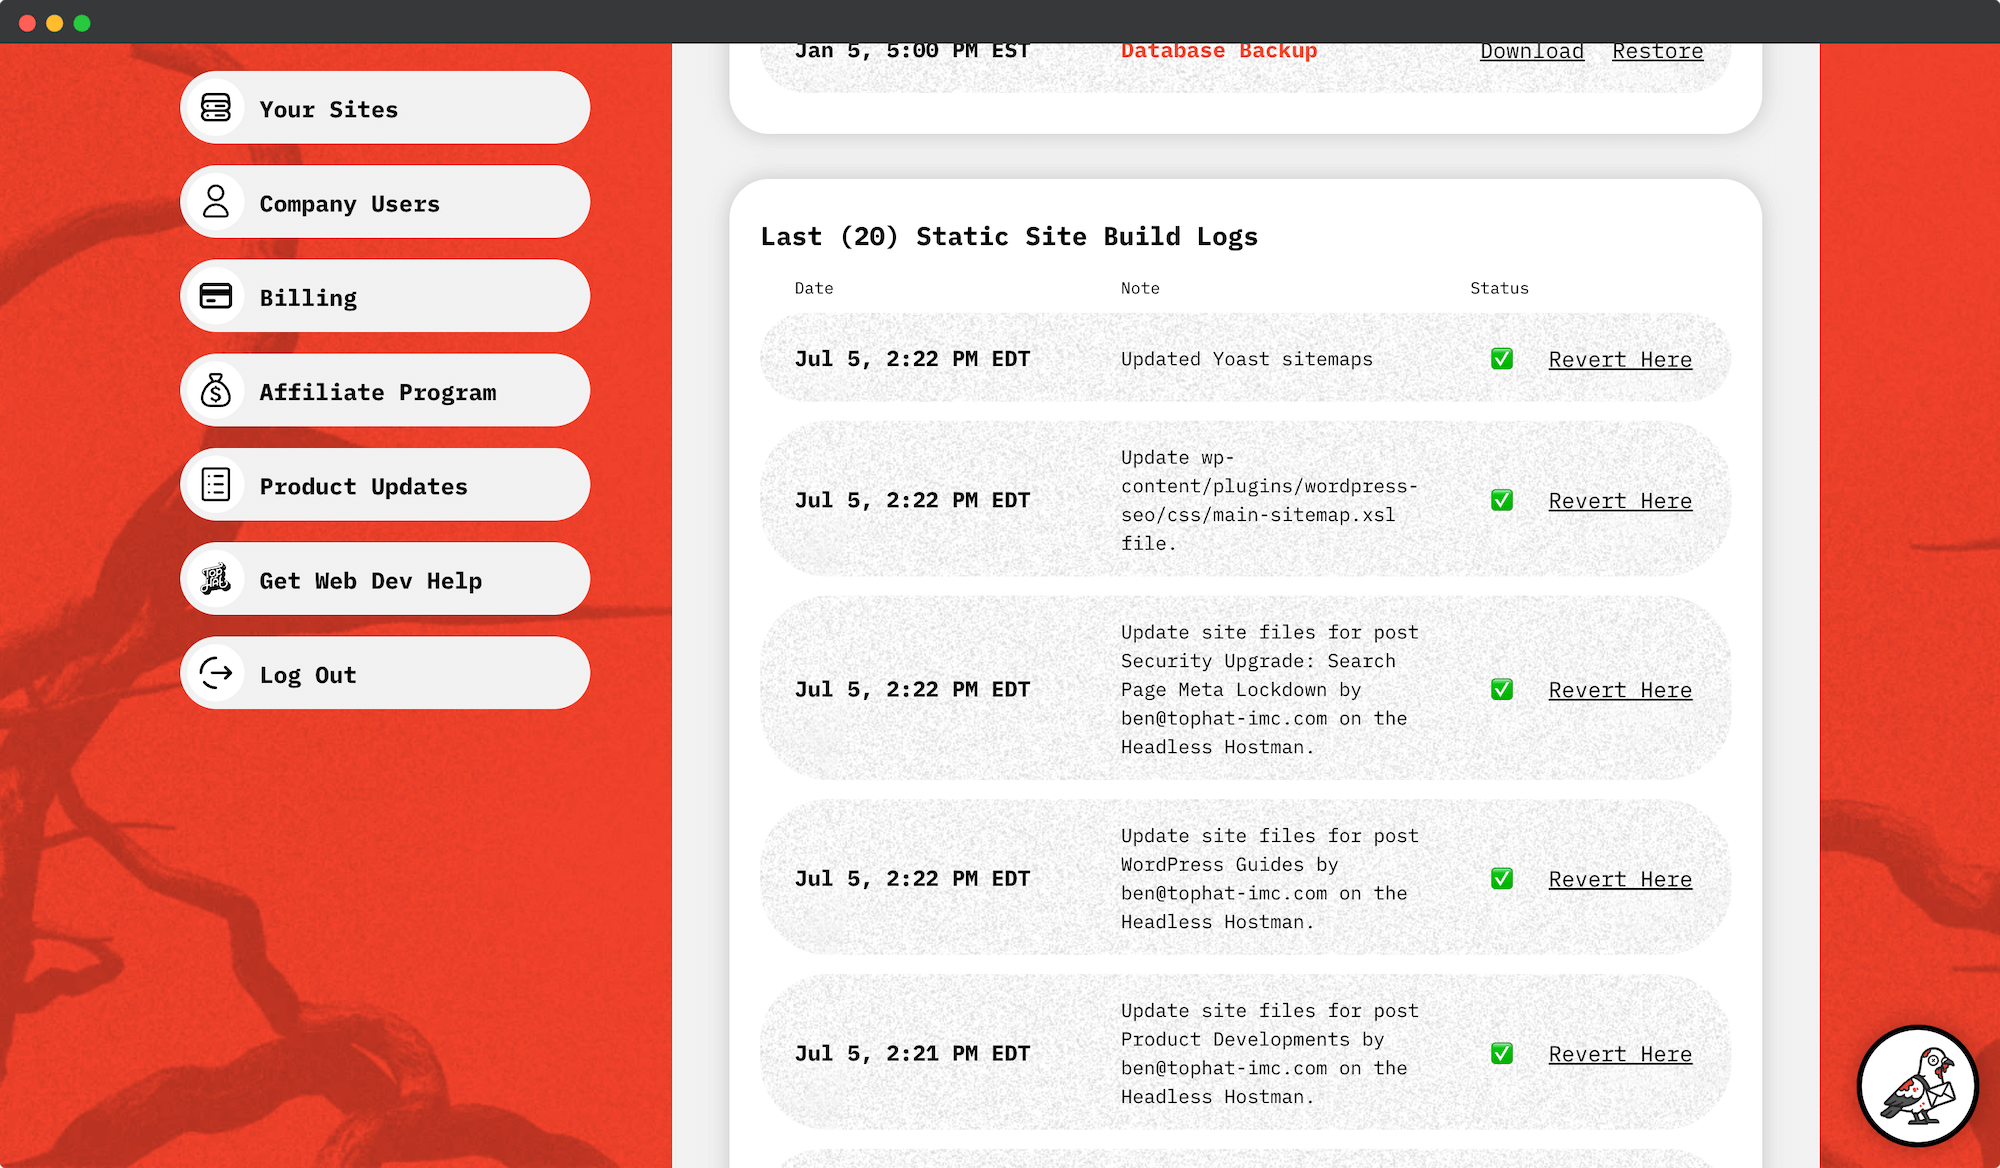
Click Revert Here
And, You’re Back to the Future
The Deployment should be immediately available upon confirmation.
We also show you what was reverted, and give you the option to Revert again.
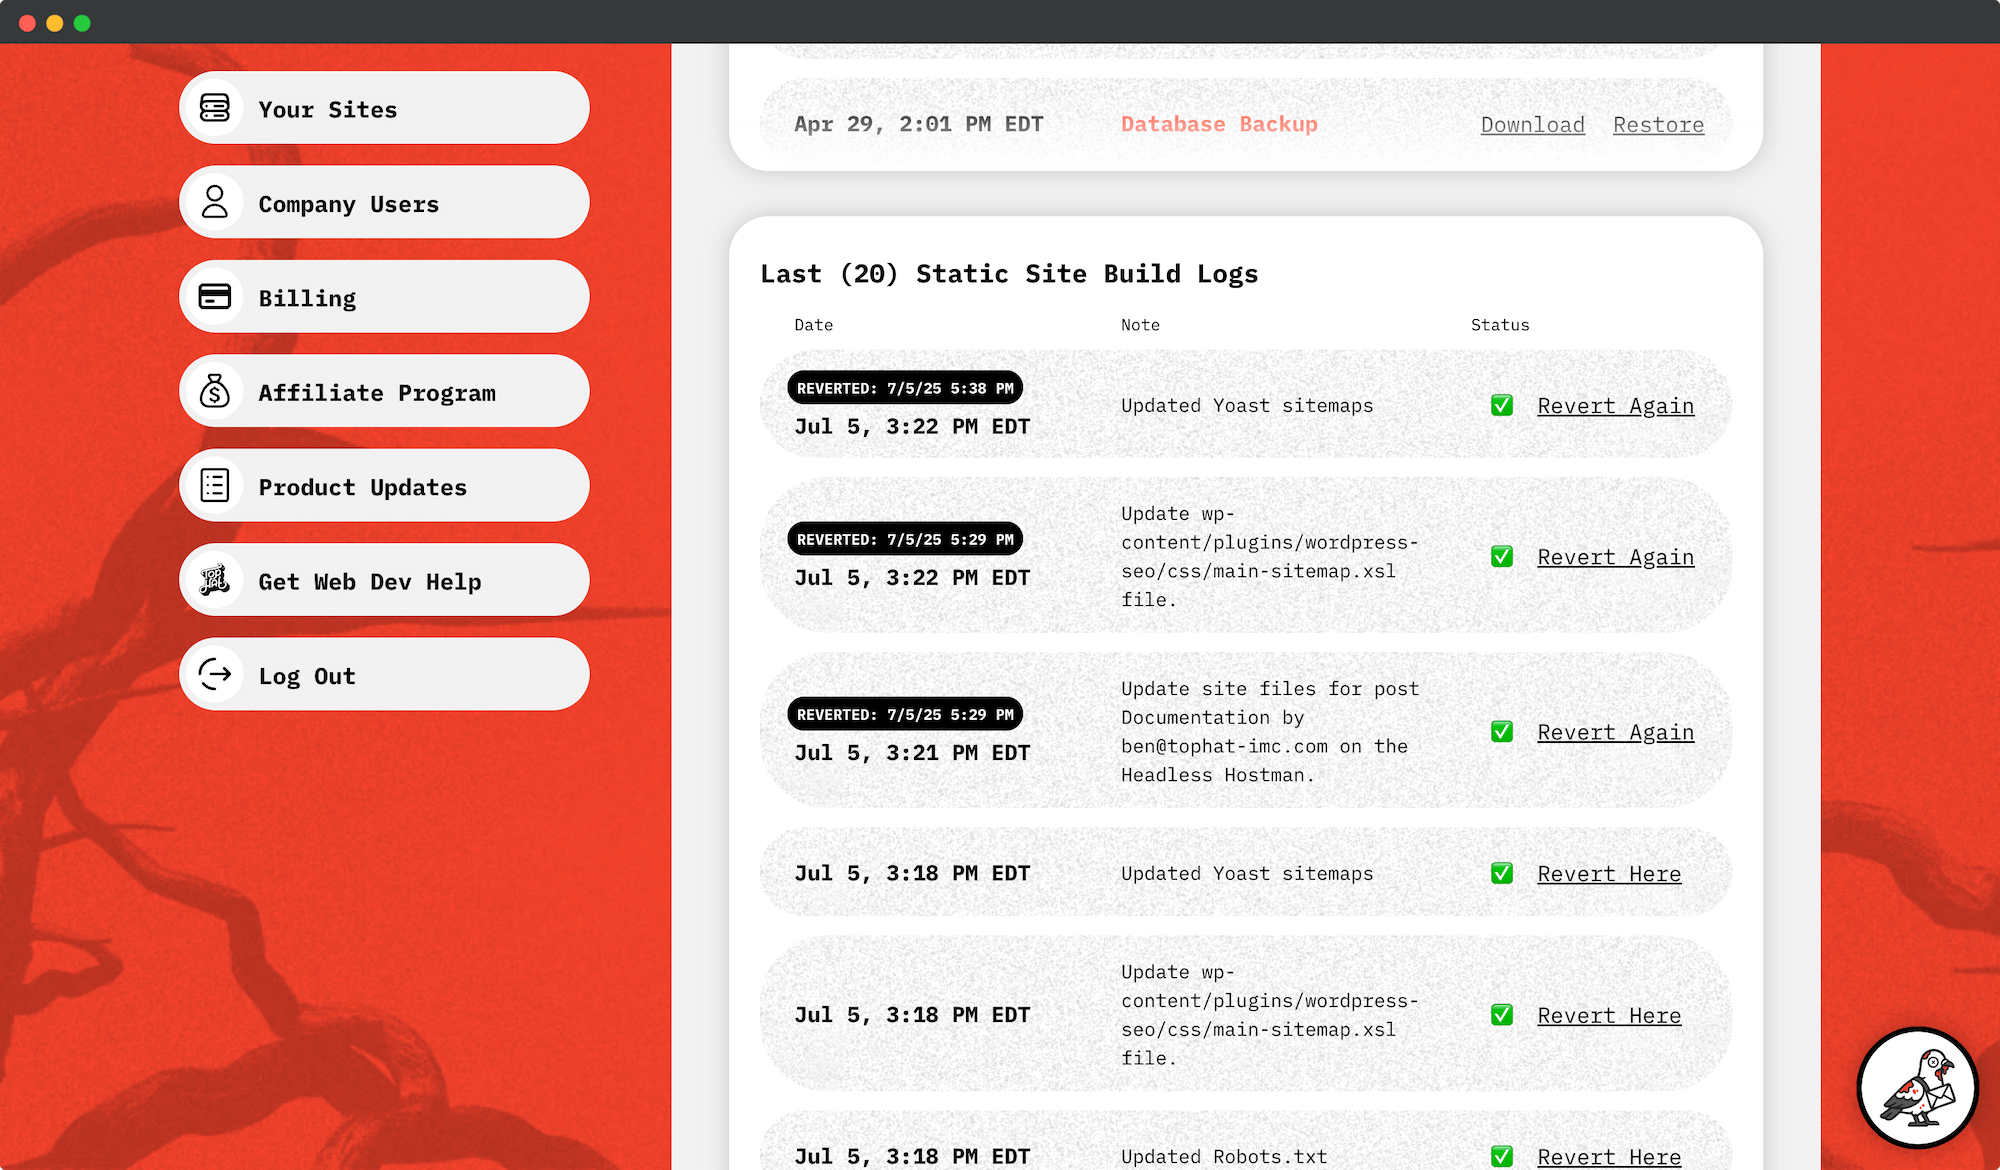
Future Deployments Will Overwrite
Please note: the next push of any varietal will overwrite a reverted deployment.
Advanced 404 Tracking for Cloudflare Pages
If you’re reading this, you might be reading it because Cloudflare Pages (Static) has a reported bug where it doesn’t 404 deleted pages immediately. Sometimes they take up to (7) days to be removed from the syndication.
To speed this along, we track and untrack 404s on every push action.
If a page is deleted, we make sure it 404s immediately rather than waiting for Cloudflare to do it.
Automatically Updated Content
Author Pages
Author Pages are hard to pin down. They’re not a “post type.”
Don’t fret though. We automatically push author pages as part of a Full Push.
And if you use Molongui Authors, we’re already integrated and detect that automatically.
Sitemaps and Robots.txt
Sitemaps and Robots.txt are updated automatically with every push action.
If you need to manually re-push them for any reason, you can do so under Full Push > Re-Push Core Files.
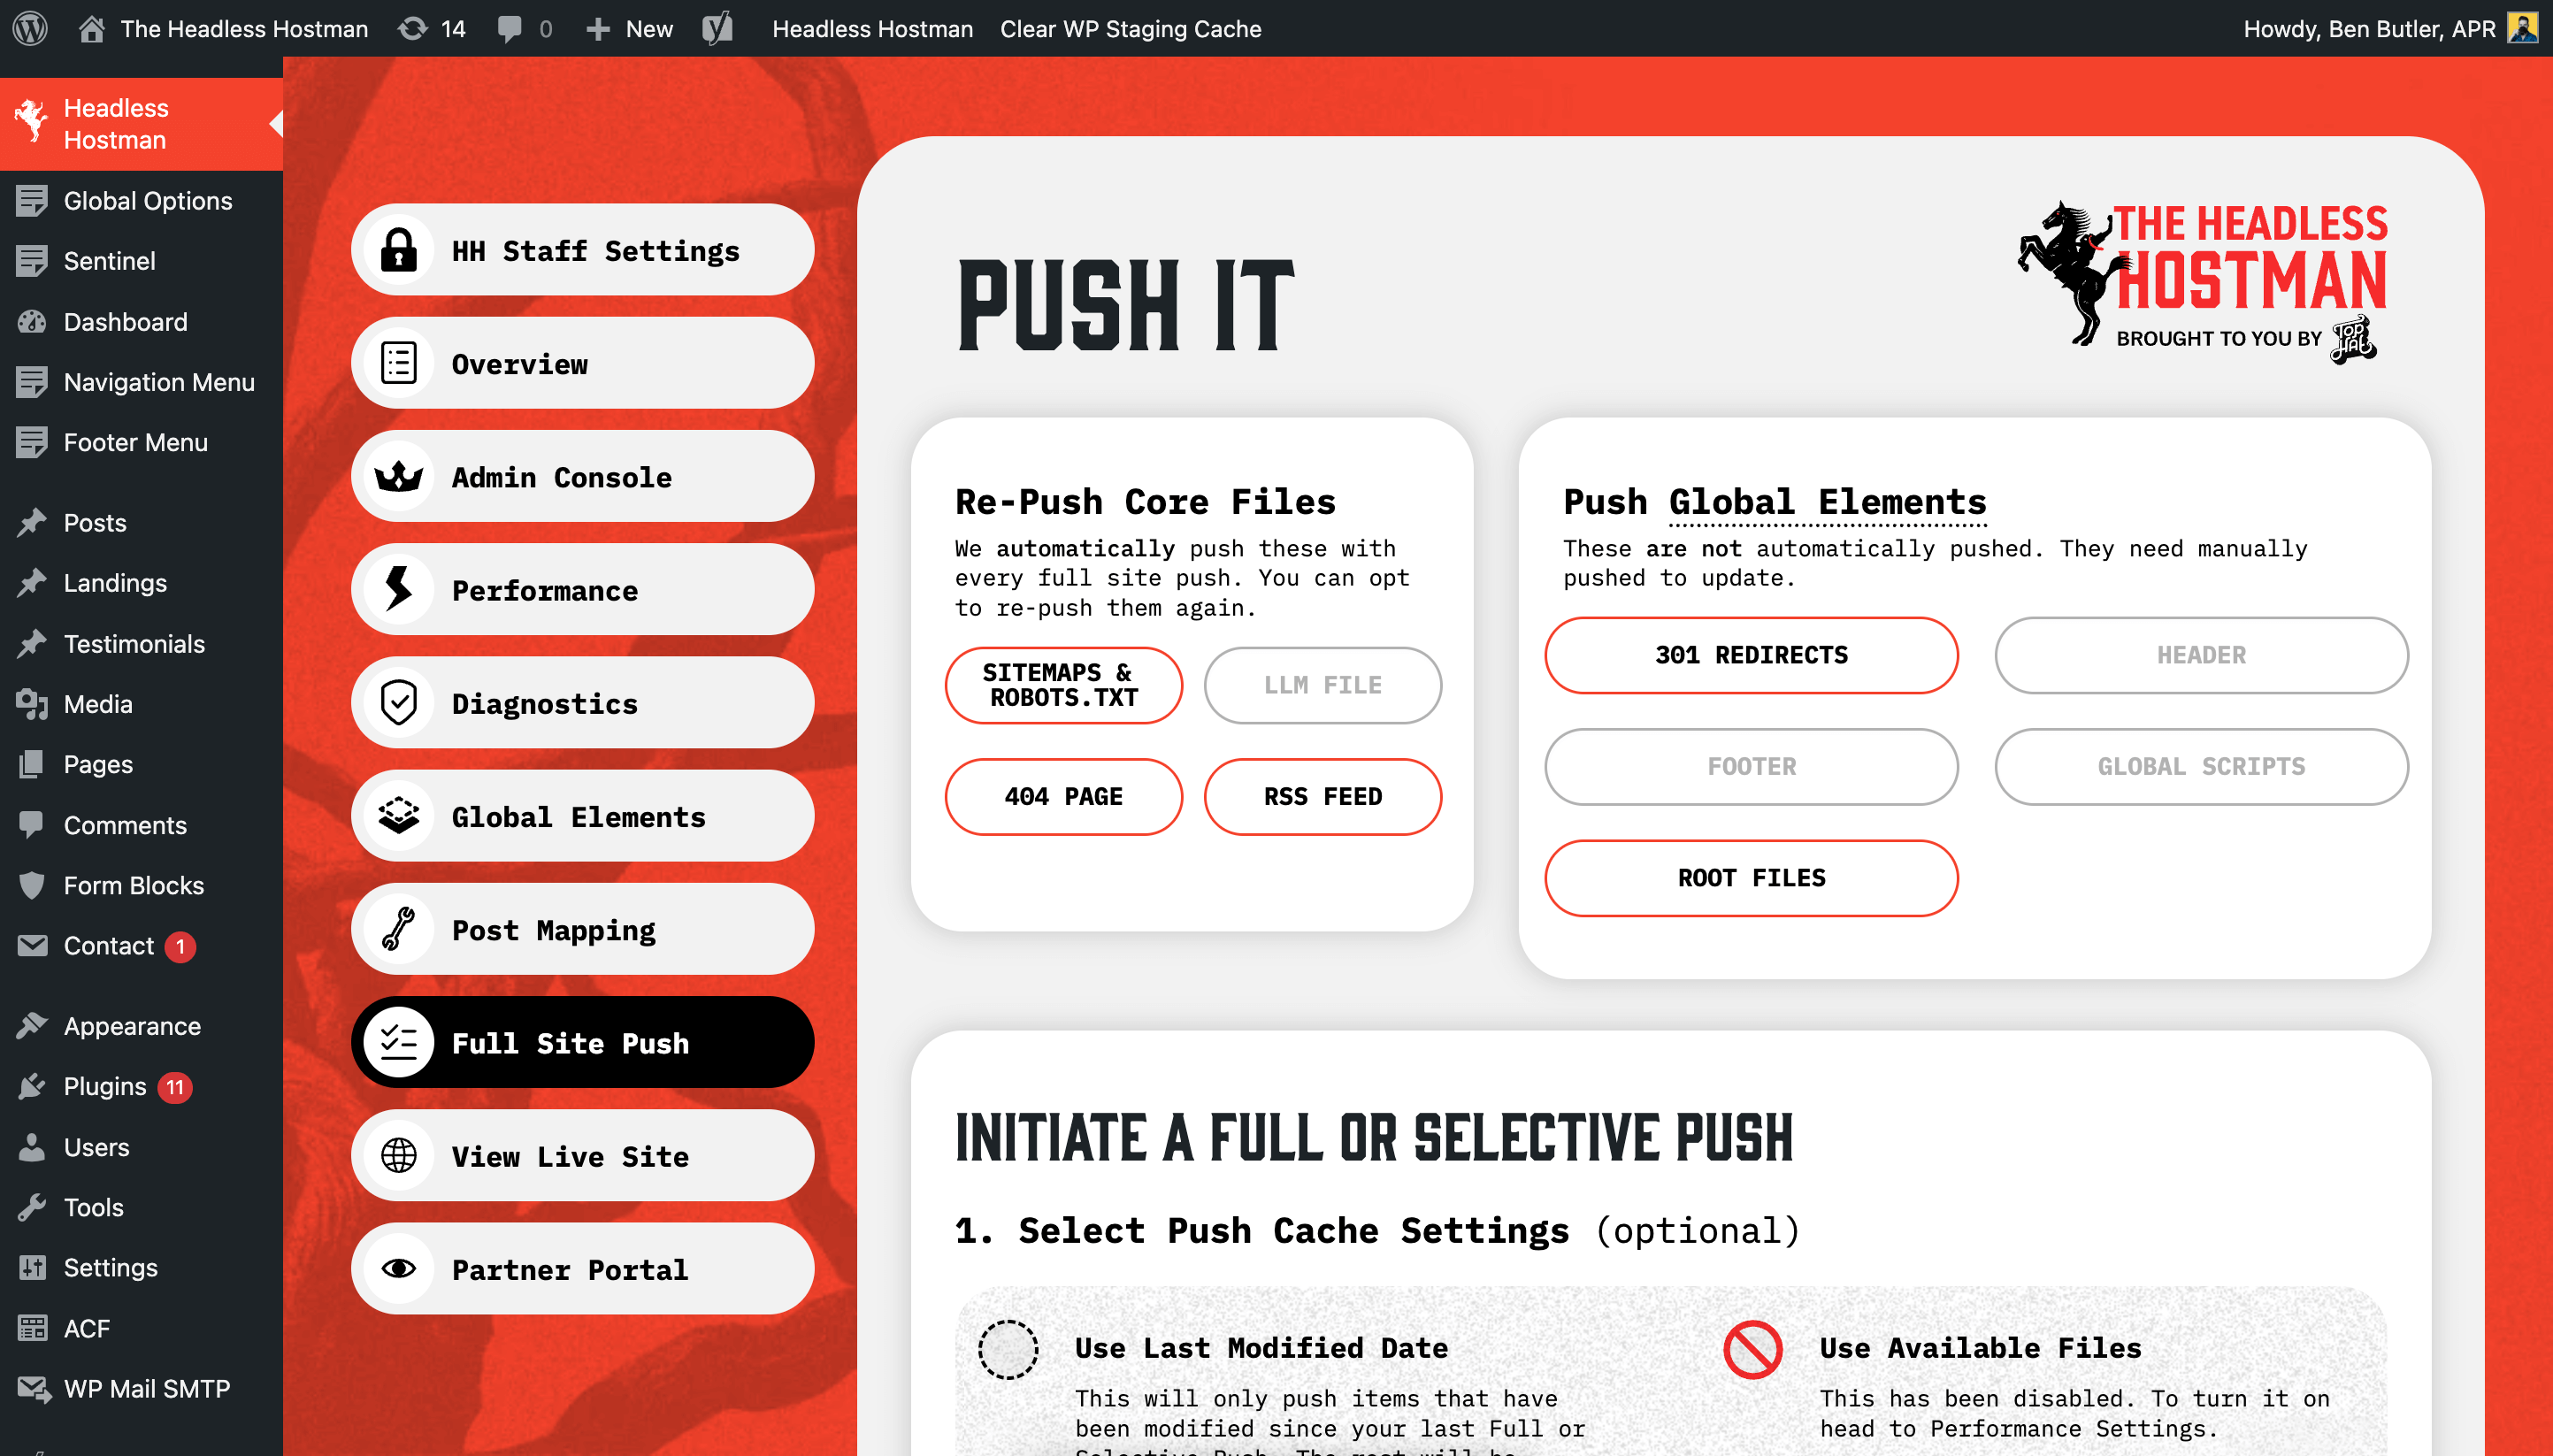
LLM Files
We automatically detect whether your SEO Plugin is utilizing an LLM file.
If so, we will automatically push it with every push action.
If you need to manually re-push them for any reason, you can do so under Full Push > Re-Push Core Files.
If an LLM solution is not present on your site, it will not be illuminated here nor will it push automatically.
404 Page
We automatically push your 404 page with every Full Push.
You can also re-push it manually Full Push > Re-Push Core Files.
RSS Feed
We automatically push your RSS feed (if it exists) with every Full Push.
You can also re-push it manually Full Push > Re-Push Core Files.
Push Timing
Full & Partial Push Timing
Our general rule is to calculate an average of 1 second per page to convert to static.
Once the Headless Hostman is done, it sends it to Cloudflare.
- Cloudflare will take an additional 2-5 minutes
Example Calculation: 900 page site, Full Push
- 15 minutes to convert
- 2-5 minutes to be deployed live
- 20 minutes total in the worst case scenario
Use Our Active Push Screen to Meter
We report in real-time as a Push is happening. As the average conversion per post speeds up or down, it will report that plus the estimated time remaining.

Our Recommendation
Use Full Pushes sparingly.
- Leverage our Global Nav, Footer, and Site Scripts to manage site-wide universal content
- Consider toggling the “Last Modified” setting
- Consider a Partial Push
- Consider pushing the page in question
Full/Partial with "Last Modified" Toggled Timing
The “Last Modified” toggle only pushes pages/posts modified since your last Full Push.
This is a bit hard to predict, but this can often times cut the push time by 50-75%.
Single Page Push Timing
The single page push will show you the exact moment an item has been pushed successfully.
If You Have Post Maps
If your page type is mapped to update other pages automatically on a single page push, this will add about 1 additional second per page mapped.
Once the Headless Hostman is done, it sends it to Cloudflare.
- Cloudflare will take an additional 2-5 minutes
Global Elements: Header, Footer, Scripts, Root Files
These take 2-5 seconds to push once the button has been pressed.
When completed, you will receive a notification on the Push screen.
Once the Headless Hostman is done, it sends it to Cloudflare.
- Cloudflare will take an additional 2-5 minutes
301 Redirects, Sitemaps, 404 Pages, and RSS Feeds
These take 2-5 seconds to push once the button has been pressed.
When completed, you will receive a notification on the Push screen.
Once the Headless Hostman is done, it sends it to Cloudflare.
- Cloudflare will take an additional 2-5 minutes
Cloudflare Deploy Times
Once Cloudflare receives Static Files it will take 2-5 minutes on average.
If you changed every single page on your site, it might take longer.
If this is your first push, it might also take a bit longer.
AWS Deploy Times
The AWS deploy times are determined on your account package and resource allocation.
After deploy, be sure to clear the Cloudfront cache as that might be interfering with your ability to see updated contents.
DNS and Launching
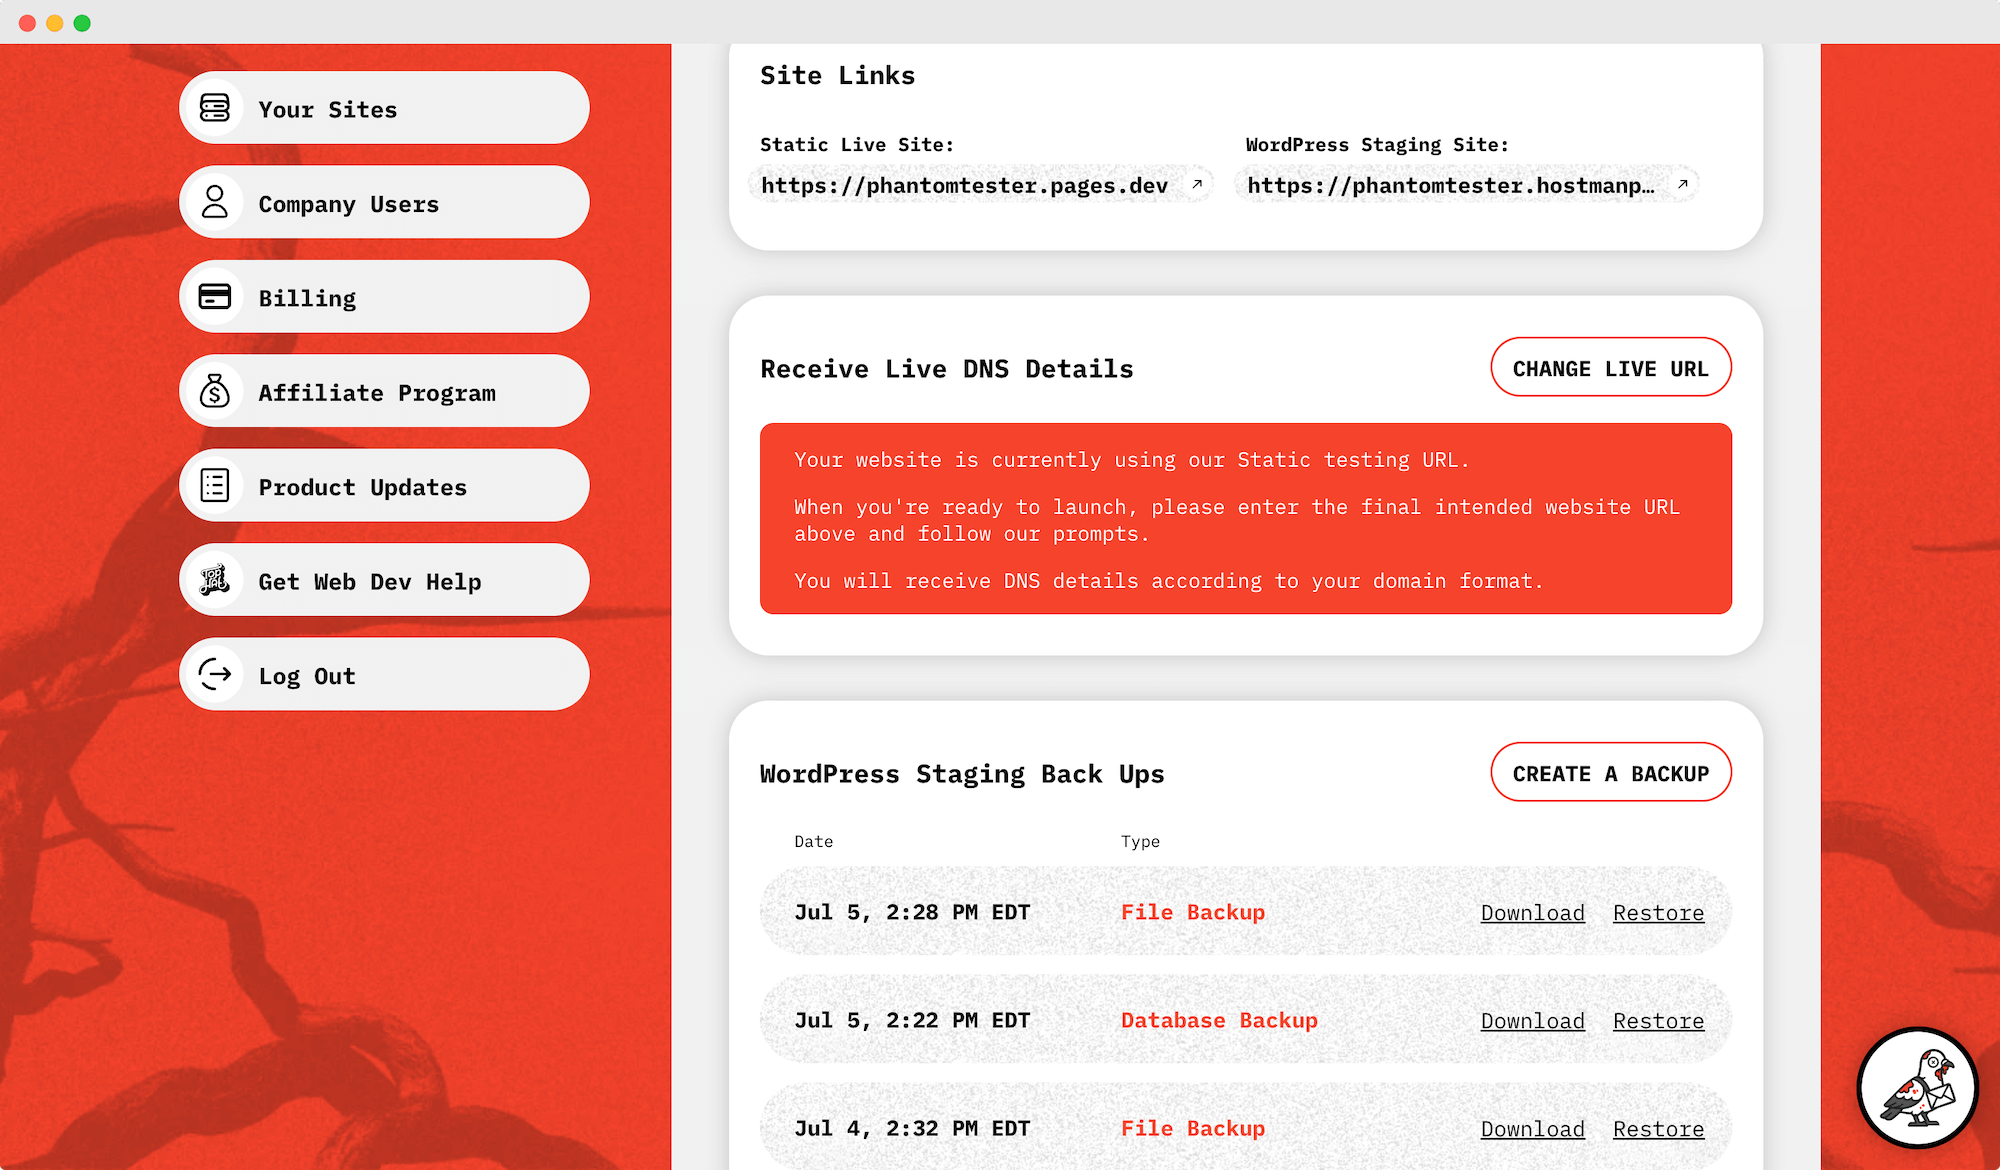
1. Head to the Cult Portal and Locate Your Site
Log in to your Cult Portal and locate the site you’re ready to launch.
It will be on the home page under “My Sites.”

2. Locate DNS and Click "Change Live URL"
By default, our sites will be running on our test Static URL.
Click “Change Live URL” under DNS.
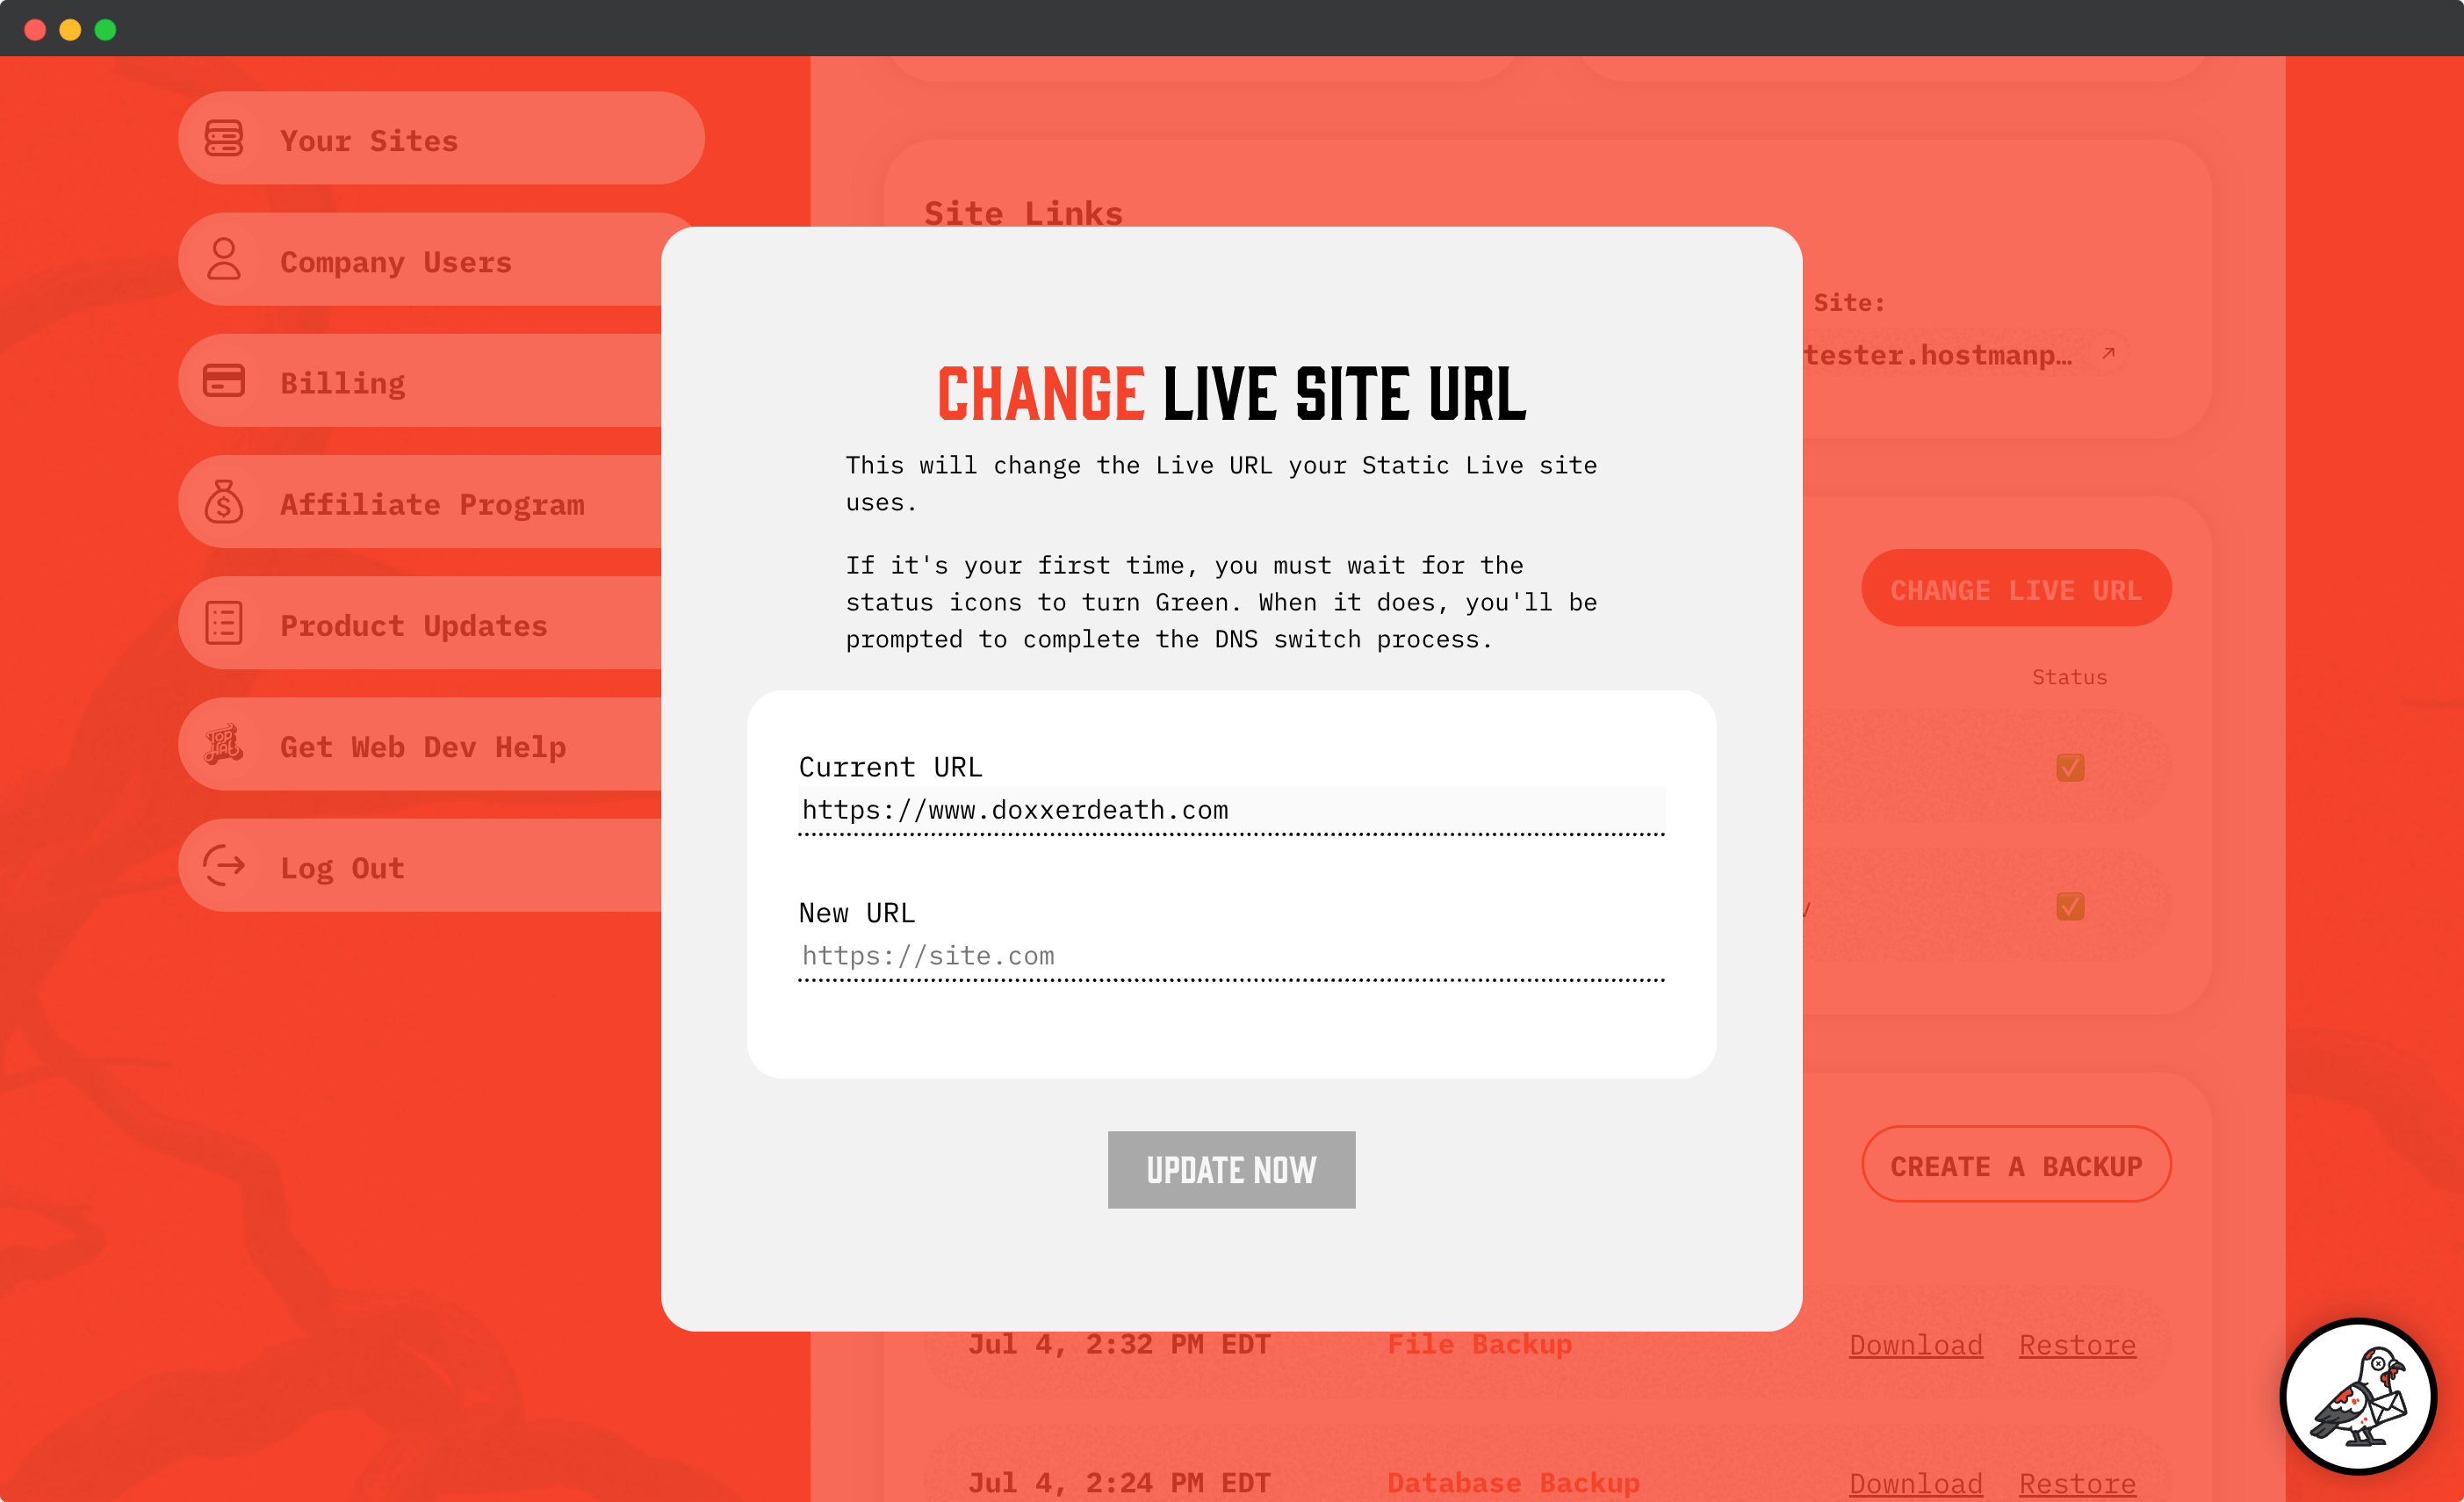
Input the domain you want to use (ex: www.doxxerdeath.com).
Once entered, the system will begin verifying DNS records.
We auto-detect what final URL you have entered and change the next-step prompts based on what we find.
There are four situations, each determining their own next steps:
- Your live site is a www CNAME subdomain (ex: www.example.com)
- Your live site is a non-www CNAME subdomain (ex: dash.example.com)
- Your live site is a non-www Apex Record (ex: example.com)
- Your live domain is already managed by Cloudflare
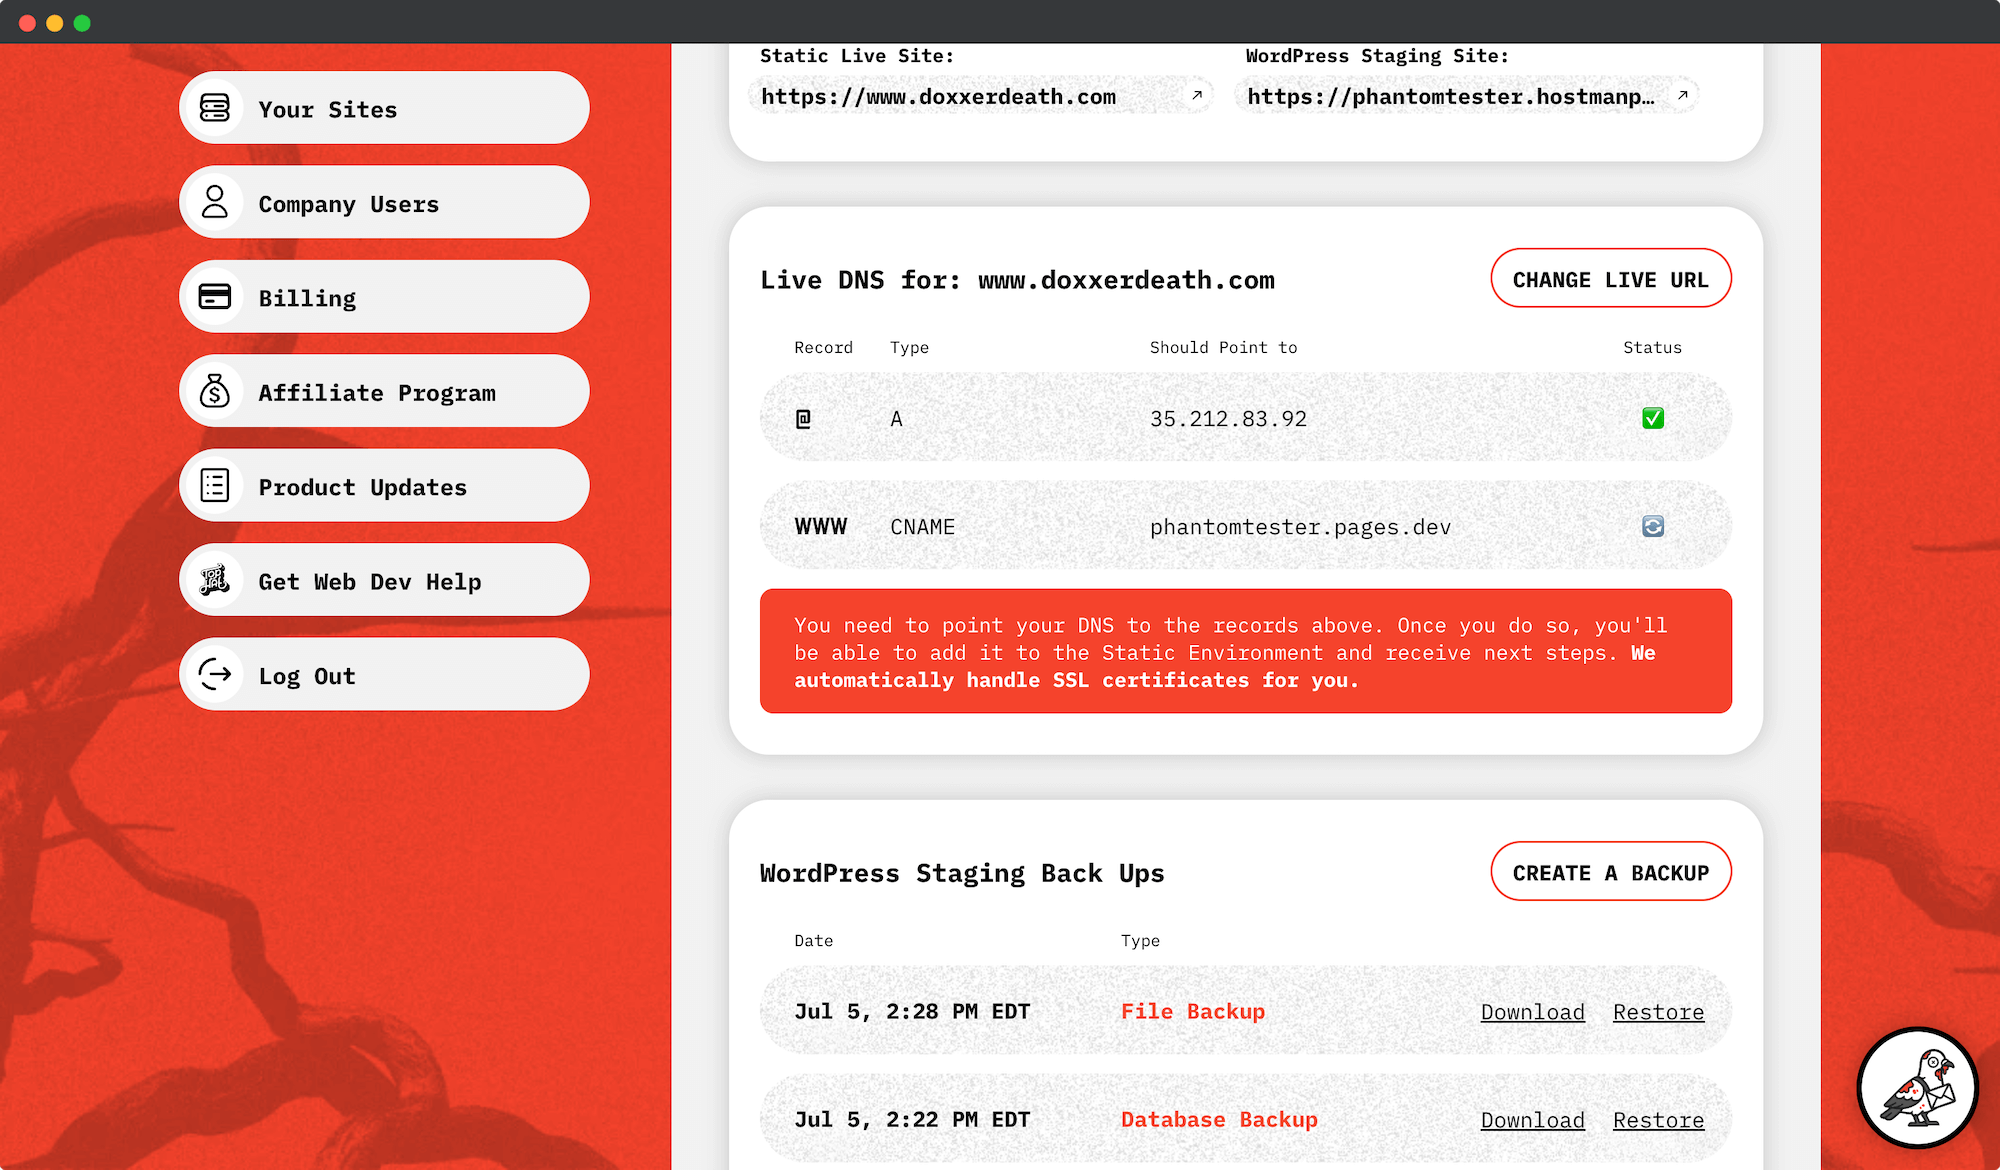
3a. Switching DNS for a www CNAME subdomain (ex: www.example.com)
This is the simplest and most familiar path to launch. This version is also known as a www CNAME subdomain.
When we detect your Live URL lives at WWW, we just need a few records updated. This can be done through any traditional DNS provider.
Enter the records as indicated and wait for them to turn green.
3b. Switching DNS for a non-www CNAME subdomain (ex: dash.example.com)
This path is also pretty straight forward. All you need to do is update a single subdomain.

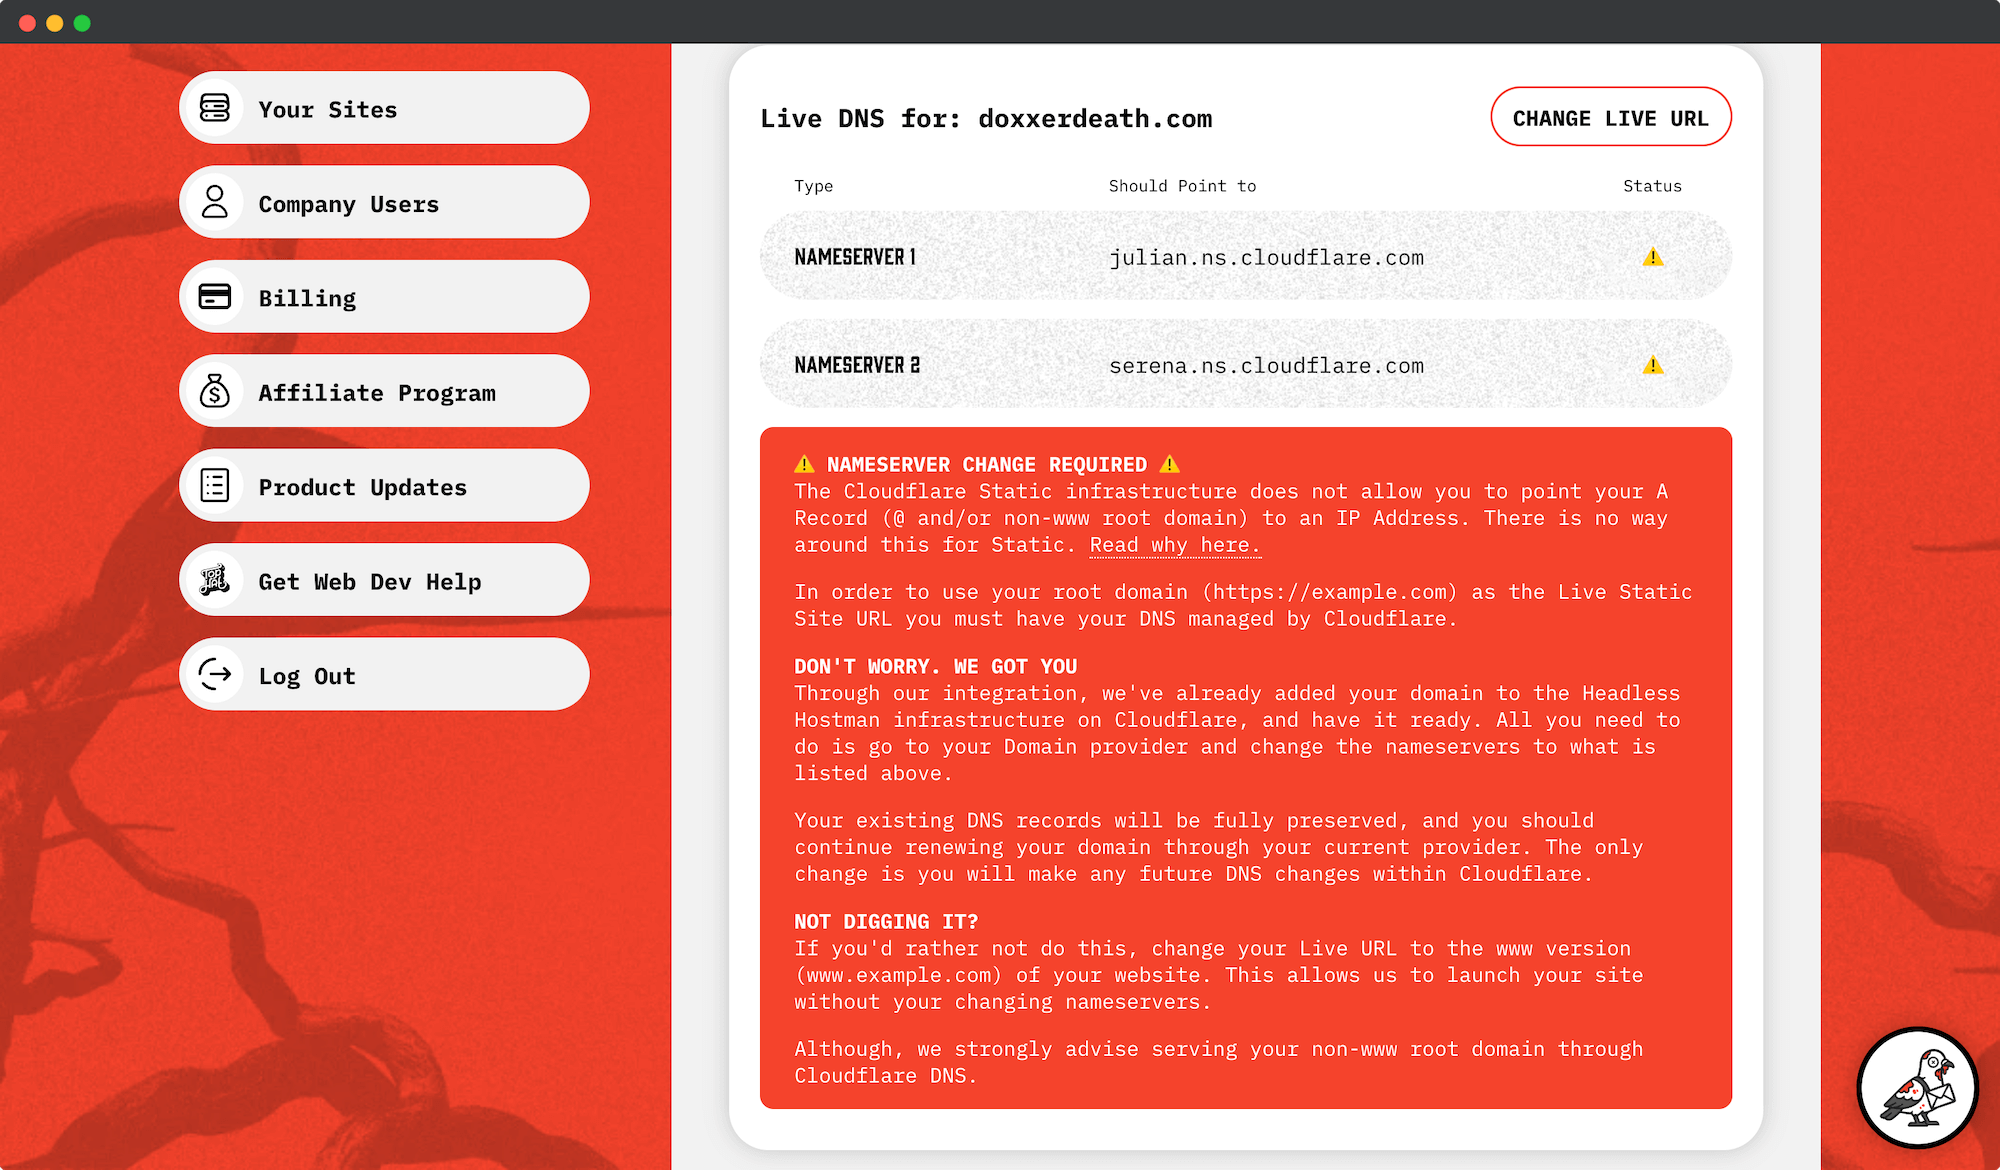
3c. Switching Nameservers for a non-www Apex Record (ex: example.com)
Cloudflare Static cannot accept an A Record (example.com is an Apex Record at @) pointed at an IP address.
It uses a Flattened A Record as a CNAME, which is a Cloudflare-only feature.
We we wrote an entire article about why this is important here
- The TL;DR is that Cloudflare Static propagates your website across 330 content delivery network servers globally.
- There is no one IP address associated with that. Traditional hosts give you an IP address because your site files live on a singular server (of course other load-balancing factors come into play at times).
- The Flattened A Record CNAME is the medium that determines where the end site is served from, which could be from a rolling and changing list of hundreds of end IP addresses.
If you’d like to use example.com, you need to switch your Nameservers to Cloudflare to get access to A Record Flattening.
- Yes, you continue renewing your domain through your normal provider. We are not transferring the registrar.
- But the DNS records will be controlled by Cloudflare
We make it easy with our premium Cloudflare integration. It’s just updating one thing.
If we auto-detect an Apex domain, not already on Cloudflare, we automatically add your domain to the Headless Hostman Cloudflare infrastructure.
All you need to do is change your Nameservers, as indicated. That’s it.
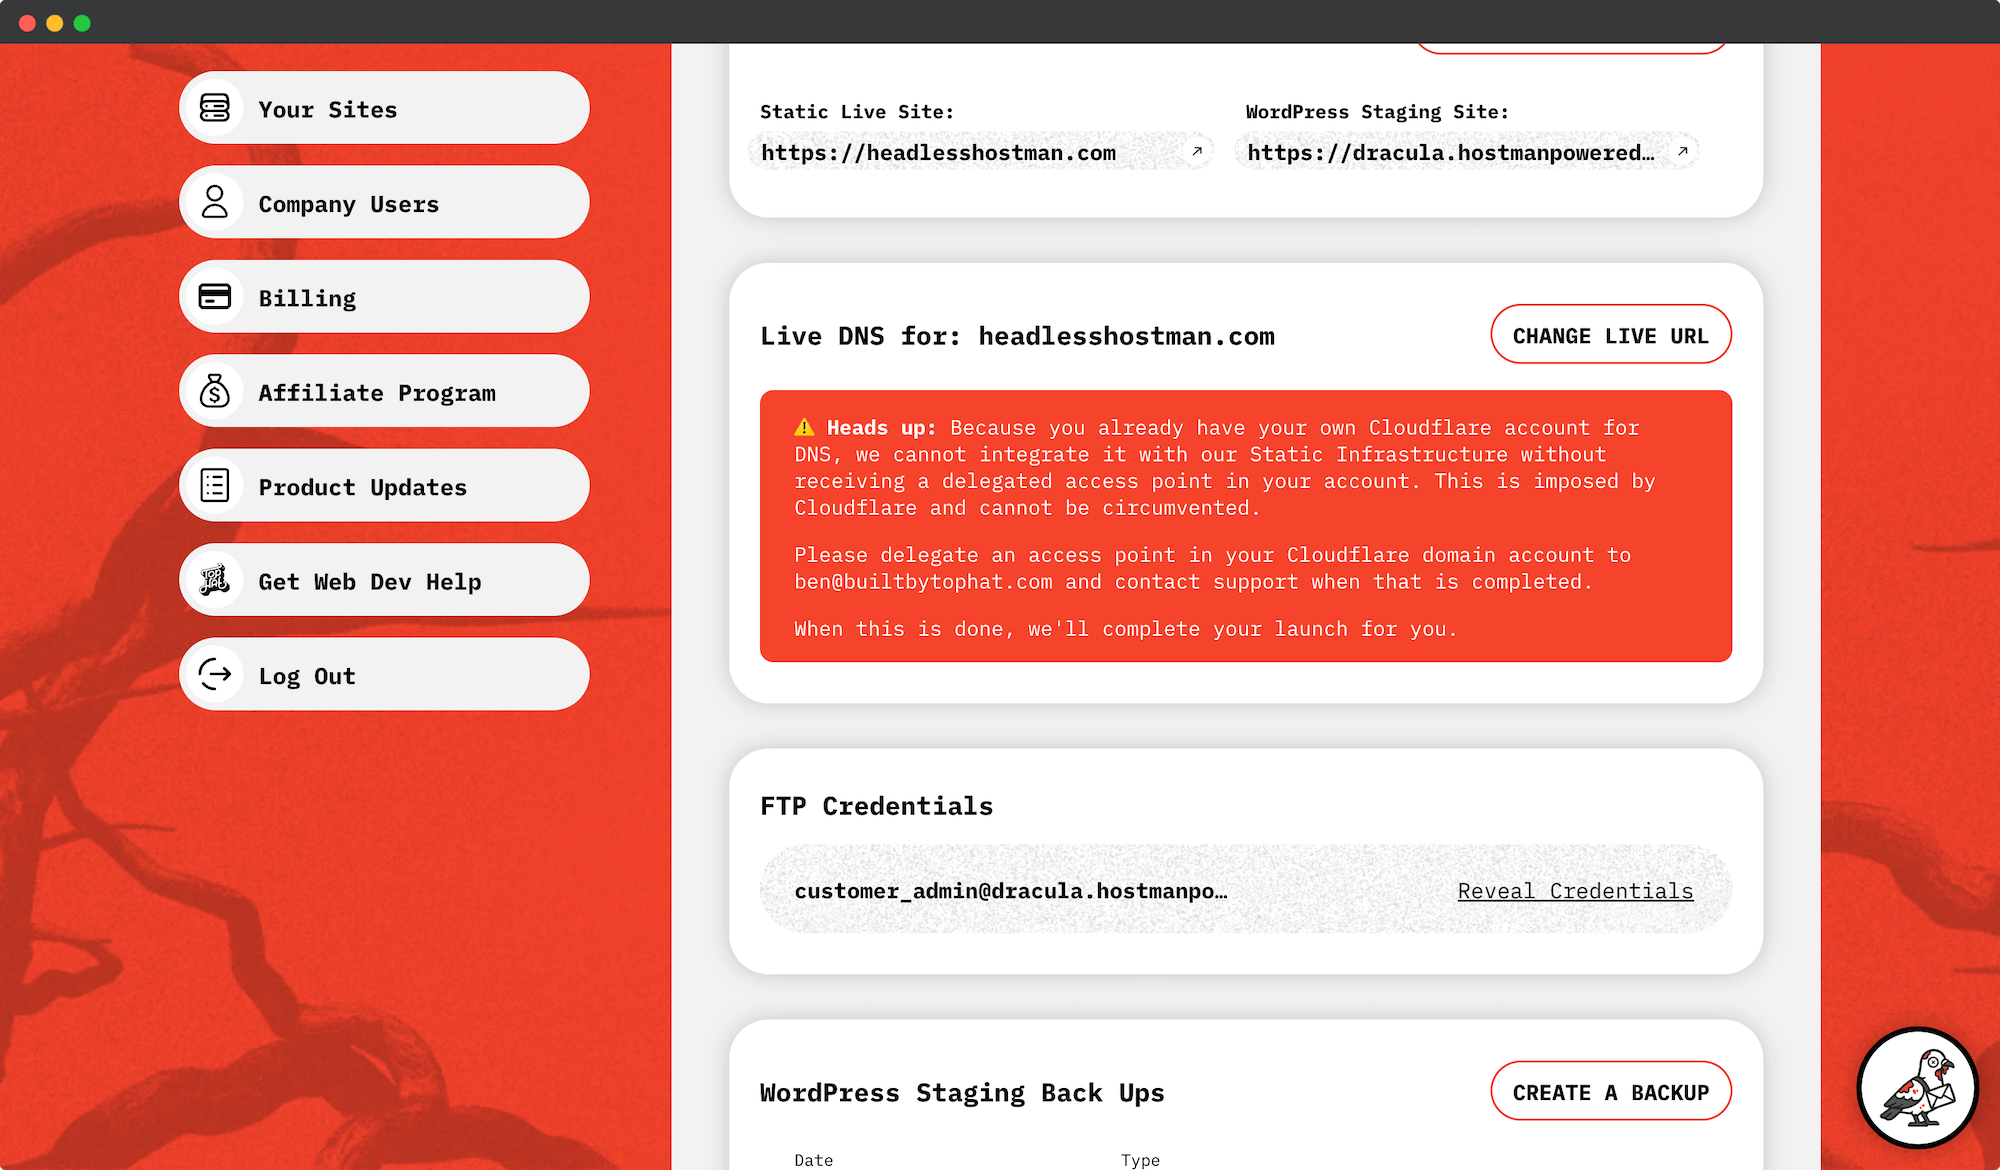
3d. Your live domain is already managed by Cloudflare
If your DNS is already on Cloudflare, we can’t auto-launch it through our system. We need a delegated access point to coordinate from first.
There is no way around this. This is a security feature imposed by Cloudflare to prevent misuse.
Once you delegate an access point to us, we will coordinate the rest of the launch for you.
4. Confirm DNS and Initiate Update
For 3a, 3b, and 3c:
Once you see green checkmarks confirming your DNS or Nameservers (for 3c) are pointed correctly, click Update Static Site.
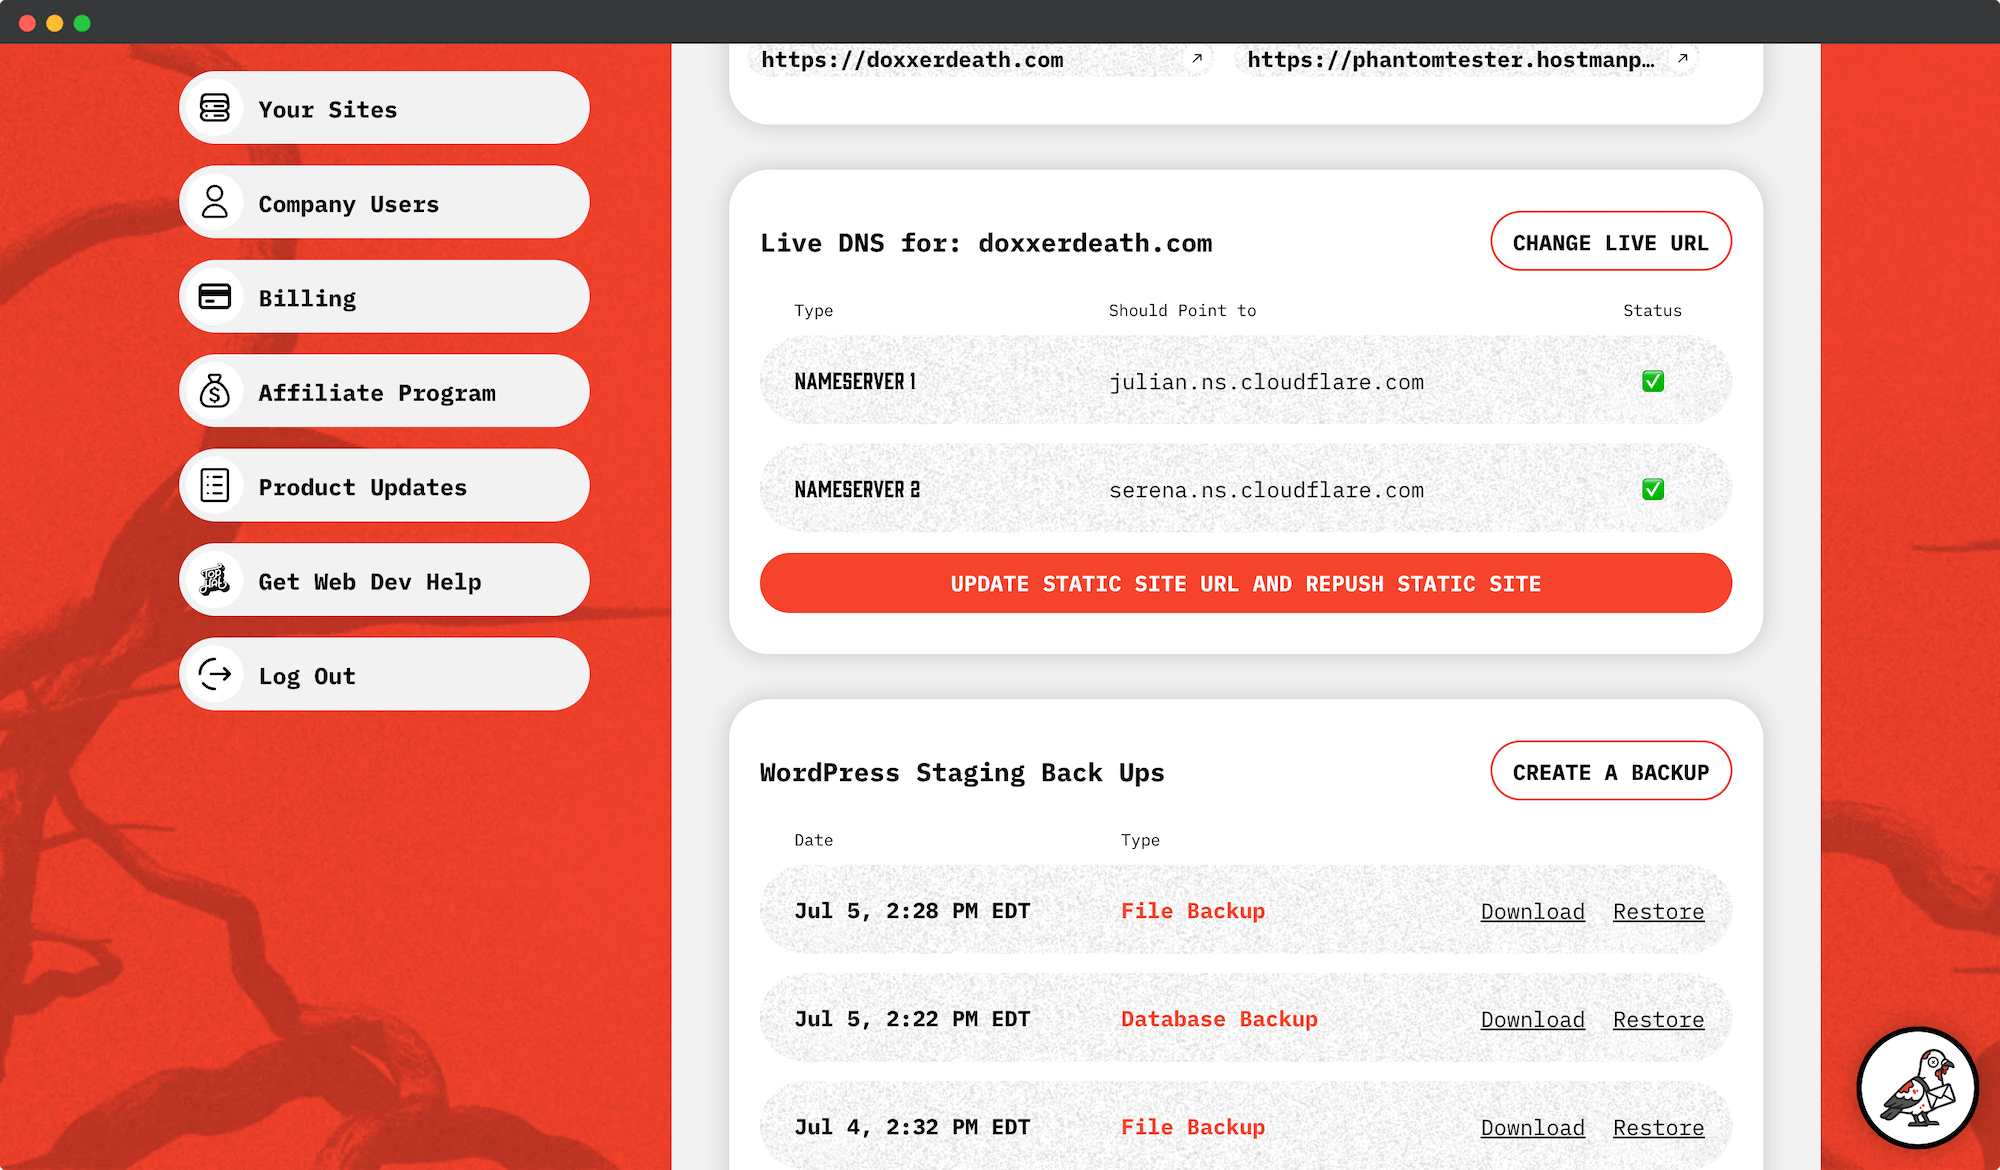
The system will prompt you to immediately re-push your site to apply the domain change to the static environment.

This is critical. Until the push happens, visitors won’t see your live content properly and your live domain will render a broken site.
5. Re-push the Static Site from WordPress (with the Final Domain Associated)
You’ll be redirected to initiate a full site push. Complete this step to publish your updated site using the final domain.

After the push is done, any warning messages in the Cult Portal will disappear, and your site is now fully live.
Advanced Features
Admin Console: Delegation & Notifications
Delegation Panel
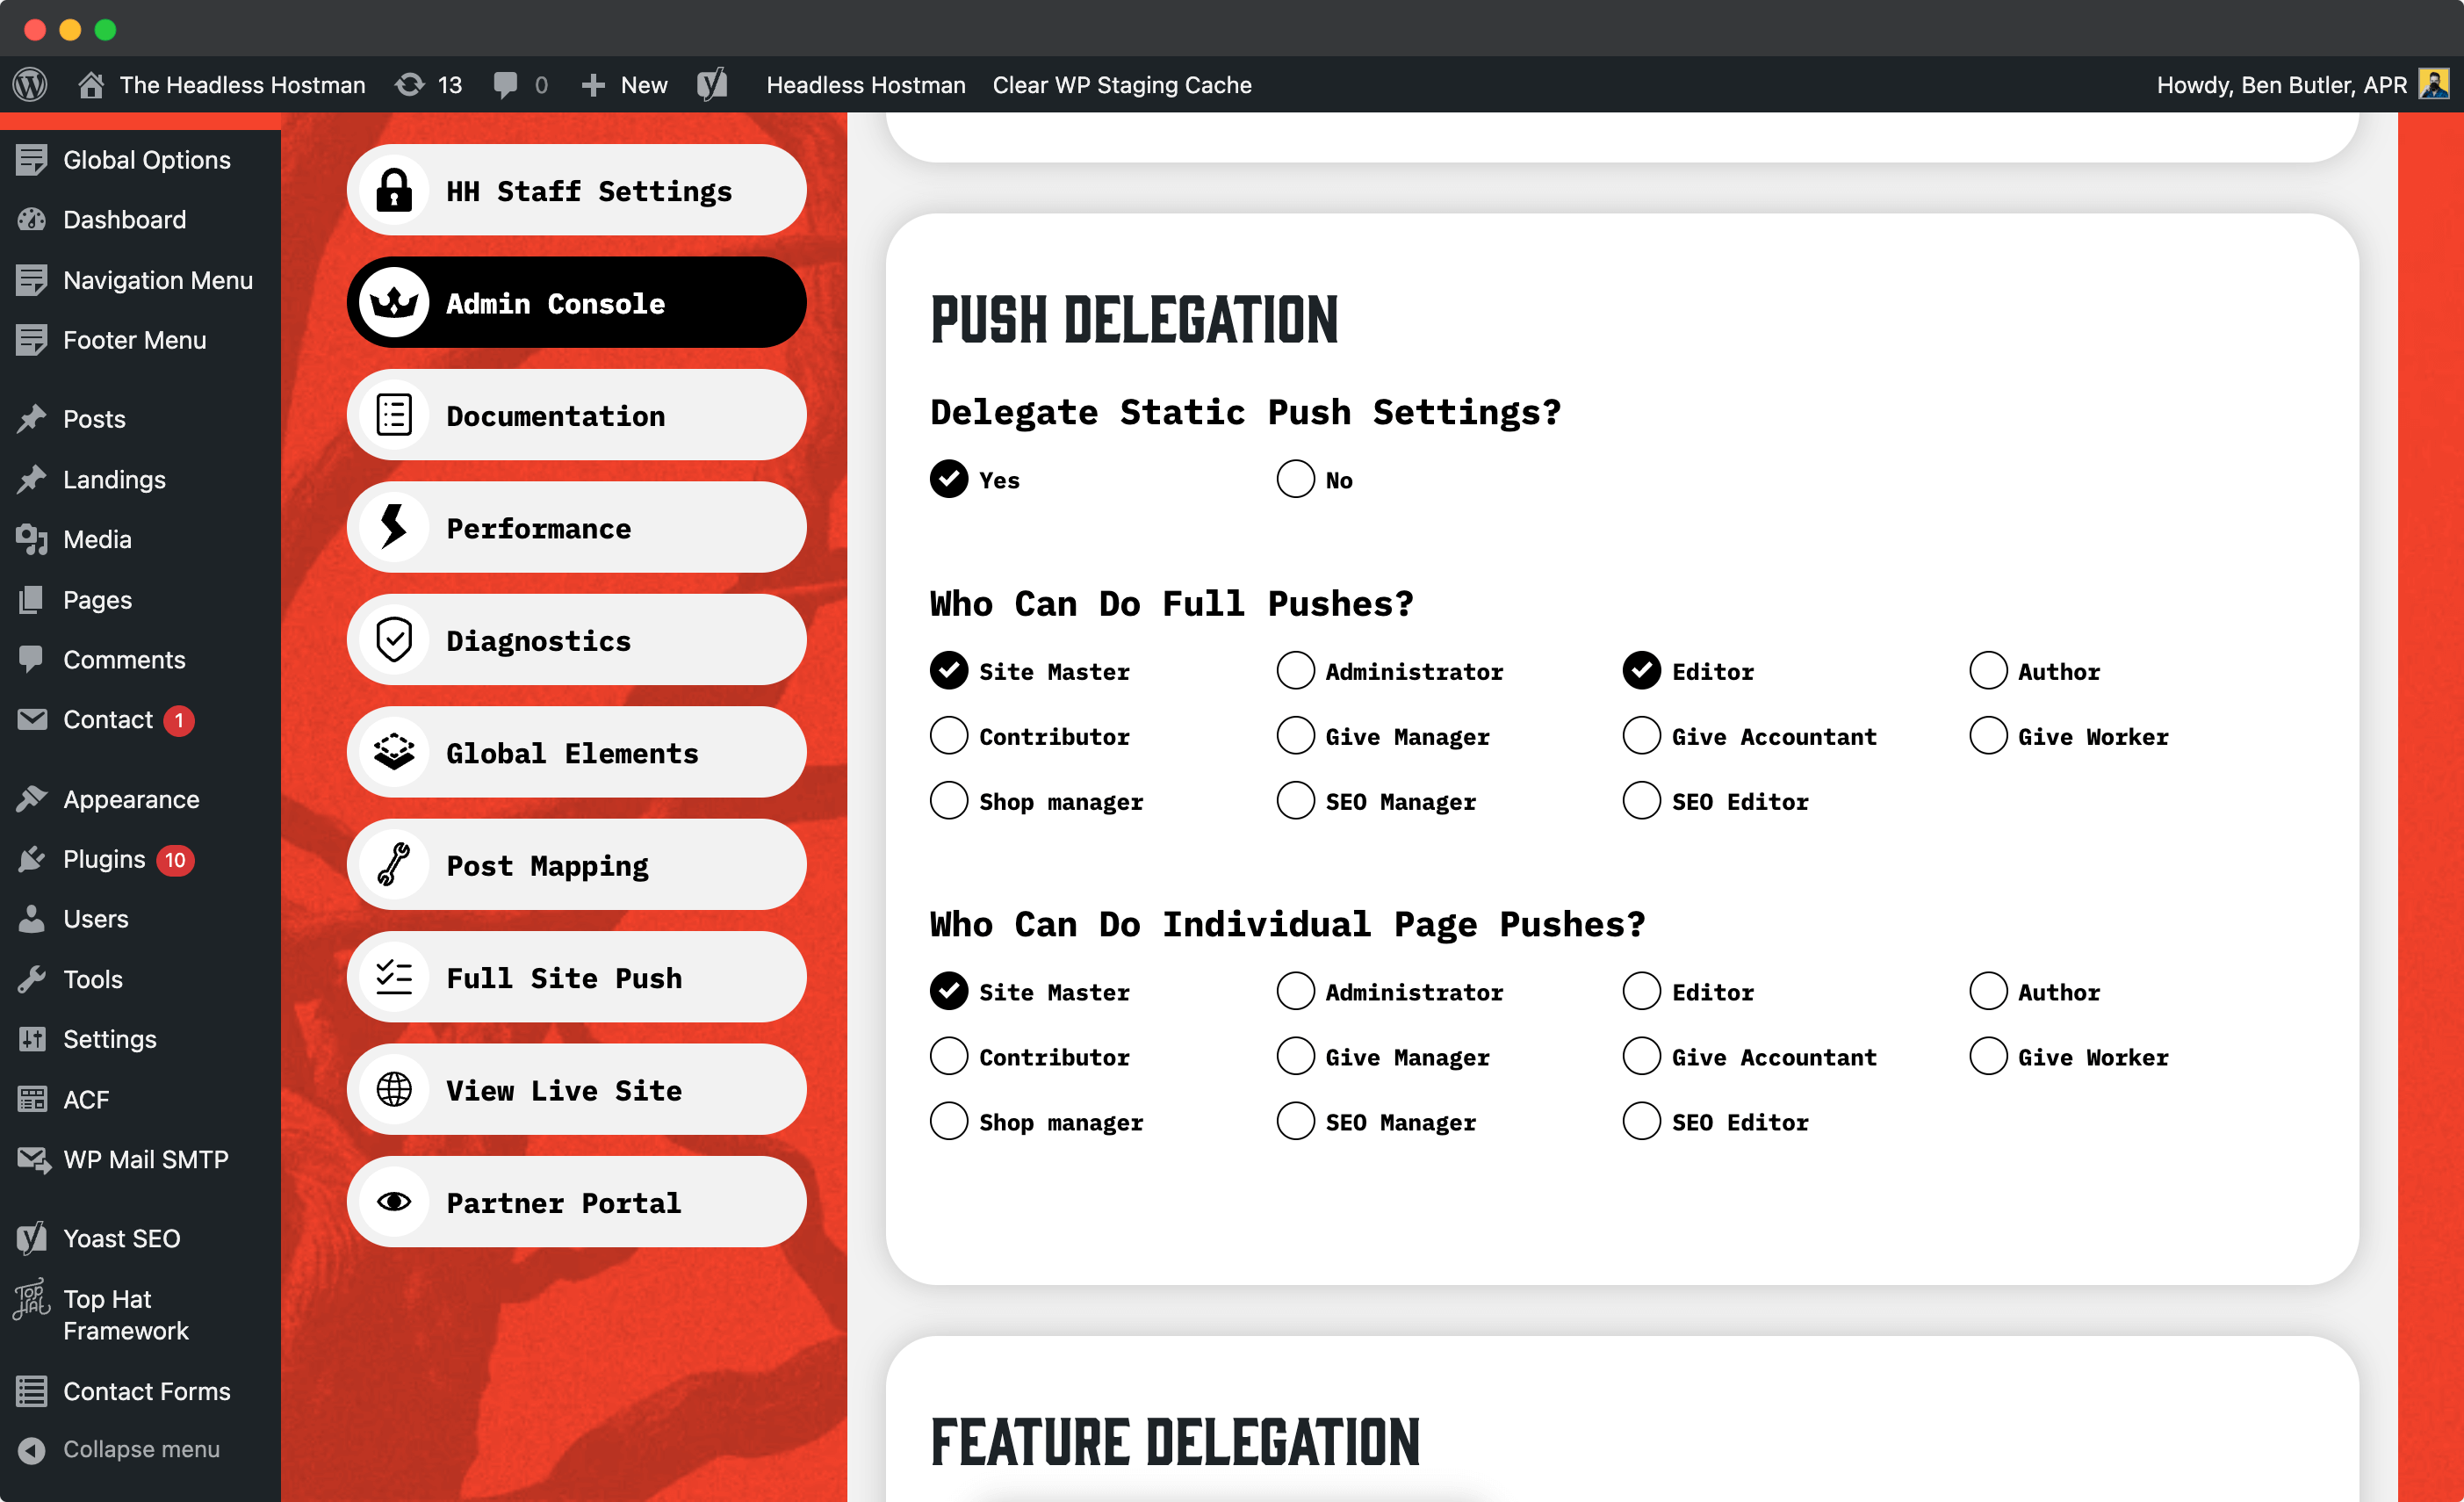
As an admin, you have access to the Delegation Panel. This lets you assign a Site Master—a superuser role within Headless Hostman.
Site Masters can be granted granular control, including permissions for full pushes, partial pushes, performance controls, post mapping, and diagnostics access. If you don’t assign these, default permissions apply: admins see everything; editors can push or delete.
Notifications
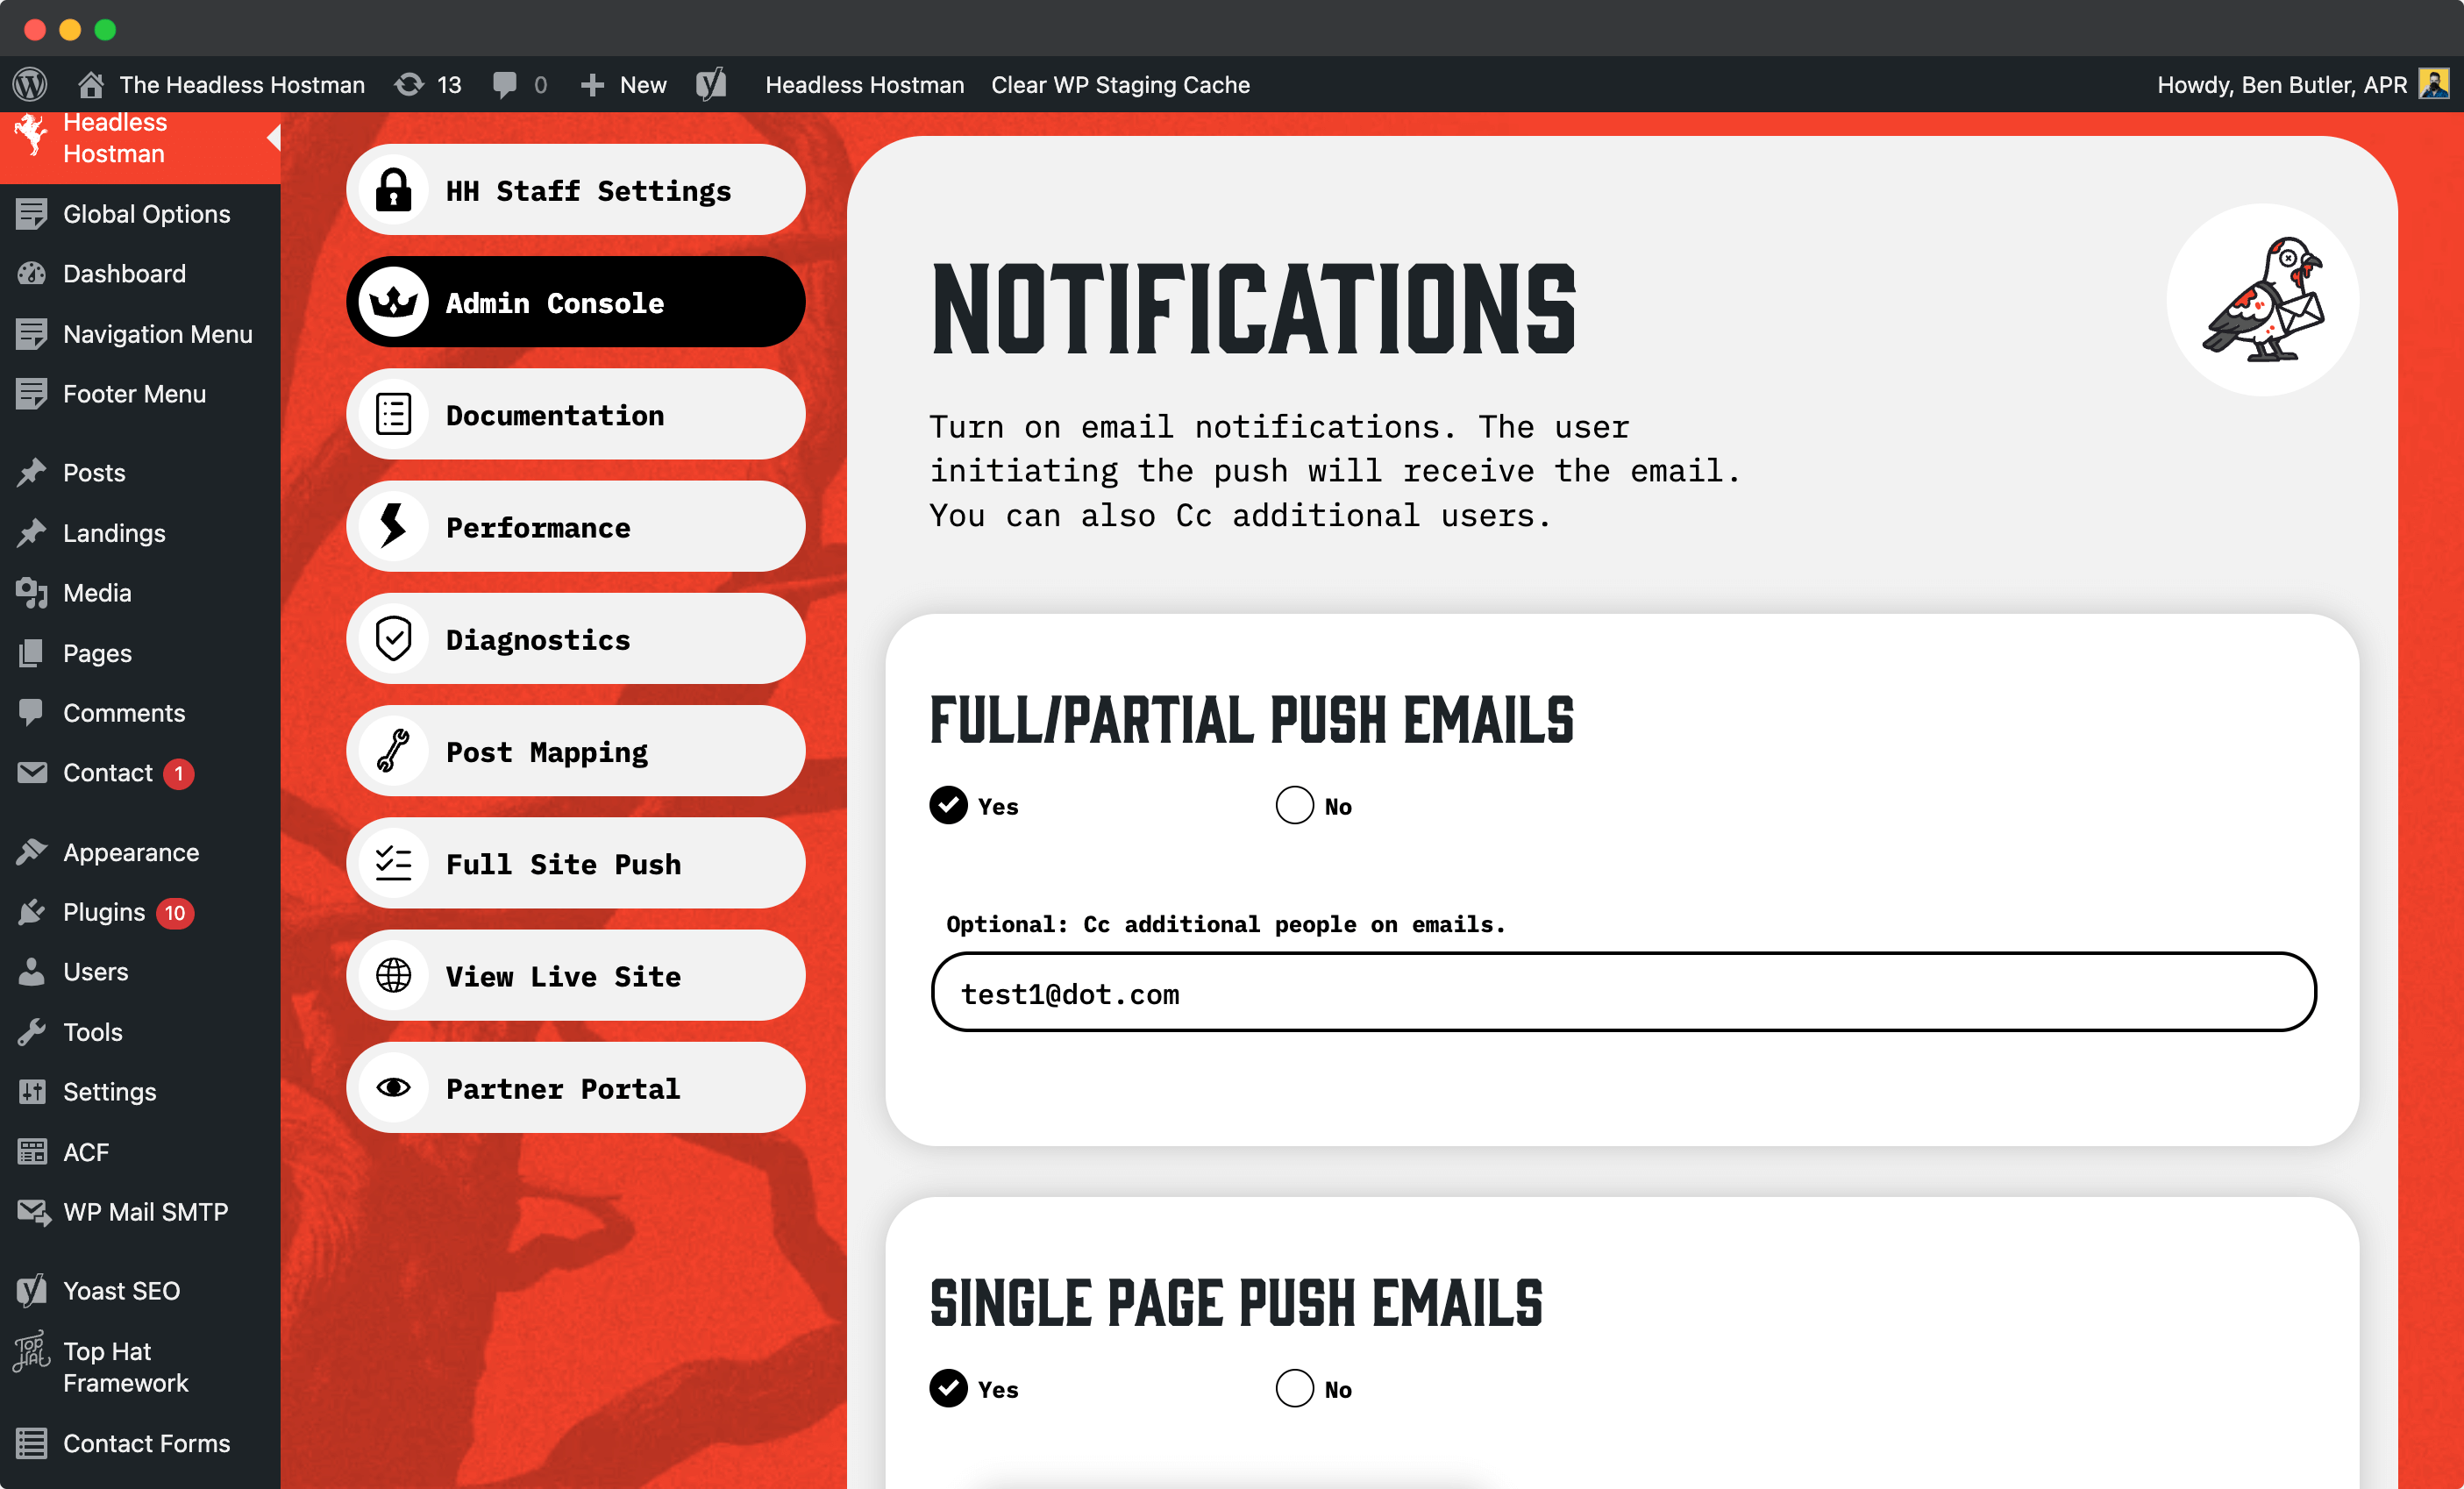
You can set up email notifications for events like full pushes, partial pushes, sitemap updates, and 301 redirects. By default, the initiator of an action receives the email. You can also CC additional users as needed.
IP Lockdown
You can restrict WordPress access by IP address. This is mainly used in enterprise settings. If you’re not familiar with managing static IPs or proxies, proceed with caution.
Global Elements: Instant Navigation, Footer, and Script Updates
Do you have to re-push your entire site when you update your menu, footer, or site-wide scripts?
Nope. You can configure Headless Hostman to recognize global elements by class or ID. Once configured, these elements can be pushed independently from the Full Push > Global Elements menu.
Example: If you change your navigation bar and have 109 pages, you don’t need to push all pages.
Just add the nav class or ID to the global sync list, save it, and trigger the push—it updates across your site in minutes.
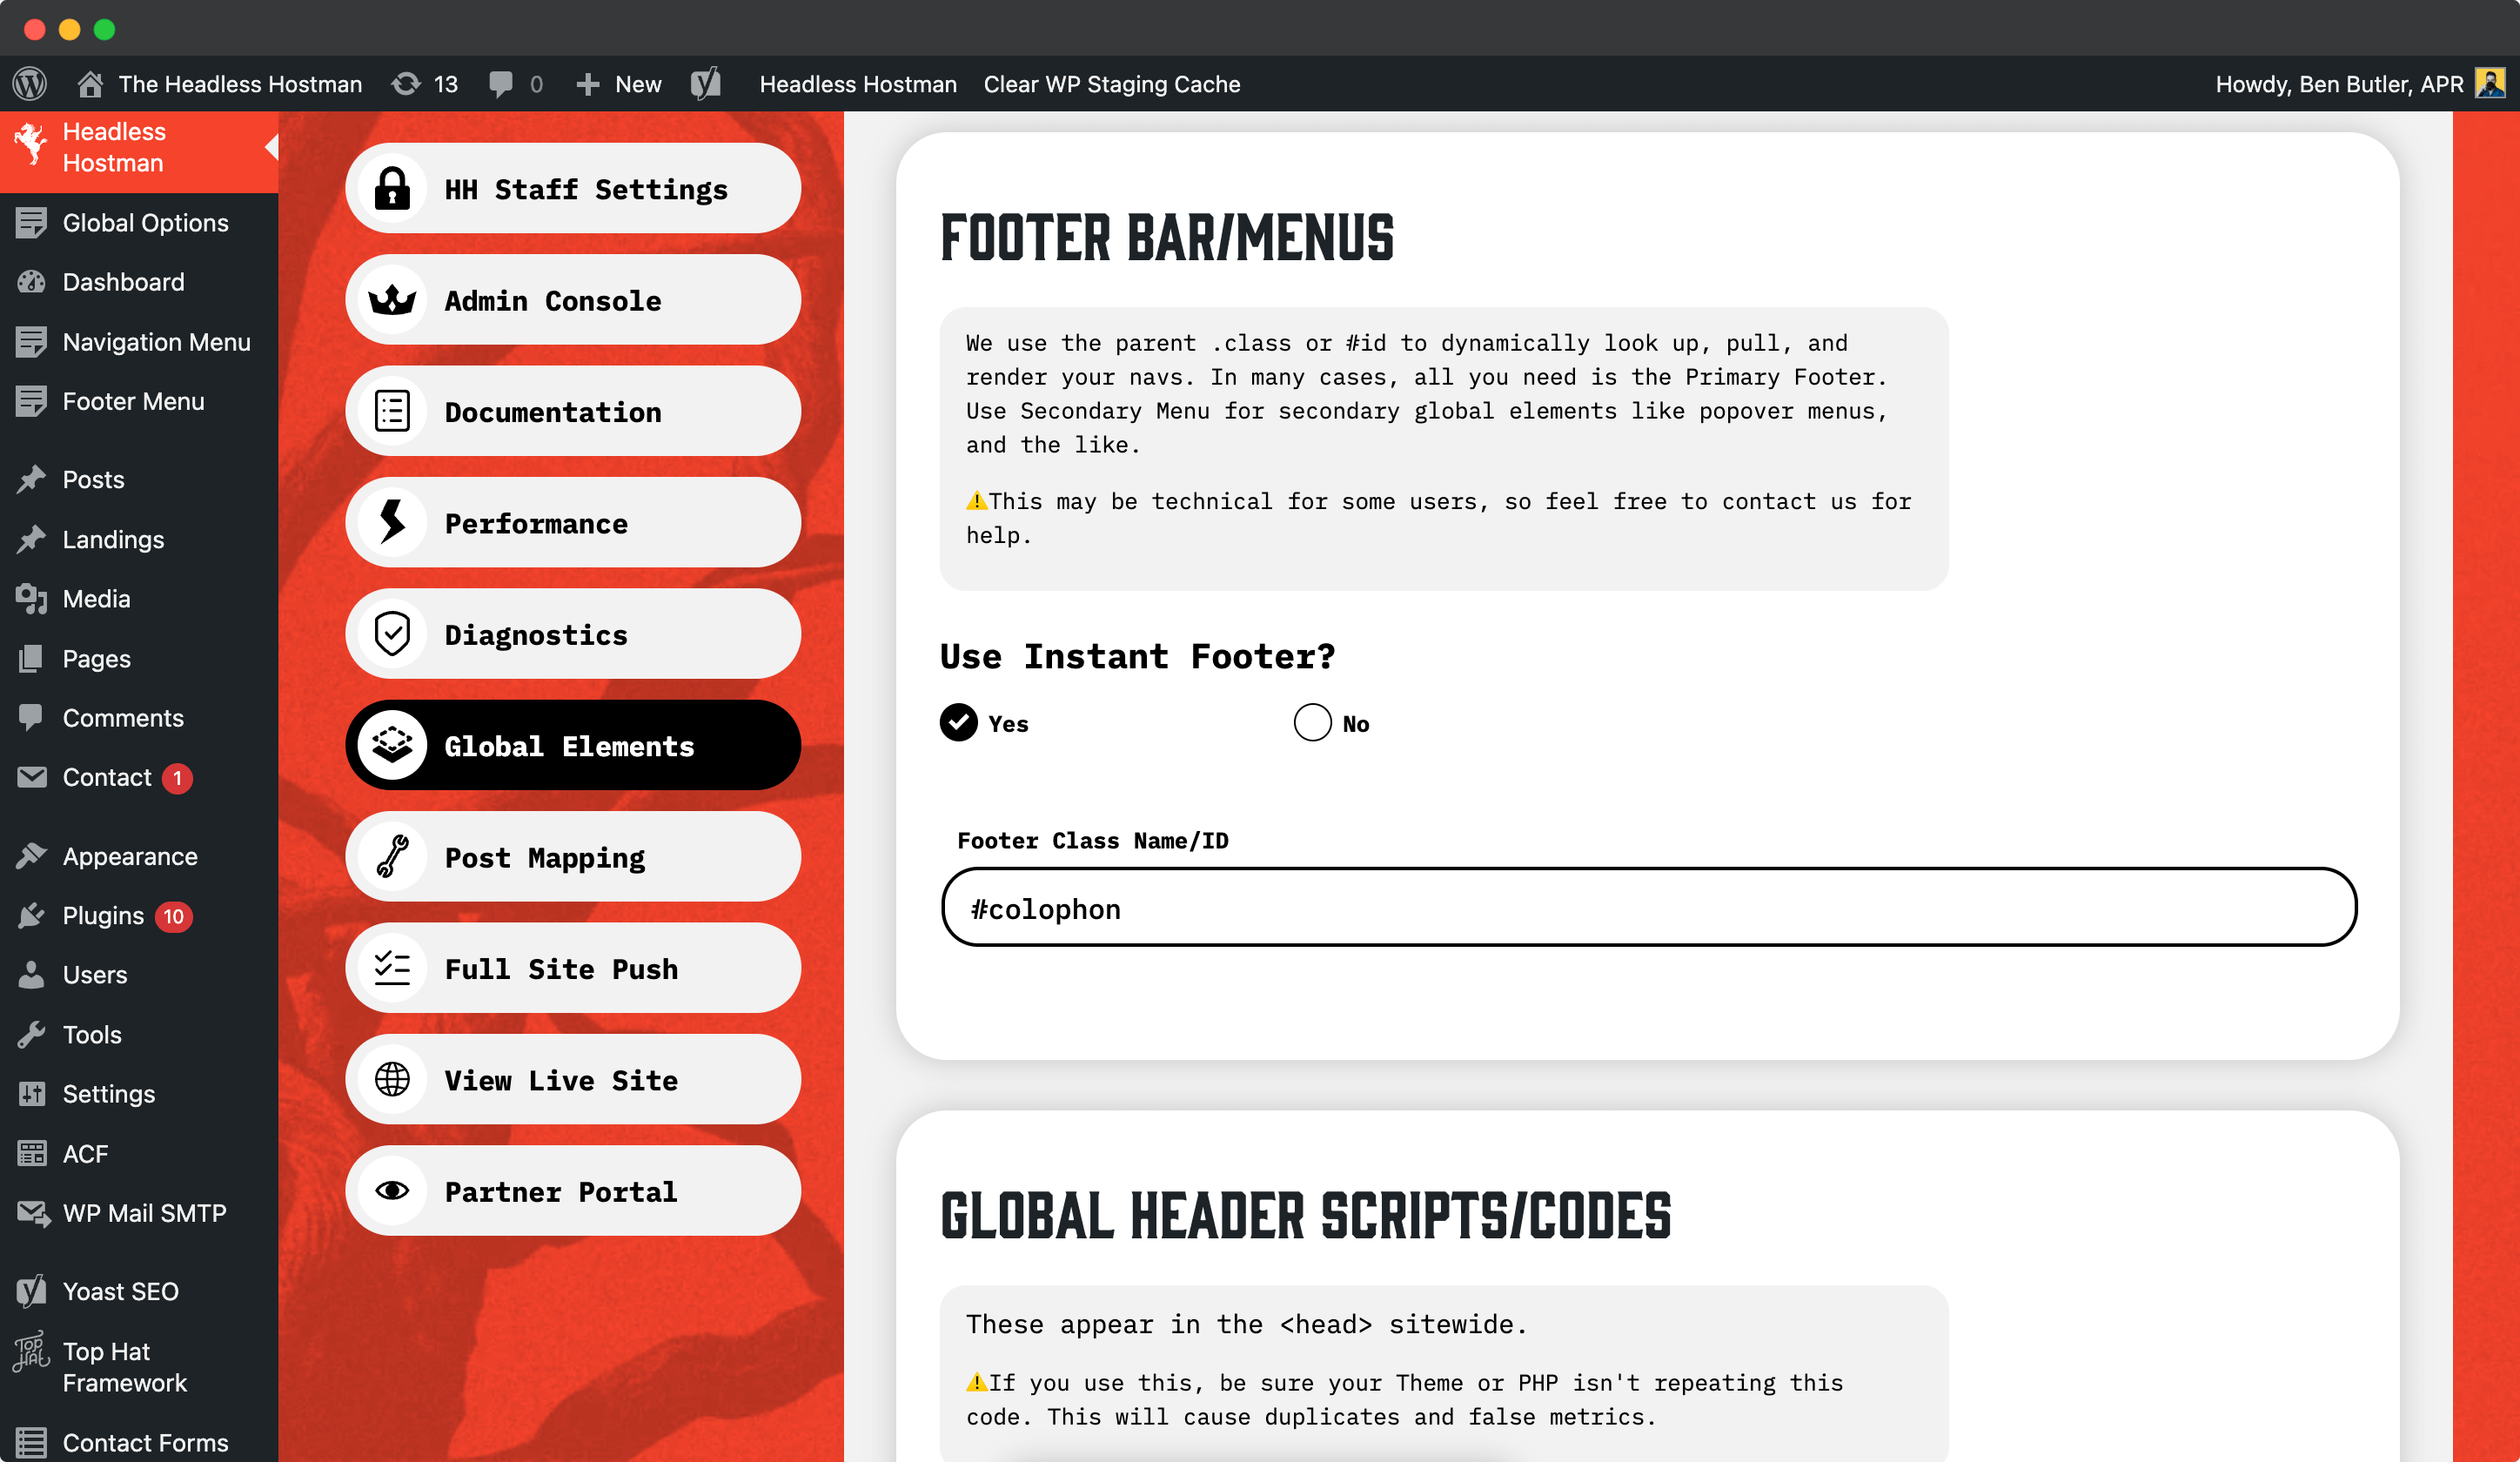
Elements you can configure this way include:
- Navigation bars
- Footers
- Header scripts
- Body scripts
- Footer scripts
Push Navigation, Footer, and Script Updates
When you’ve mapped this per the step above, you need to push them live.
Anytime you make a change to these, you must push them live.
Head to Full Push > Push Global Elements, and whatever you push will be available in a few minutes across the entire site.
Global Elements: Push Root Files to Static Live
Have advertiser verification files, or other things you need to have at the Public HTML of your live Static site?
Examples:
- ads.txt
- app-ads.txt
- google[unique-id].html
- BingSiteAuth.xml
- facebook-business-verification.html
- tiktok-pixel-verification.html
- apple-app-site-association
- assetlinks.json (for Android App Links)
- yandex_[unique-id].html
- baidu_verify_[unique-id].html
- adform-site-verification.html
How to make them available for pushing
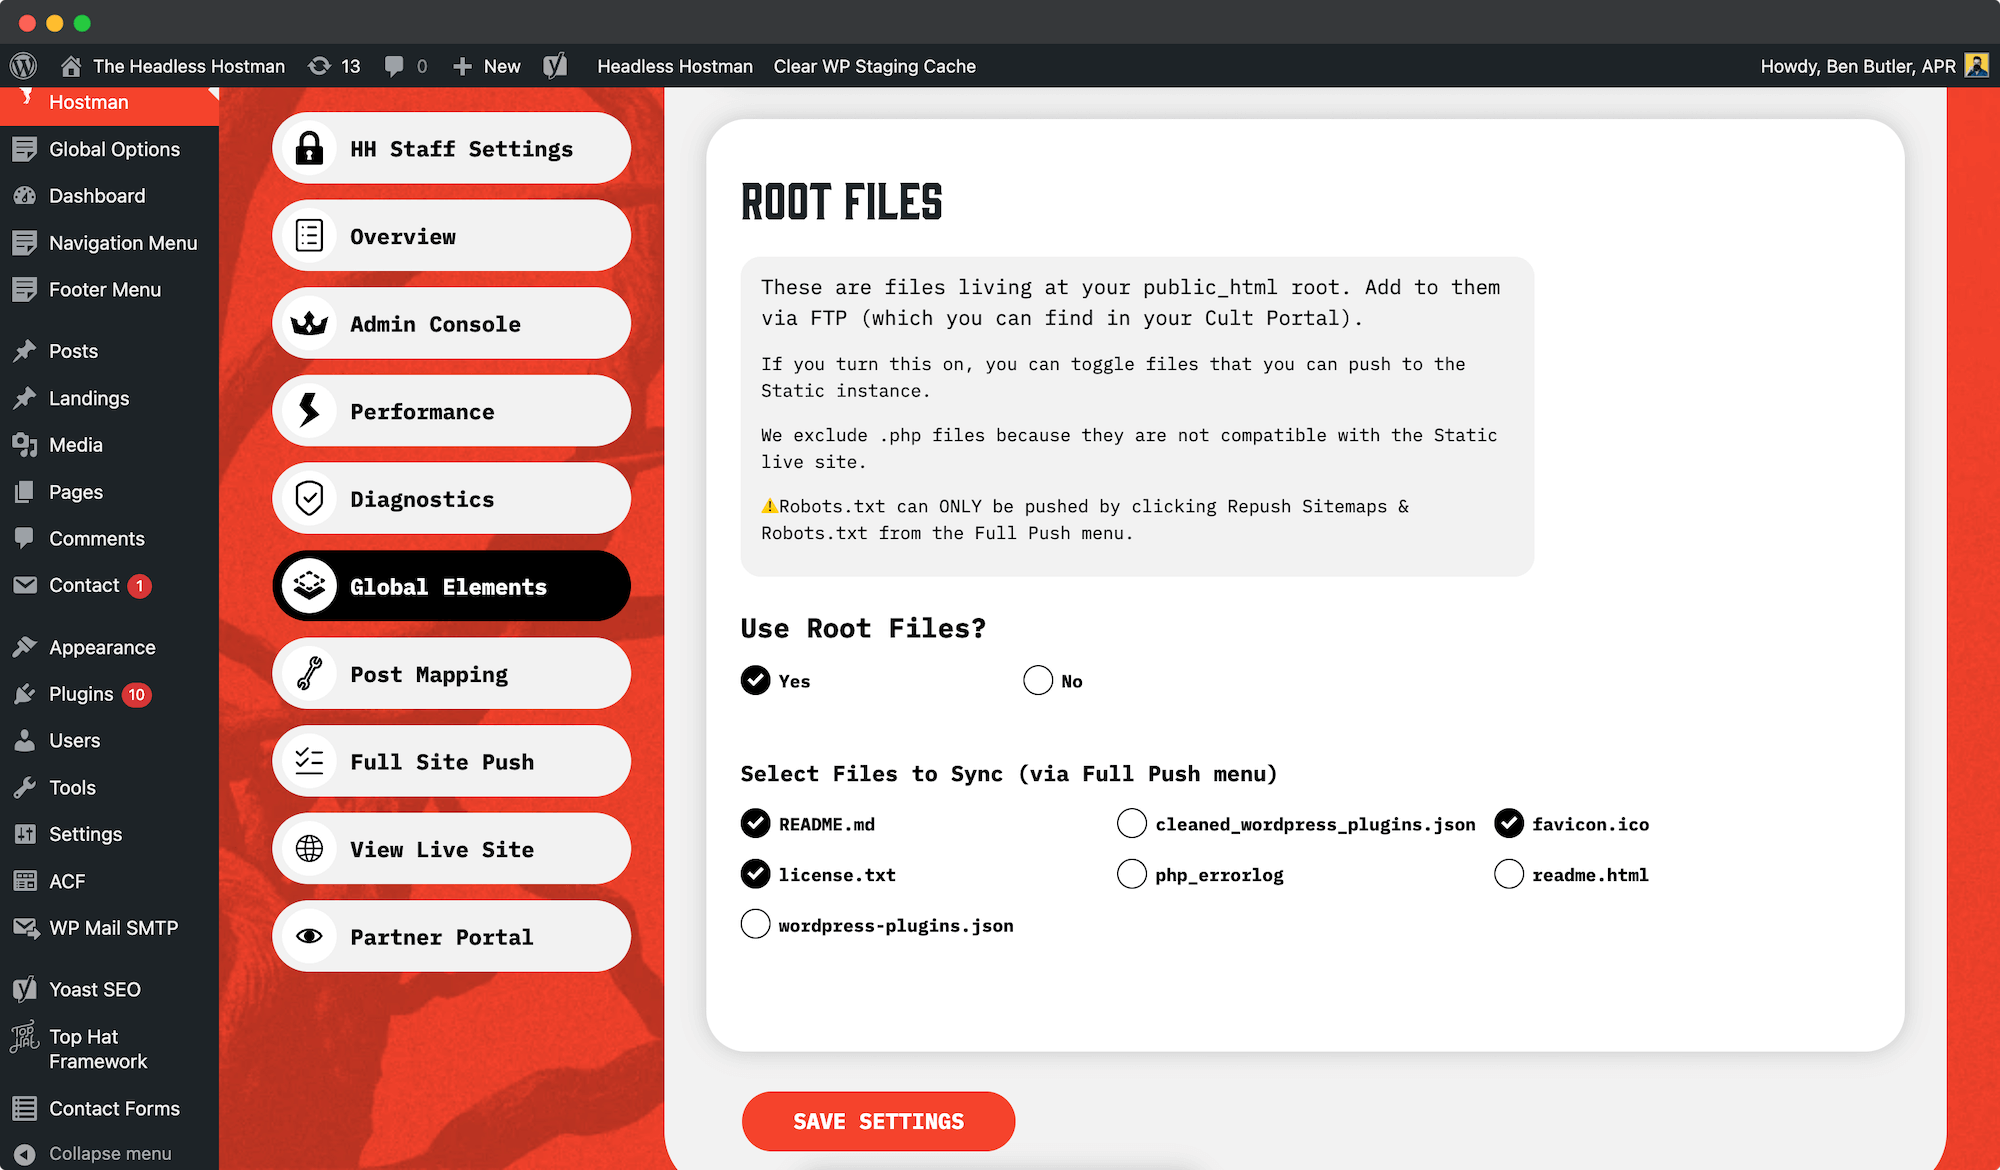
- Head to Global Elements
- Scroll to “Root Files.”
- When toggled on, you get access to selecting everything existing at the public_html root — except .php and .ini files.
How to add to them
- Head into your Cult Portal
- Select the site in question
- Get FTP credentials
- Upload to the public_html directory (first one you arrive at)
How to push them
- Once this option is toggled on, and files are selected, the “Push Root Files Live” button will be illuminated and available to use under Full Push.
- Clicking this will send all of those files to your Static site within a couple of minutes.
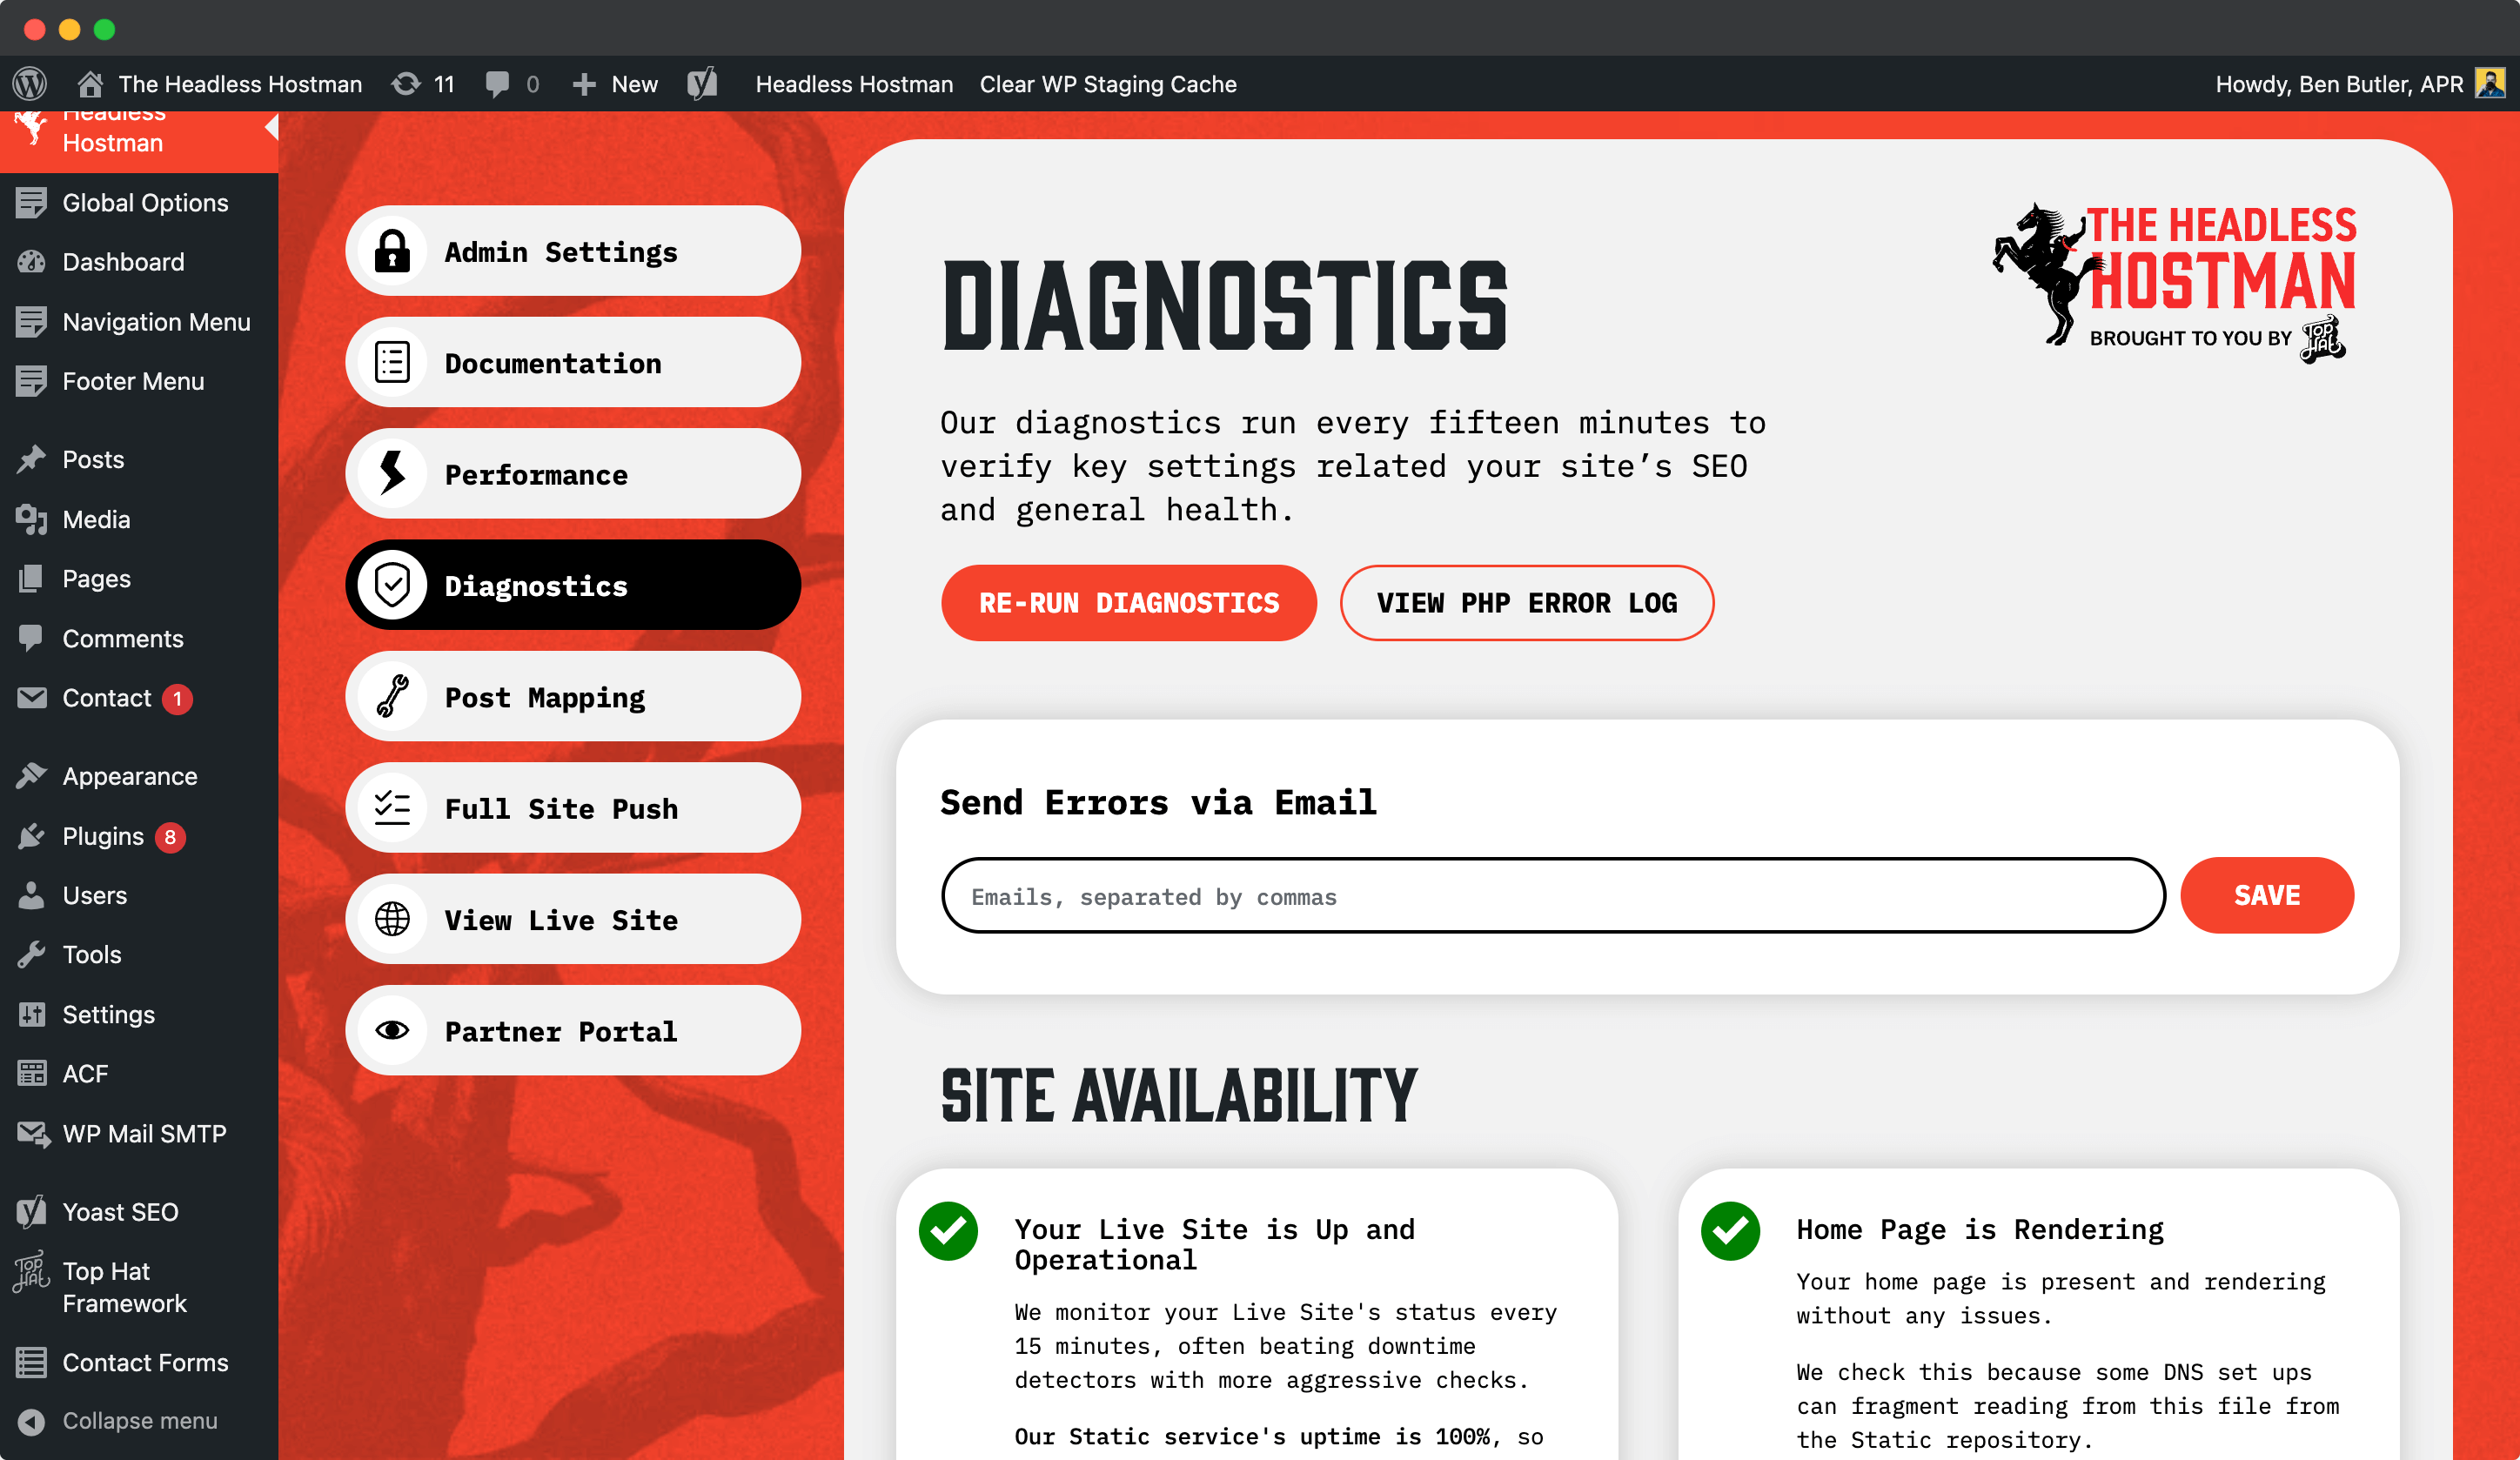
Site Diagnostics
The diagnostics panel checks essential site health metrics:
- Is your live website up?
- Is the homepage rendering?
- Are your important SEO tags (index tags, sitemaps, robots.txt, x-robots headers) present and valid?
- Is your 404 page returning the correct status?
- Is HSTS (Strict-Transport-Security) enabled?
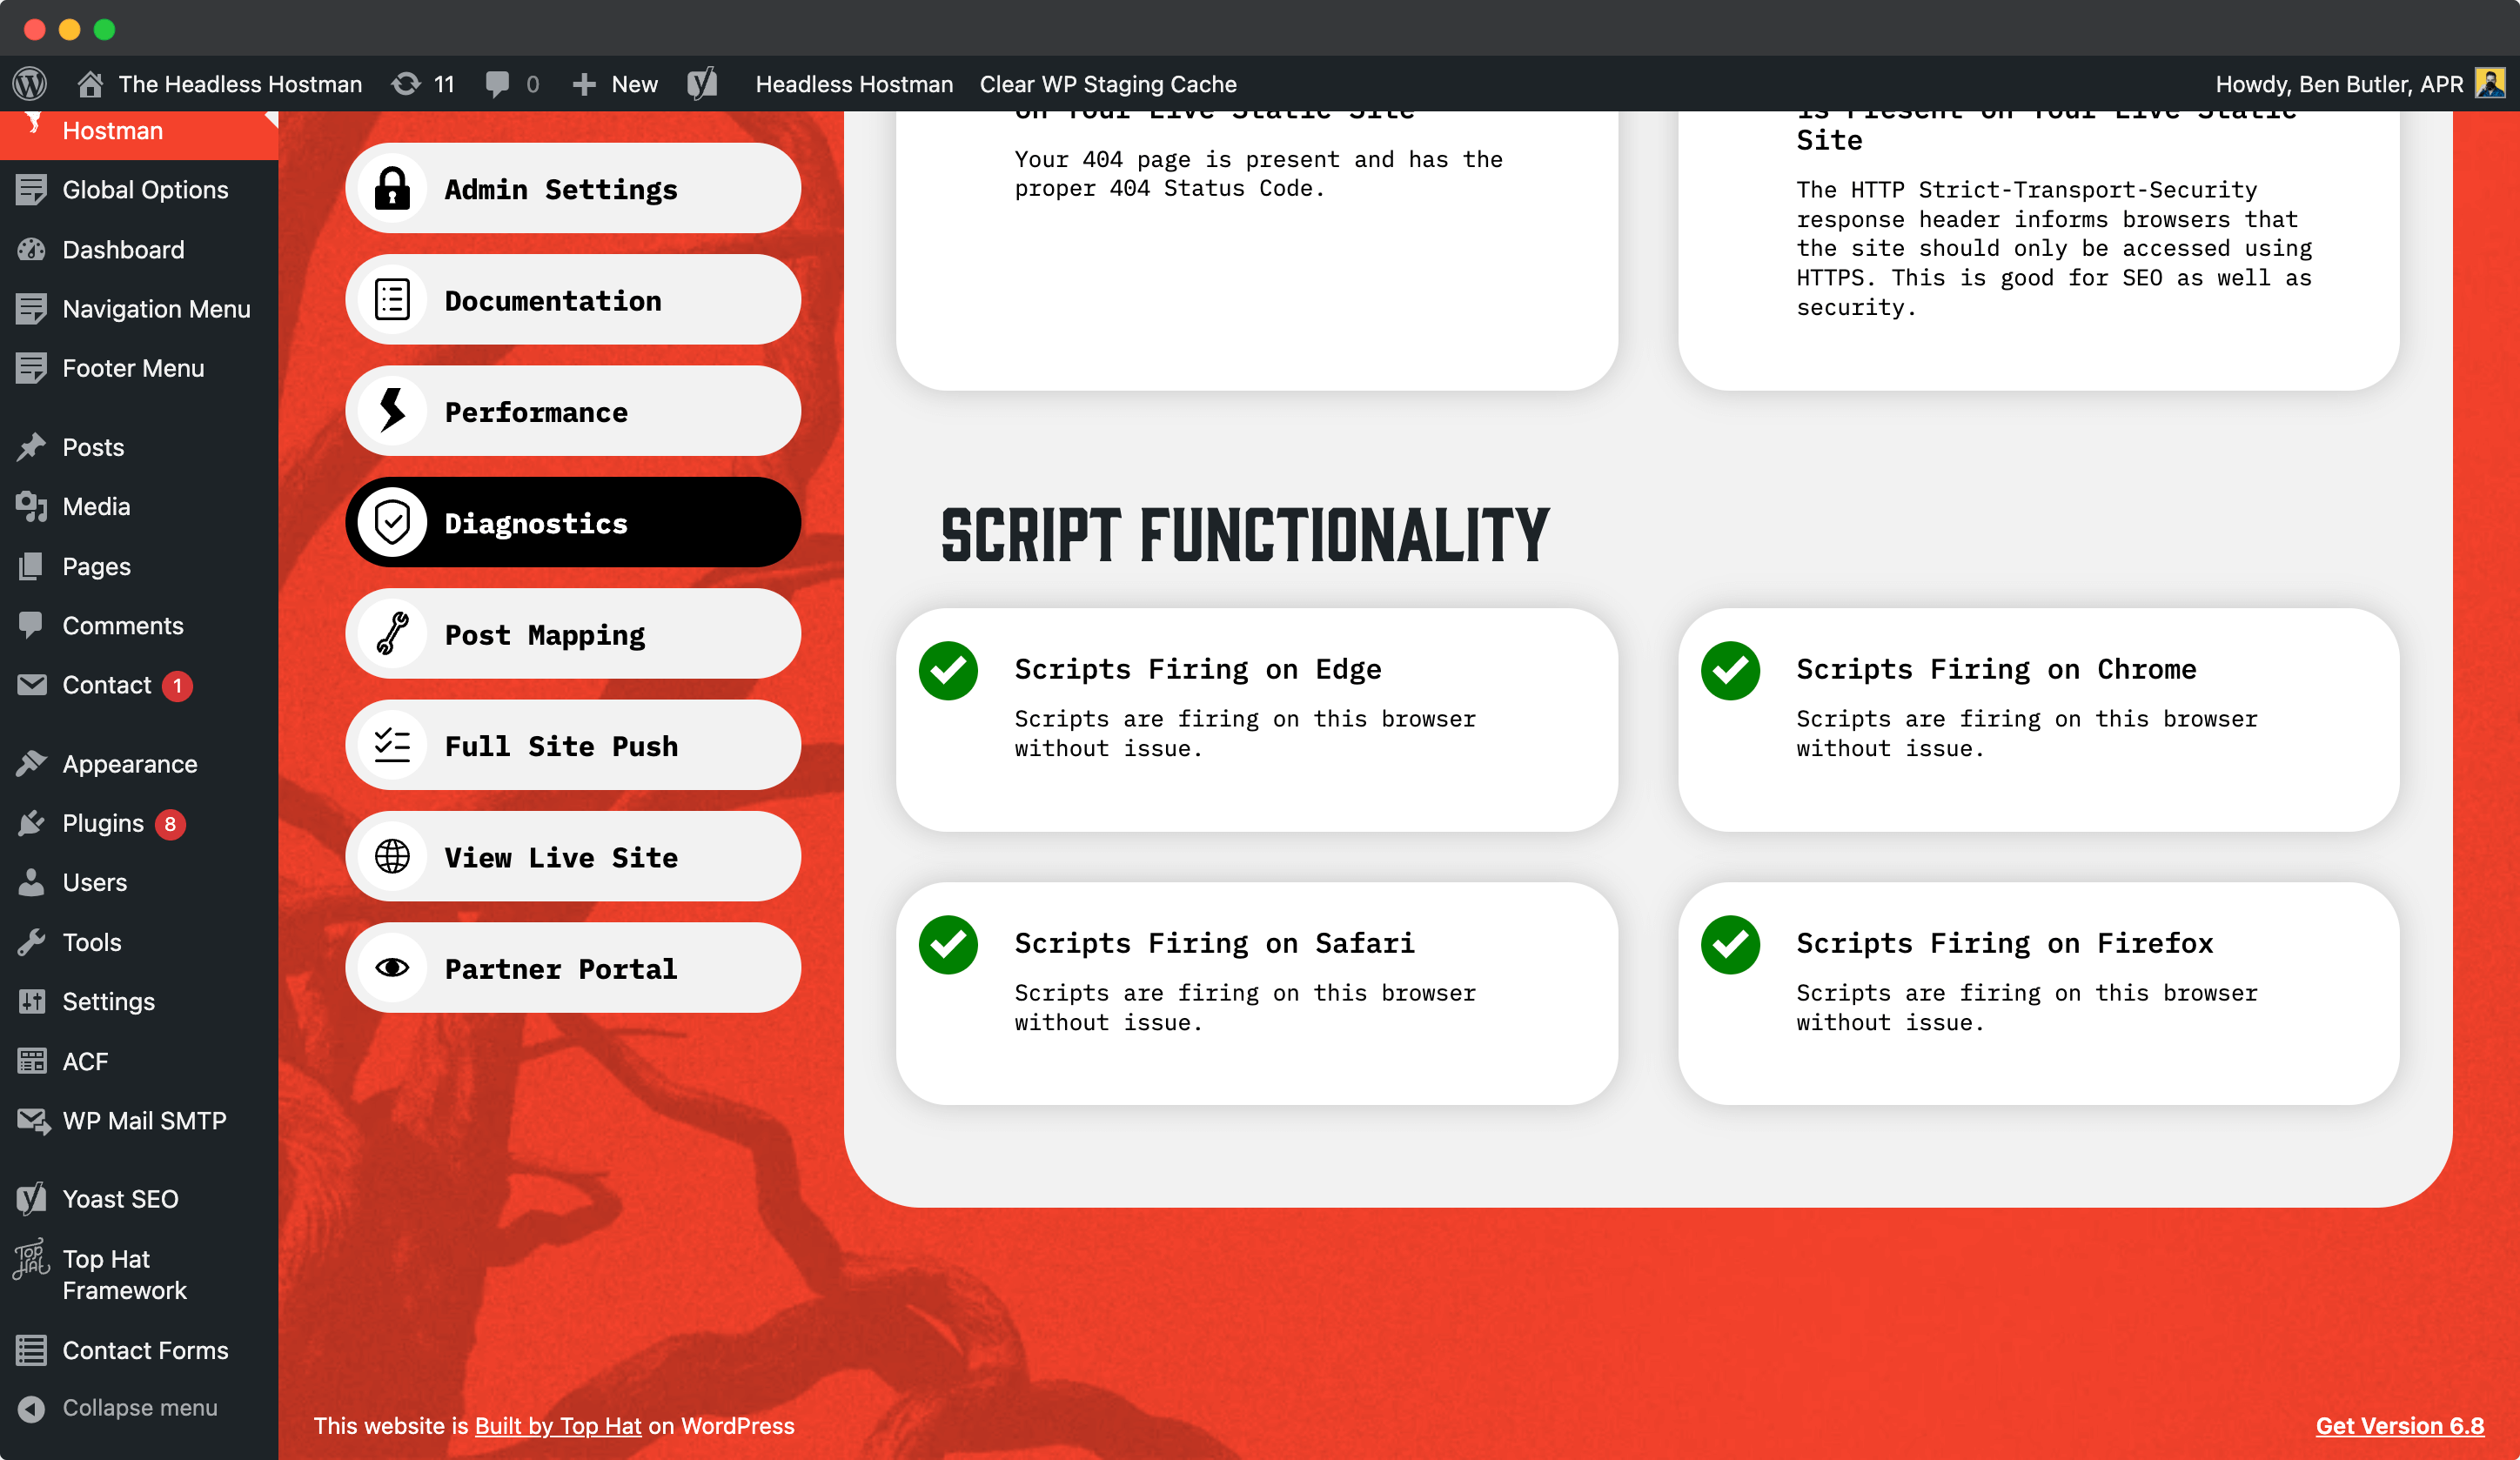
Browser Changes
The system also watches for browser-specific script issues.
For example, when Firefox released a breaking update in April 2025, our affected customers were notified automatically.
Error Log
You also have access to an error log for debugging broken plugins or development issues.
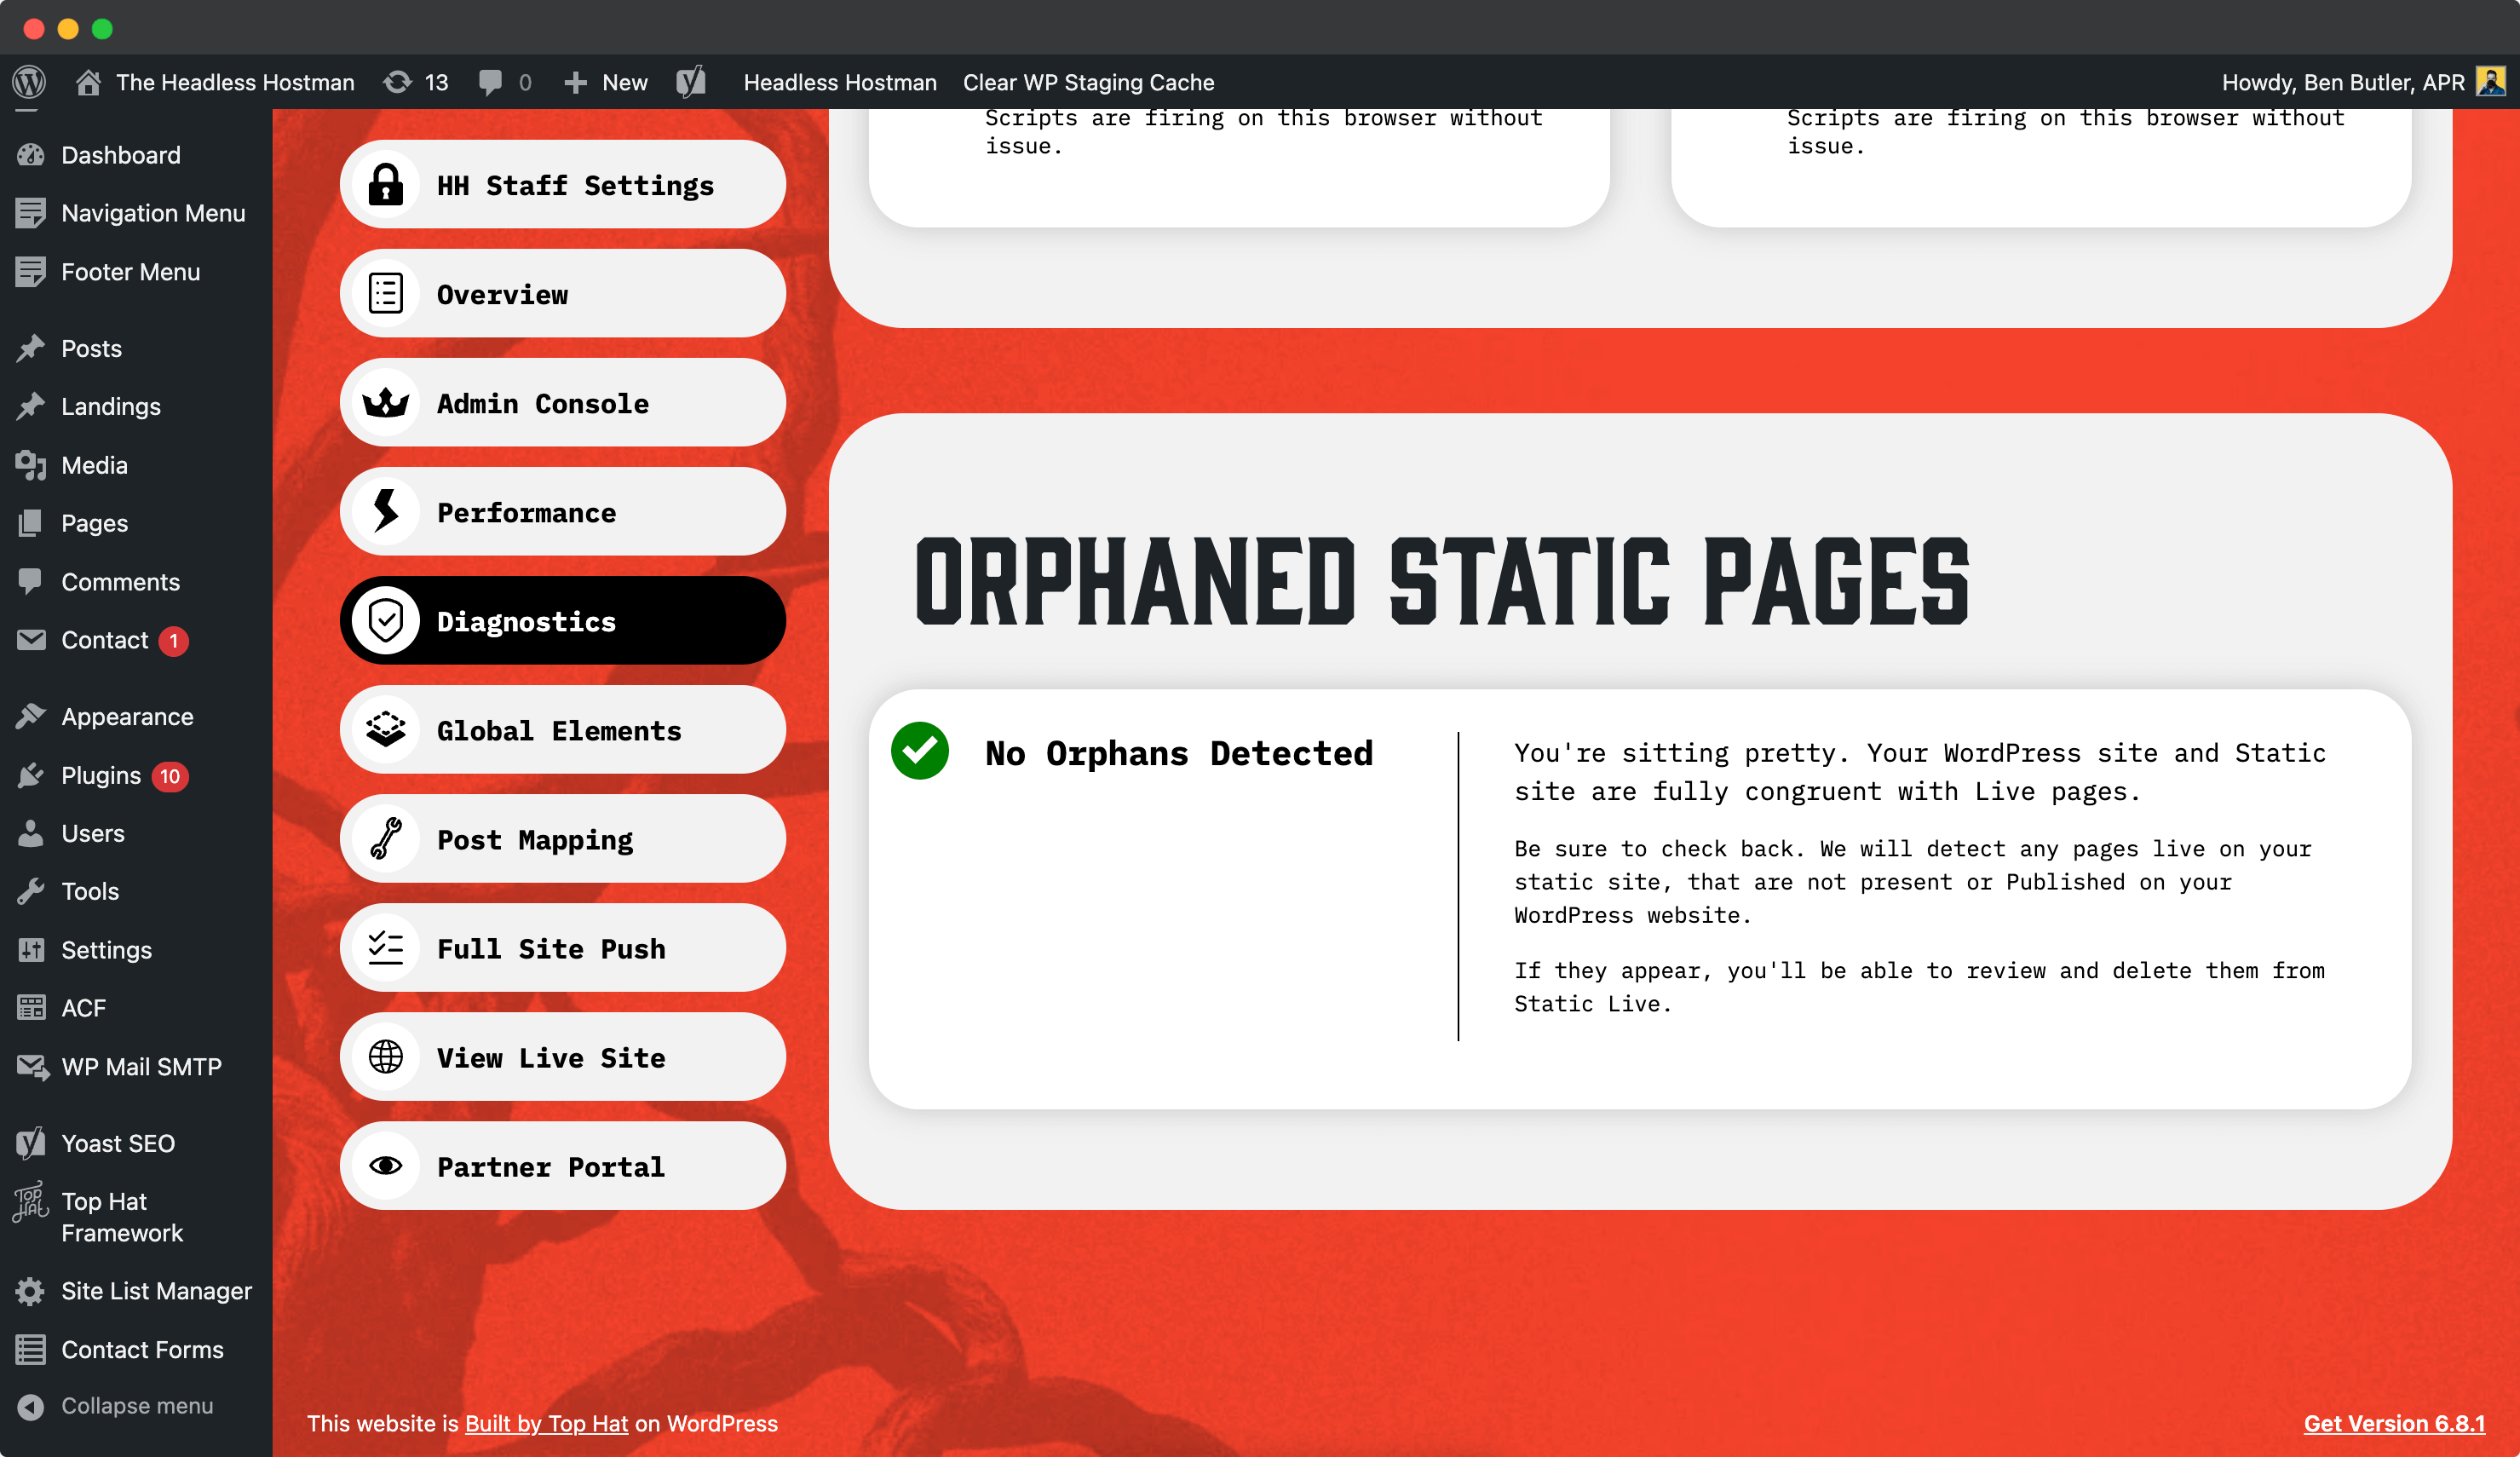
Static Orphan Page Detector
The Orphaned Static Pages Tool in Headless Hostman helps ensure your Static Live site matches your WordPress site exactly.
Normally, using Headless Hostman as intended, especially clicking “Delete from Headless” when removing or unpublishing content, should keep the two in sync.
However, in some edge cases, static pages may persist even after their WordPress counterparts are gone, creating “orphaned” pages. These can result from plugin behavior, CPT deactivation, failed content syncing, or content drafts that were never properly removed.
To see if this is the case, and to handle it, head to the Diagnostics tab from your WordPress site.
- Scroll to the end
- Evaluate the results
- Export to a CSV
- And/or mass delete these from the Static Live site
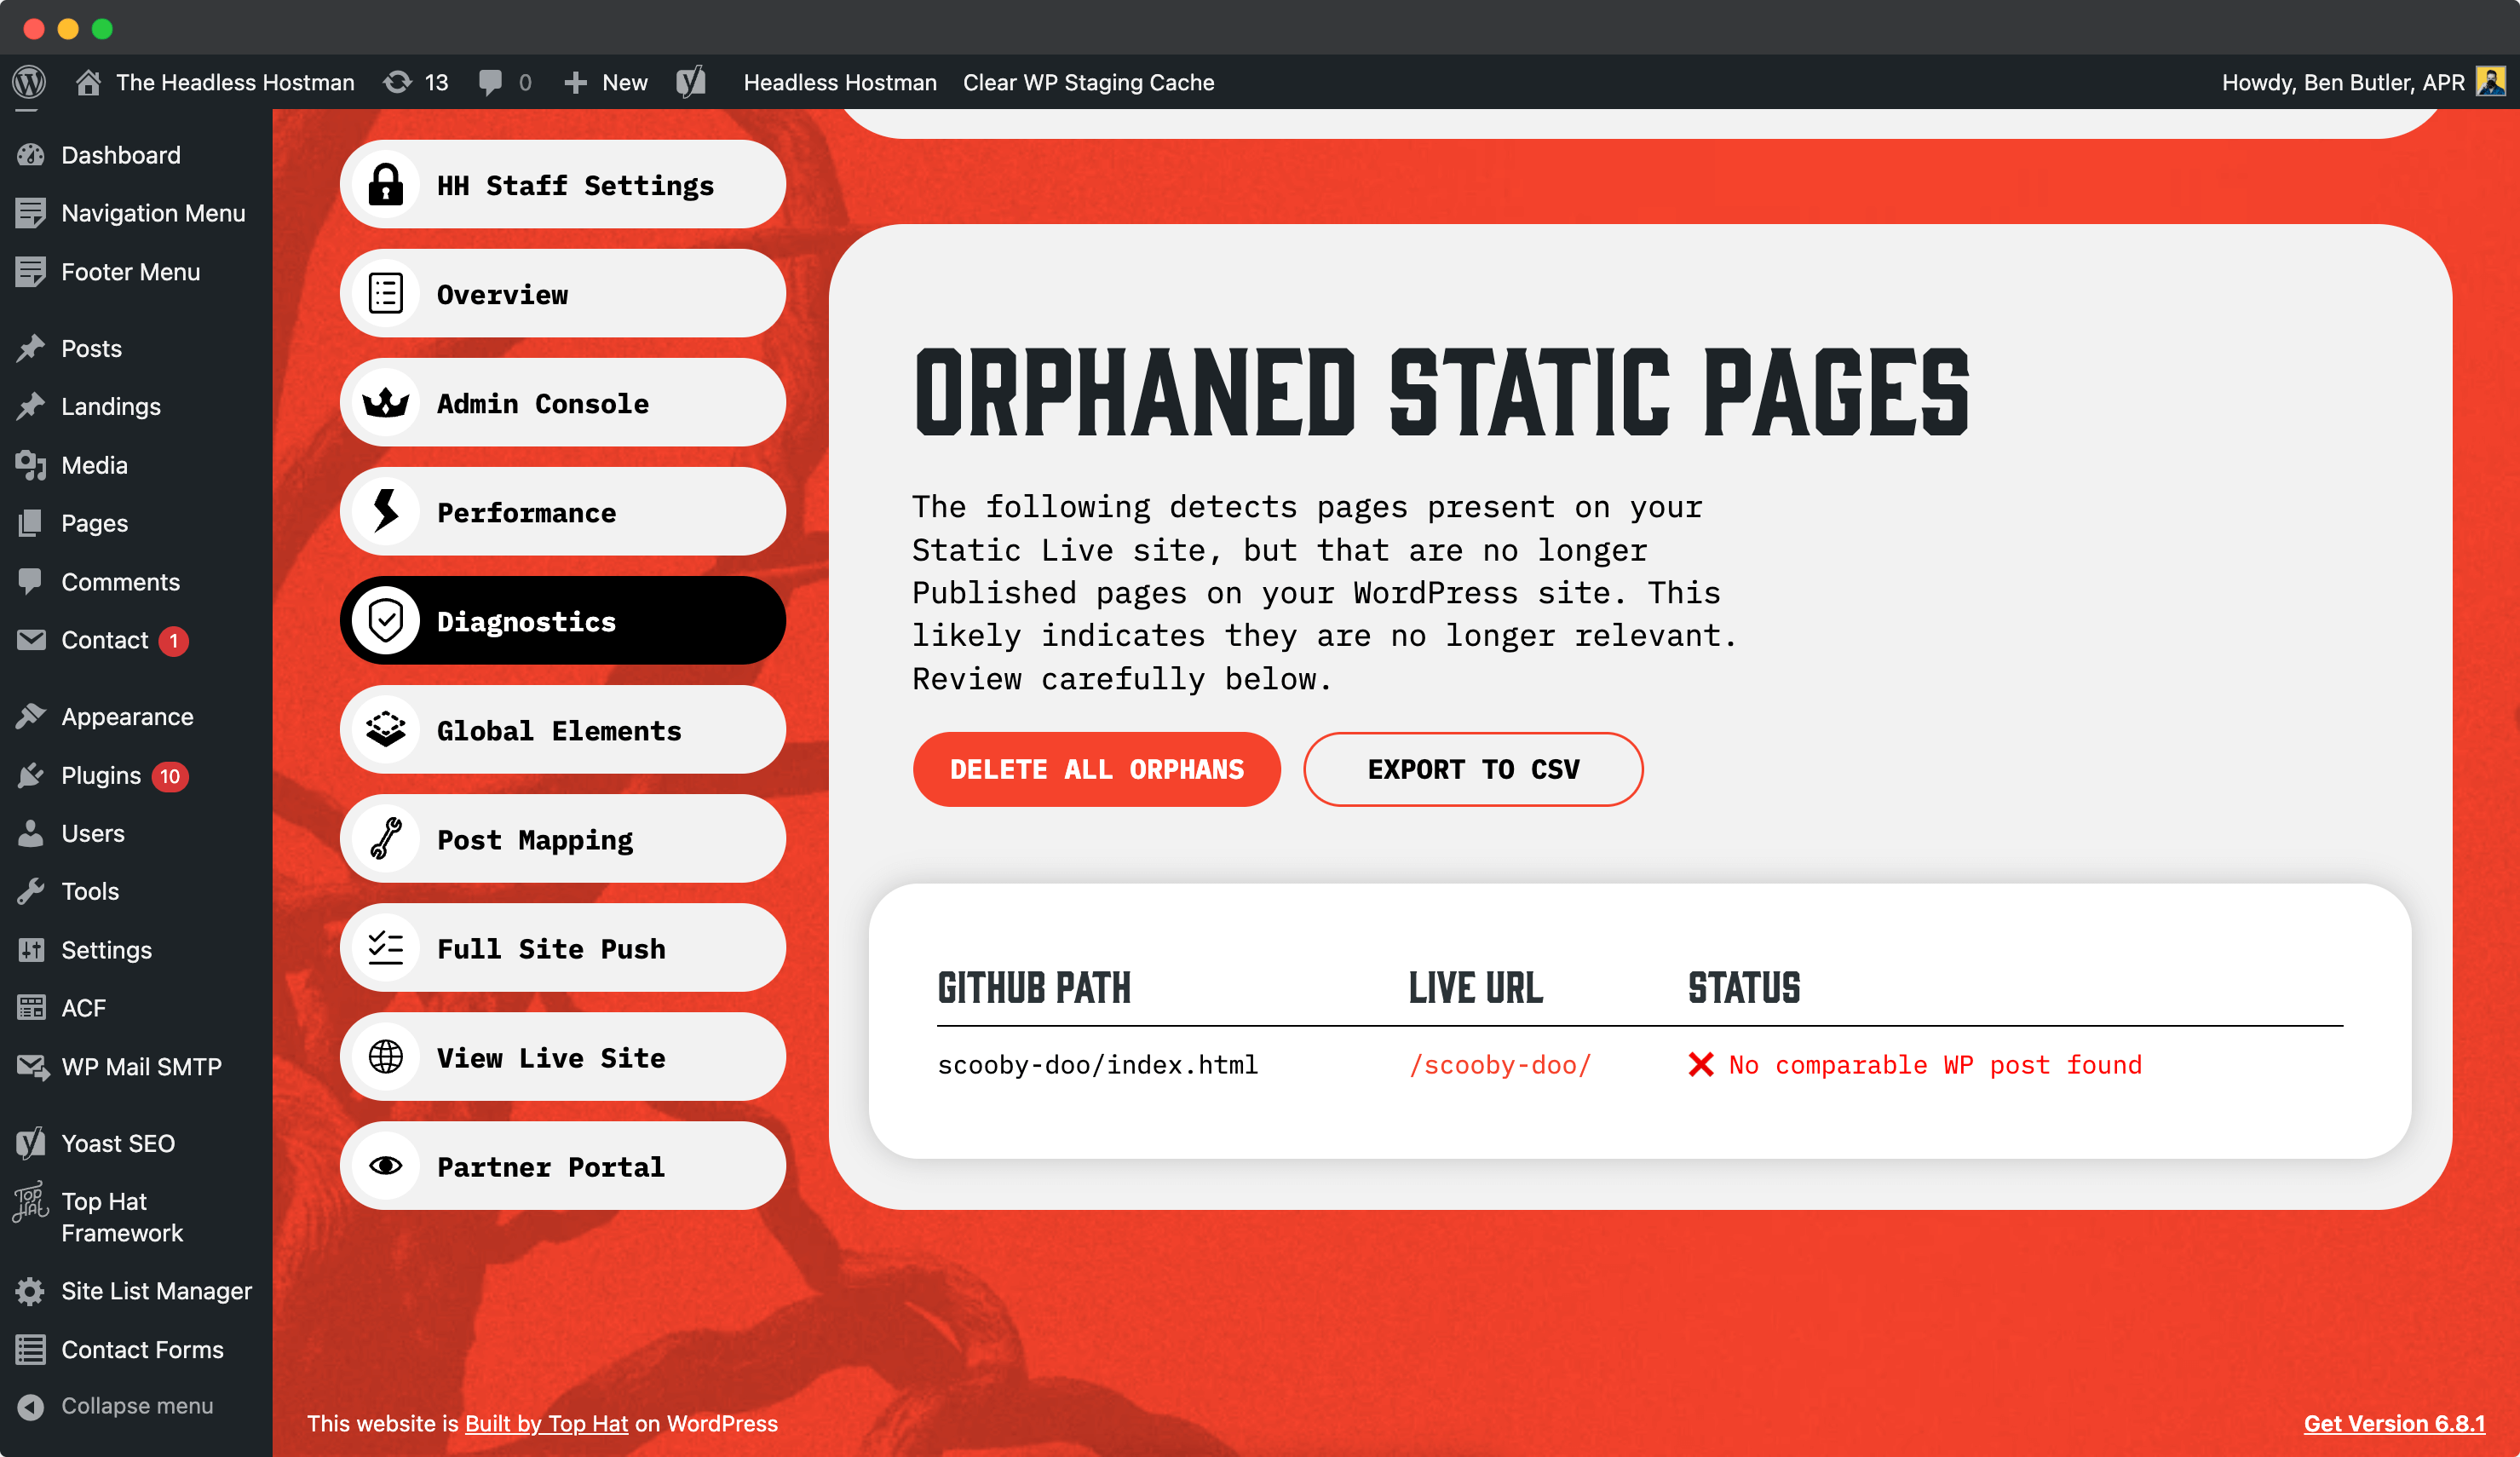
We automatically scan every 24 hours to find static pages that no longer have a published counterpart in WordPress.
If you’re clean, you’ll see this.
SEO Note
For any page you axe, you should have a 301 redirect in place.
If you have a bulk of Orphans consult your SEO team for guidance.
RSS Feed Auto-Rewriting
WordPress handles RSS feeds in the following way, typically:
- They appear at the /feed/ URL
- From that URL, they “nice render” the RSS feed
- When an actual syndication platform reads it, they serve an XML file
This format it not compatible with Static WordPress, so we:
- Automatically rewrite your RSS feed to /feed/rss.xml – across the entire site
- Push it to Static with every push (or on-demand, see above)
- Automatically set up a 301 redirect to redirect /feed/ to /feed/rss.xml
As a general rule, we also remove the feed/comments/ as it is a common vulnerability point.
301 Redirect Trailing Slash Enforcement
Cloudflare Static pages will always end in a trailing slash. To make sure 301 redirects are correct, if your “to” page does not end in a trailing slash we will add it for you.
- Ex: example.com/thing will be example.com/thing/
This prevents confusion.
However if you came from a site where everything ended in non-trailing slashes — ex: example.com/thing — our support team can turn off this enforcement.
In this case, you will need to insure everything you enter is correct for both your legacy non-trailing slash and new Static Site “mandatory” trailing slash.
Security Features
Freeze Your WordPress Website
Not super active in your WordPress site? You can shut it off.
Here’s How:
- Head to the Cult Portal
- Navigate to the Site you want to shut down
- Click “Freeze It” under “WordPress Carbonite”
- Done
It will be complete inaccessible, but your Static Site will be alive and well.
Two-Step WordPress Authorization
Our most-popular security feature is two-step Auth.
This requires anyone logging into WordPress to log into the Cult Portal first, and click “Access Site.”
Everyone else? They get the red screen of death.
Here’s How:
- Head to the Cult Portal
- Navigate to the Site you want to lock down
- Click “Require” under “Two-Step WordPress Login”
- Done
IP Login Restriction for WordPress
Within the Admin Console, you can enter a range of IP addresses — one per line — to restrict access to the WordPress site.
This is for advanced users who know what they’re doing. You should only use this if you or your organization uses a Dedication IP address for a Proxy or VPN.
Once this is toggled on, the two-step auth (mentioned above) is automatically disabled as they are conflicting in principal.
Cult Portal Google Single Sign On
Upon request, we can restrict your company’s Cult Portal access to Google Single Sign on.
A few credentials are required to do so.
Custom SSO or Other Security Features
We are developers, so if there is another solution you’d like to implement for SSO at the Cult Portal level feel free to reach out, and we can quote it out.
Adaptive Edge Protection™
Static WordPress is inherently more secure and DDoS-resistant, but we go further with Adaptive Edge Protection™ on our Cloudflare-backed infrastructure.
Key Benefits:
- Real-time threat detection based on traffic patterns
- Behavior-driven filtering for bots and scrapers
- Country-based access controls
- Automatic risk scoring and blocking
Fast & Invisible
Security happens at the edge, so your site stays fast. Legitimate users never see a slowdown, while bad actors are blocked instantly.
Always Evolving
Our system continuously adapts to emerging threats using live traffic data — so your protection keeps getting smarter over time.
WordPress Search Page Title Hijack Prevention
The WordPress default search page has one downfall: whatever you search appears in the Page Title.
This is not a hack, and isn’t usually that harmful.
However, it can skew your Google Analytics results and potentially lead to toxic backlinks.
So, we overwrite it default on our platform to just read: “Search Results | Site Name” in the Open Graph data, SEO page title, and page title.
Automatic Backups Every 24 Hours
We take automatic backups every 24 hours.
You can access these in the Cult Portal.
You can also take, restore, or download backups on demand.
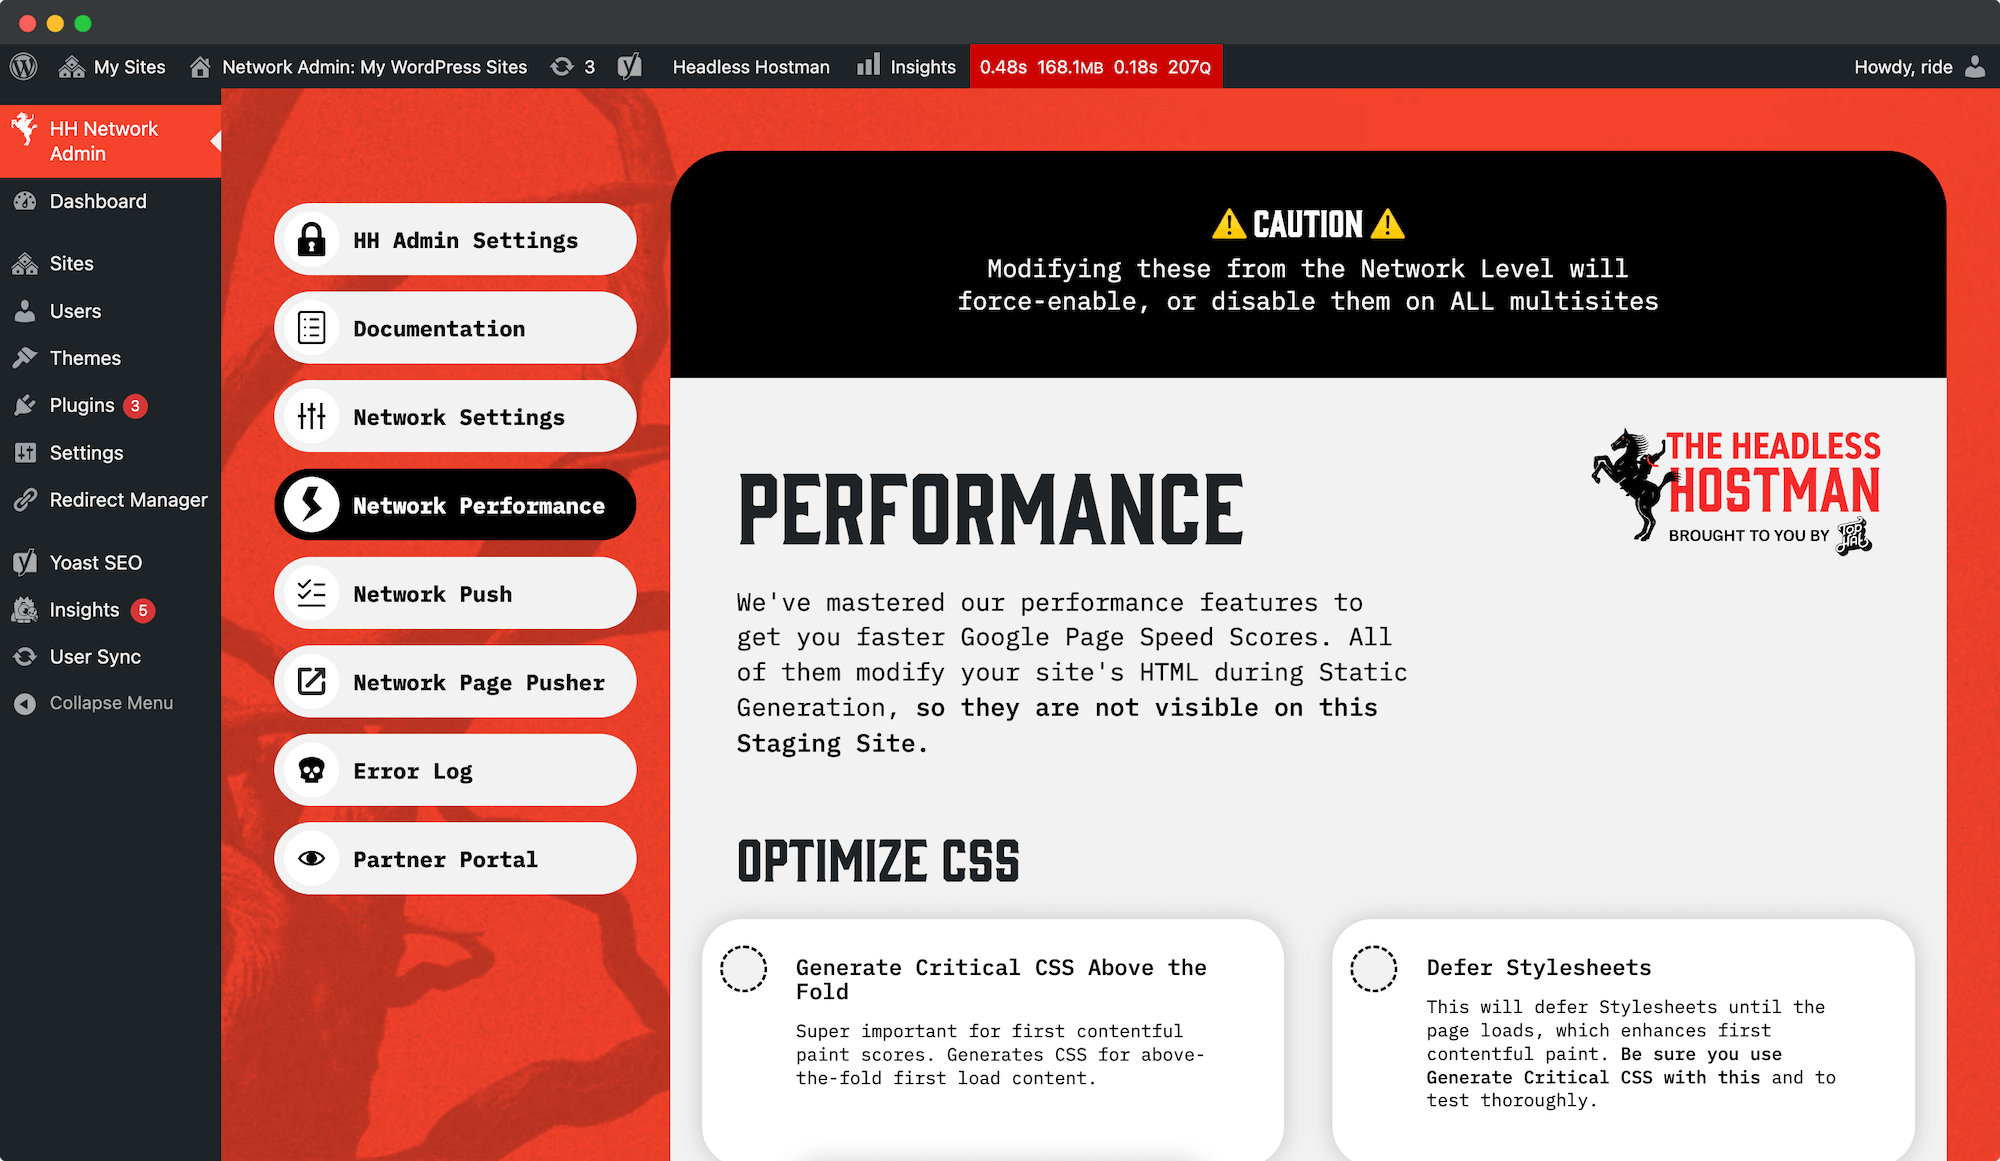
Performance Package
Built to Make Static WordPress Even Faster — without Reliance on Plugins
Headless Hostman includes a custom performance pack built specifically for static publishing.
Popular caching plugins like WP Rocket or Perfmatters don’t work efficiently here, because they cache pages dynamically and rebuild every time they’re cleared. Because of that, the changes are often delayed or harder to detect by our Static Conversion mechanism.
Instead, our performance features — like critical CSS, style deferring, Gutenberg cleanup, and lazy loading — are applied automatically when you push your site to static.
These have no effect on your staging environment and don’t interfere with previewing changes.
Optimize CSS
Generate Critical CSS
This captures the CSS needed to render the above-the-fold content on each page and places it at the top of the document.It improves First Contentful Paint by allowing the browser to render visible content immediately, without waiting to load all external stylesheets.
Be aware, your Theme or Site Builder might already do this. It’s not a good idea to stack them.
Defer Stylesheets
After the above-the-fold content is rendered, deferred stylesheets load the rest of your styles in the background.
You must combine this with Generate Critical CSS to prevent layout shifts.
Gutenberg Removal
Even on custom themes, the Gutenberg block editor may still load.
If you’re not using it, remove it here to improve speed and reduce clutter.
Optimize Image Loading
Lazy Load Images
Lazy loading delays loading of images that appear below the fold until they are about to come into view.
You can choose between default, faster, and fastest preload thresholds to control when images load during scroll.
- Please be aware, if your Theme builder is using this by default do not turn this on as it will cause issues.
Auto Preload Images Above the Fold
This ensures that above-the-fold content is always loaded instantly by automatically reading what’s appearing and embedding them in the header as preload links.
It bypasses lazy loading for these assets during static conversion and forces them to preload.
This improves FCP and other core vitals.
Experimental Features: Background Images
Background images cannot be preloaded. Anything above-the-fold should be an IMG tag object.
However, two experimental features can help:
- Load Above Fold Background Images on First Interaction
- Convert Above Fold Background Images to IMG Elements
These are experimental and should be tested before use.
Add Image Dimensions
Automatically adds width and height attributes to all image tags.
This prevents layout shift and improves visual stability on load.
Optimize Scripts and HTML
Defer Scripts Until First Interaction
Prevent render-blocking by deferring JavaScript execution until the user interacts with the page. This includes scrolling, touching, clicking, or moving the mouse. Scripts will then load and execute in the background.
A must-have if you want instant speed score boosting.
Lazy Load Iframes
Iframes (e.g., embedded videos or forms) are slow.
Lazy load them unless they appear above the fold. Options include fast, faster, and default load thresholds.
Defer Below-the-Fold Content
This uses visibility: hidden to deprioritize content below the fold.
It doesn’t dramatically improve PageSpeed scores but may help actual browser performance.
Minify HTML
Minified HTML reduces page size and theoretically improves parsing speed.
Not always impactful, but it’s available.
Cache Pages at the Edge via Cloudflare's CDN
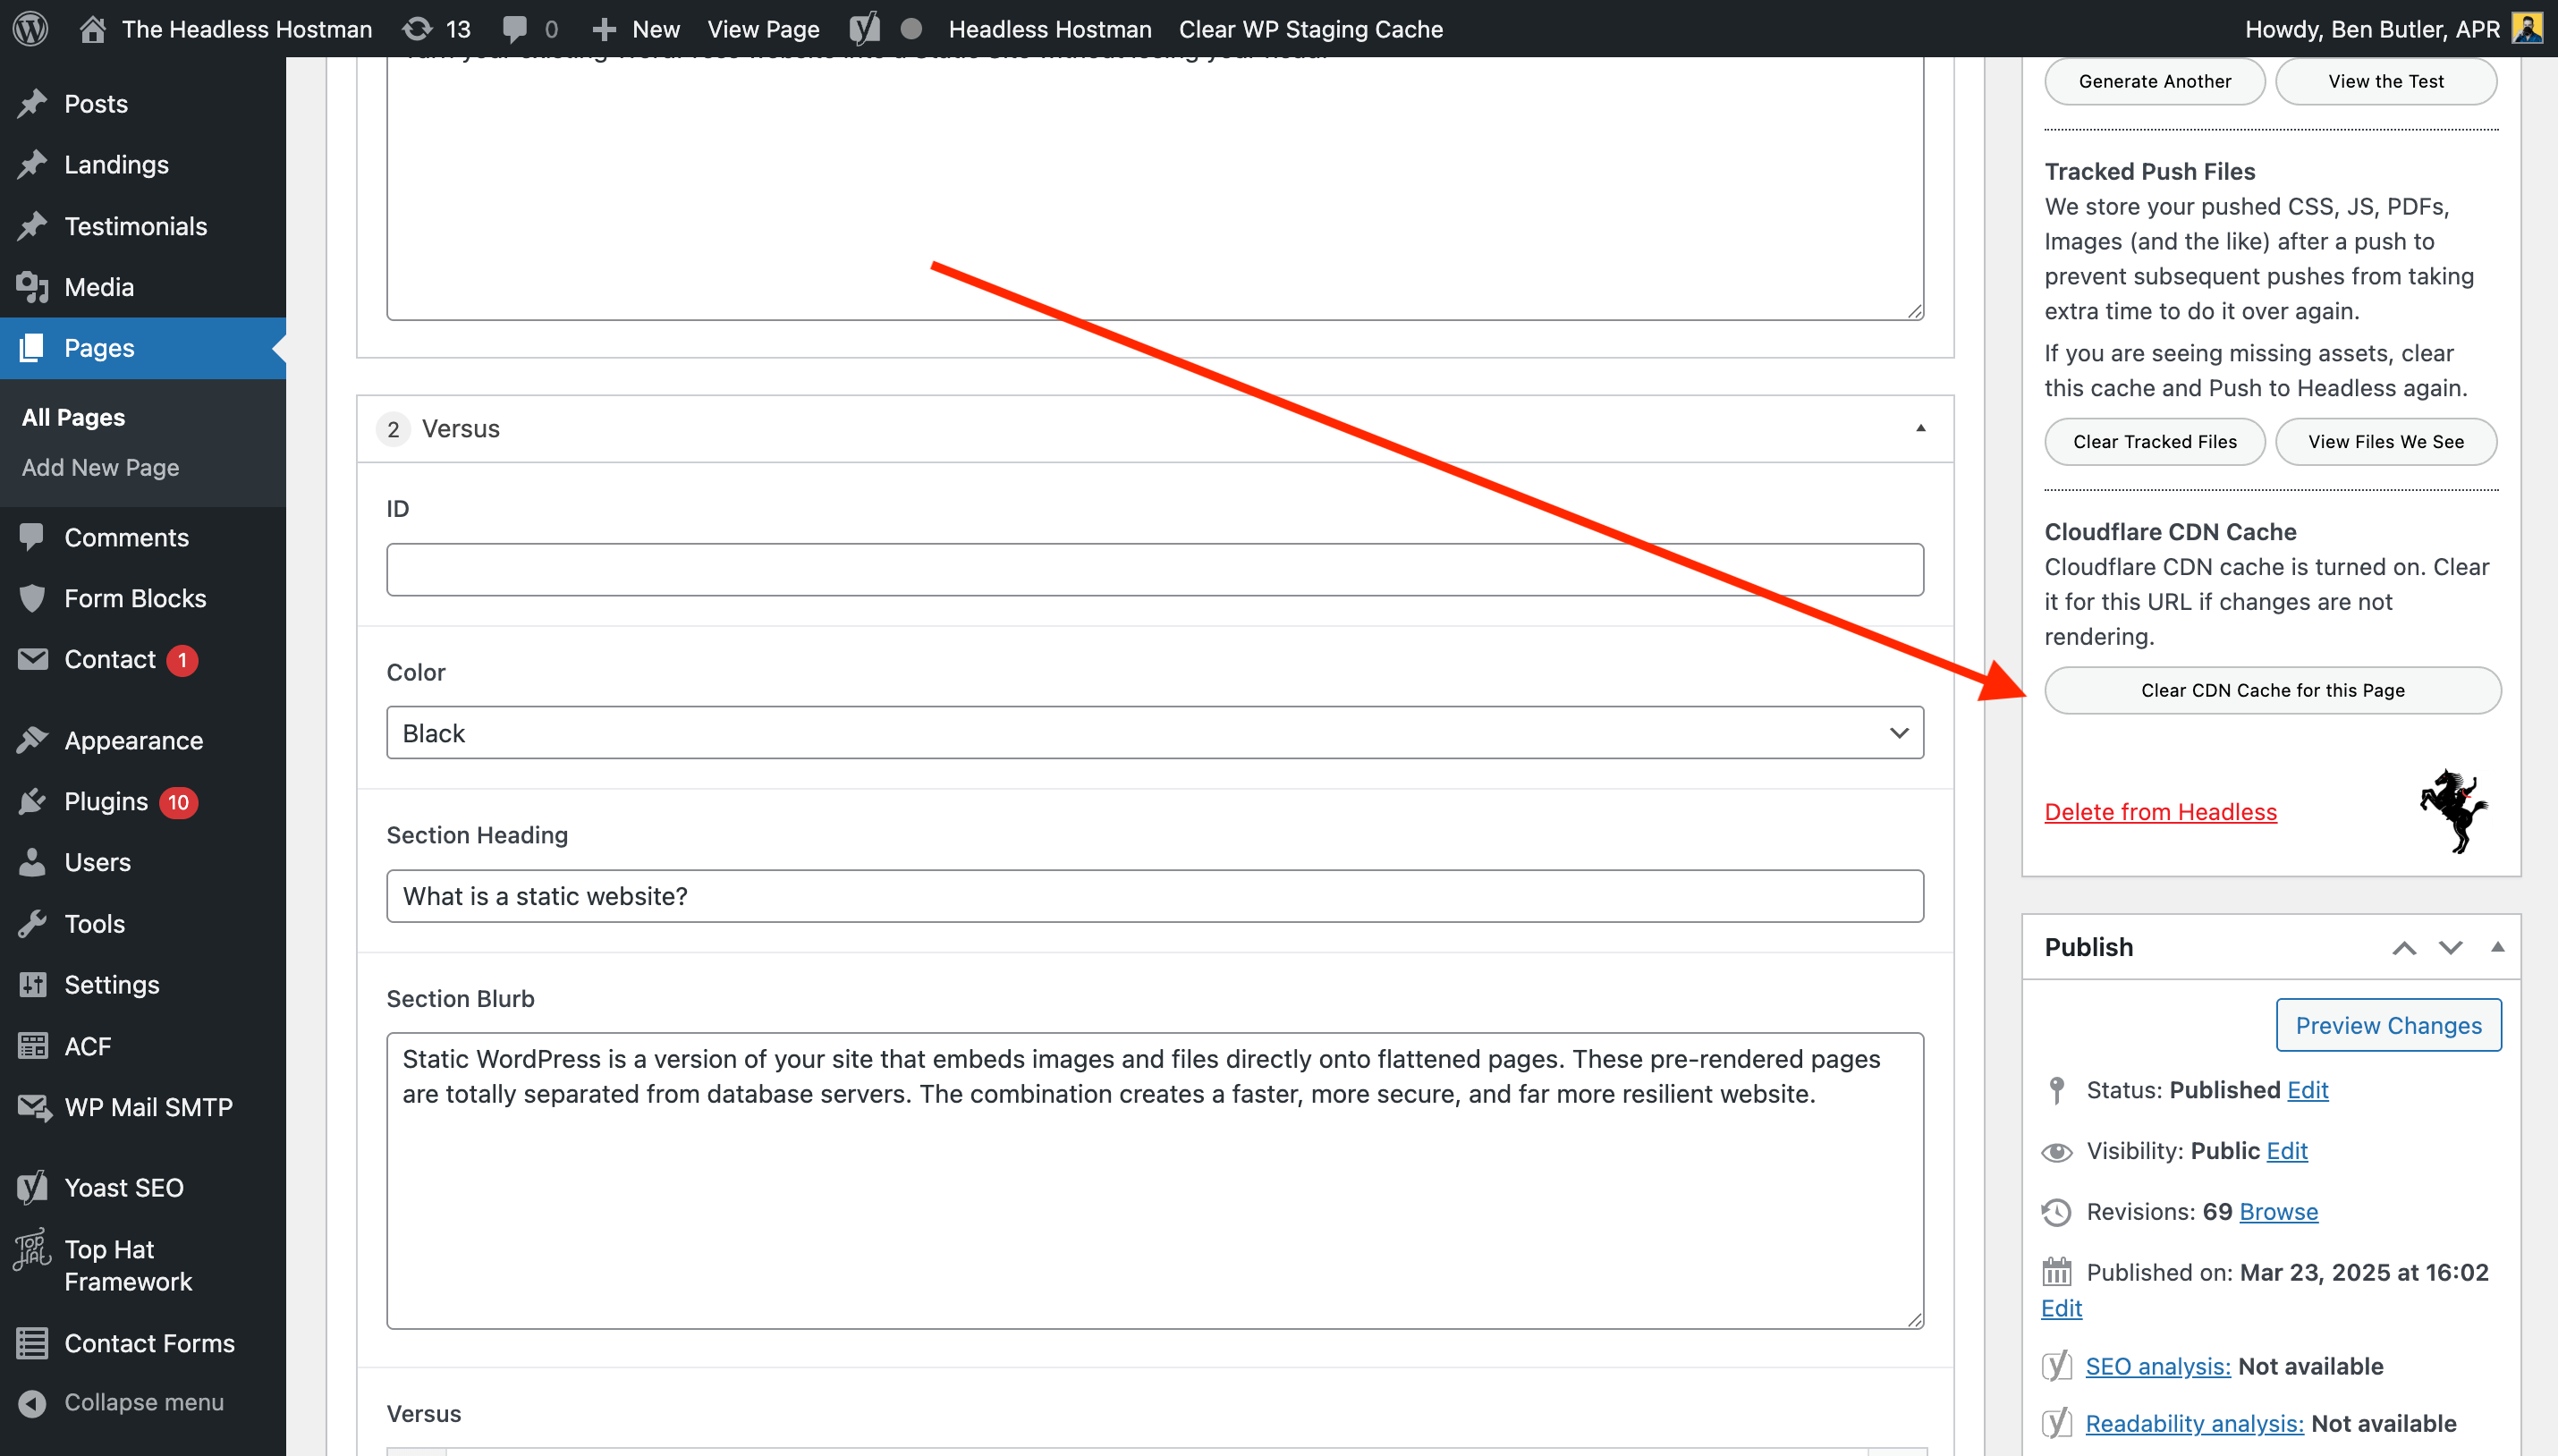
Wrench your TTFB and speed performance even faster by enabling Cloudflare CDN caching.
This caches your static HTML pages on the Cloudflare across 330 CDN locations worldwide.
To Enable
Head to the Performance area, scroll to the second section, and click the box.
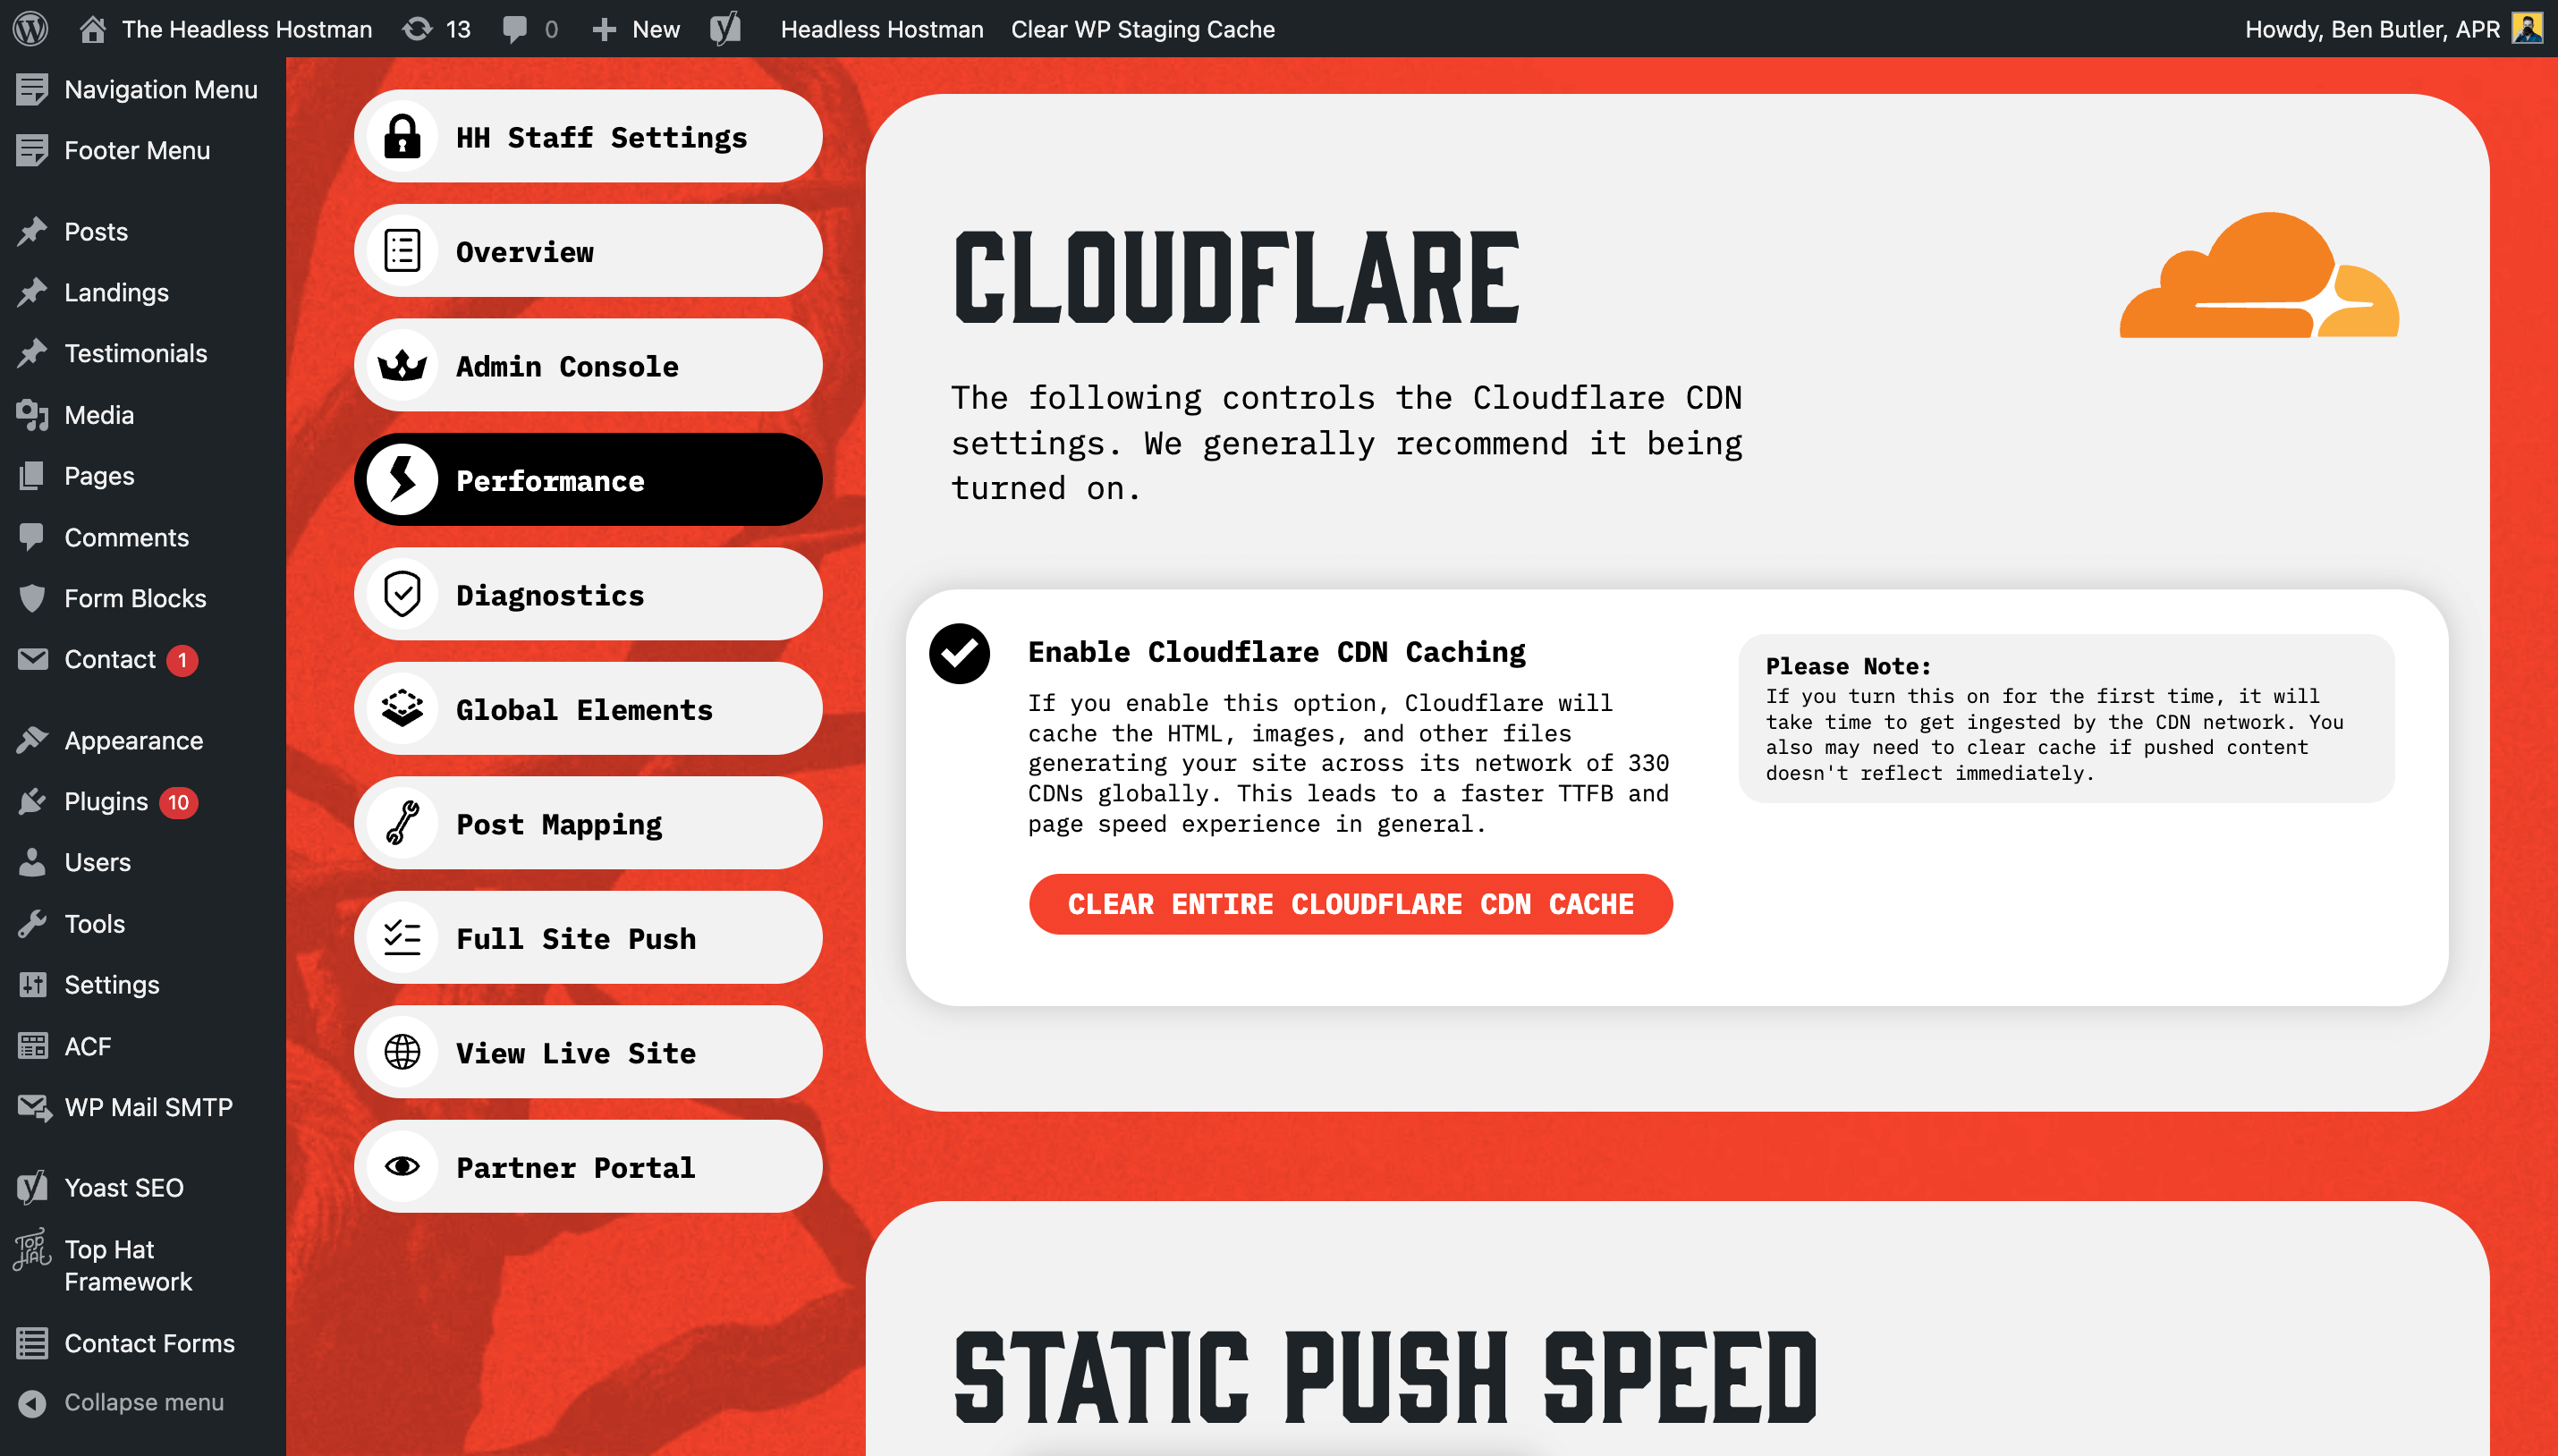
To turn off, just unclick the box.
Once This is On, You May Need to Clear Cache
To do so, just head back to Performance to nuke the entire site’s live CDN cache.

Or, Our Recommendation, Head into the Page(s) Individually and Clear There
This prevents the entire site’s cache from going bunk, and only clears the individual page that has updated content.
Troubleshooting Scripts and Stylesheets
Troubleshooting: Stylesheets
If things break when using “Defer Stylesheets,” you can and should exclude mission-critical stylesheets.
Just paste the relative URL into the exclusion field.
Troubleshooting: Scripts
Use our smart exclusion library for scripts that shouldn’t be deferred. It’s been compiled from common issues across hundreds of sites. If needed, enable this to automatically exclude known problematic scripts.
Use the Test Tool
Our built-in test tool lets you render any page as static without pushing it live.
Use this to experiment with performance settings safely and preview the results before deployment.
What Do I with WP Rocket, Perfmatters, etc?
You can certainly try them, but trust us when we say they’re cache-Plugins first, and performance Plugins second.
Our best recommendation is to use our tools, which optimize the pages during Static Conversion.
Developer Functions
Programmatic Single Page Push
Building a custom function and want to call the Hostman to push a page?
Use the following function. It will also call to update mapped pages, too.
headless_hostman_push_single_page($postid)
Please Note
This is not intended to be fired rapidly. By doing so you will cause a development pipeline hold up.
If you need to push more than a small handful of posts, use the push by Array of IDs
Programmatic Deletion of Single Page or Push
Building a custom function and want to call the Hostman to delete a page?
Use the following function. It will also update mapped pages, too.
headless_hostman_delete_single_page($postid)
Programmatic Full Push by Post Type
Building a custom function and want to call the Hostman to push an entire post type?
Use the following function. Please note, post_type must be in the lowercase version — like you would use for a WP Query (ex: page, post). It only accepts one at a time.
This function is set to not conflict with existing Full Pushes. If one is going on when this function is called, it will try again in 5 minutes.
While running, you cannot initiate another full push unless you go to the Full Push page and cancel. You can also view progress there, if you wish.
headless_hostman_full_push_by_type($post_type)
Programmatic Push by Array of IDs
Building a custom function and want to call the Hostman to push an array of Post/Page IDs?
Use the following function. Please note, the array must properly formatted, ex: array(1, 2);.
This function is set to not conflict with existing Full Pushes.
headless_hostman_push_array($array)
Request a Custom Function
We are developers, and regularly collaborate with our customers’ development departments to create custom solutions.
If you need one, please reach out to discuss. We’ve provided bespoke solutions for dozens our or customers.
Cloudflare DNS
If You Already Have Cloudflare DNS
Great! You’re one step ahead.
Per our DNS and Launch steps, this enables you to use Apex records for the Static Live site.
To launch
You need to delegate us an access point. It’s a requirement of Cloudflare and is not able to be circumvented.
The exact delegation type is:
- Resource: Domain > Permissions >> Domain Administrator
It Looks Like This

Be sure to hit save/update before exiting.
If You Use Our Cloudflare DNS Integration Set Up
See our DNS launch steps for this above.
In short, you simply change your nameservers we handle the rest.
Important Notes
- This is a free service
- Keep your current DNS provider on auto-renew. Cloudflare acts as a proxy layer on top
- After this is completed ALL DNS changes must occur in Cloudflare (we’ll get you access)
What DNS Records Do I Keep?
In either case, we will set up you up an A Record and a WWW Record during launch.
Whatever you see entered there, please keep it.
If Your A Record Serves as the Public Site
You will see a CNAME of the Apex domain (non-www) pointing at a pages.dev target. This is called a Flattened A Record CNAME.
If Your WWW CNAME “Points Somewhere Else”
Don’t worry about it. We use Cloudflare Page Rules to auto-redirect all www request to the non-www.
Because the www record will be proxied (indicated by the orange cloud), it doesn’t matter where it points as long as it points somewhere.
Cloudflare will intercept requests, avoiding the target endpoint, and will redirect per the Page Rule.
Other Benefits of Cloudflare DNS
Cloudflare DNS + Static Cloudflare for your public site is the ideal situation.
Although our Adaptive Edge Protection can offer many of the mitigation techniques by Cloudflare DNS, Cloudflare DNS on top of it gives us more functionality to access.
Cloudflare DNS also offers:
- Advanced caching and tiered cache buckets
- Advanced Web Application Firewalls
- Bot deterrence
- AI learning blocking
There are also plenty of paid add-ons to make things even better, even faster, and even stronger.
When You Don't Need Cloudflare DNS
Check out our DNS launch notes above. But the long story short is:
- When you use a www subdomain as your live site (ex: www.example.com)
- When you use a CNAME subdomain as your live site (ex: dash.example.com)
In those scenarios, we don’t need to set up Cloudflare DNS.
AWS Integration
How Static WordPress for AWS Works
Instead of deploying Static files to our native Cloudflare Static live infrastructure, our AWS integration deploys to an AWS S3 Static Site Bucket on your own AWS account.
It’s a premium add-on with a few extra onboarding steps that cannot be automated, and is available for Enterprise-level packages.
Functions That Don't Work on AWS
As opposed to our native Cloudflare network, the following do not work on the AWS integration:
- AJAX and WP-JSON routing
- Self-serve DNS launch services
- Static deployment rollback
- WordPress search routing
- Global navigation, footer, and scripts
All of our other features have an integration built for AWS.
Blog/Page Pagination Limitations
Our Cloudflare network dynamically paginates in real-time.
On AWS, our Static Conversion tool scans your pages for pagination and pushes those to Static.
If an index number isn’t present on the page, we are unable to see and push it.
301 Redirect Routing through Lambda Functions
If you use Yoast SEO, RankMath, or Redirection, our 301 Redirection integration works here — although it is treated a bit differently.
We build a singular .json file, which is read by a Lambda function. This function must be added at the Cloudfront Distribution level.
It’s smart enough to fix AWS’ famous trailing slash read error as well.
Disclaimer: Cloudfront Cache
Cloudfront Cache is far and beyond the most persistent cache in the web ecosystem today.
If you are pushing changes, and not seeing them, follow these steps:
- Make sure you waited at least 5-10 minutes
- Go into the Cloudfront Distribution and invalidate the cache
- Try an Incognito window
If you’d like, there is a feature to enable a Cloudfront Distribution cache clear button within the Headless Hostman tools inside WordPress.
Multisite Integration
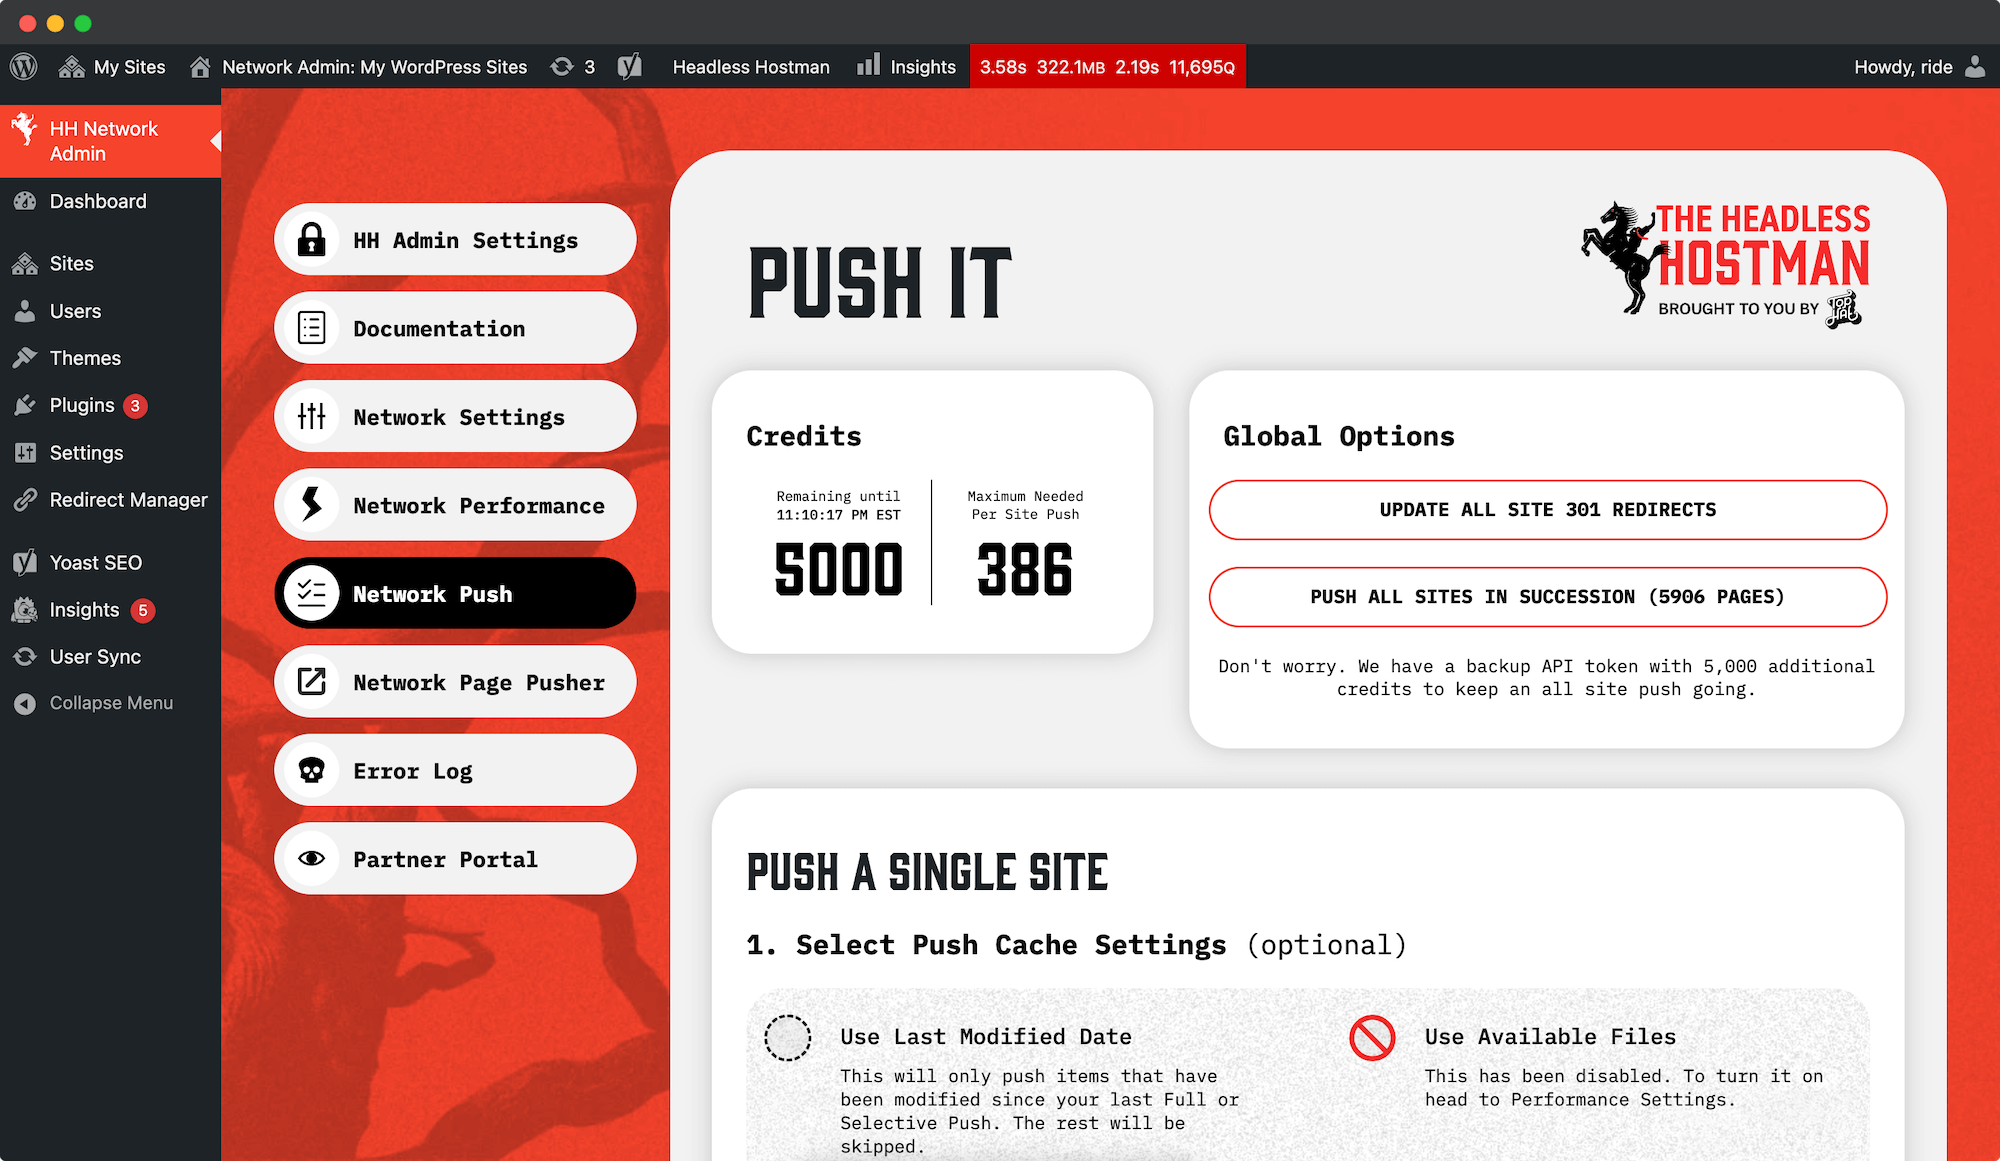
Push All Multisites in Succession
From the Network Admin you can initiate a successive push across all sites in your network.
This might take some time depending on the size and number of multisites.
To do so:
- Head to the Network Admin
- Navigate to Headless Hostman
- And then Network Push > Push All Sites in Succession
Push All Subsite Redirects at Once
From the Network Admin you can push all 301 Redirects from across all sites at once.
To do so:
- Head to the Network Admin
- Navigate to Headless Hostman
- And then Network Push > Push 301s
Network-toggle Performance Settings
You can change the default checked Performance Settings across all sites.
To do so:
- Head to the Network Admin
- Navigate to Headless Hostman
- And then Network Performance
- Make your selections
- All sites use these now
These can be overridden at any time from each subsite.
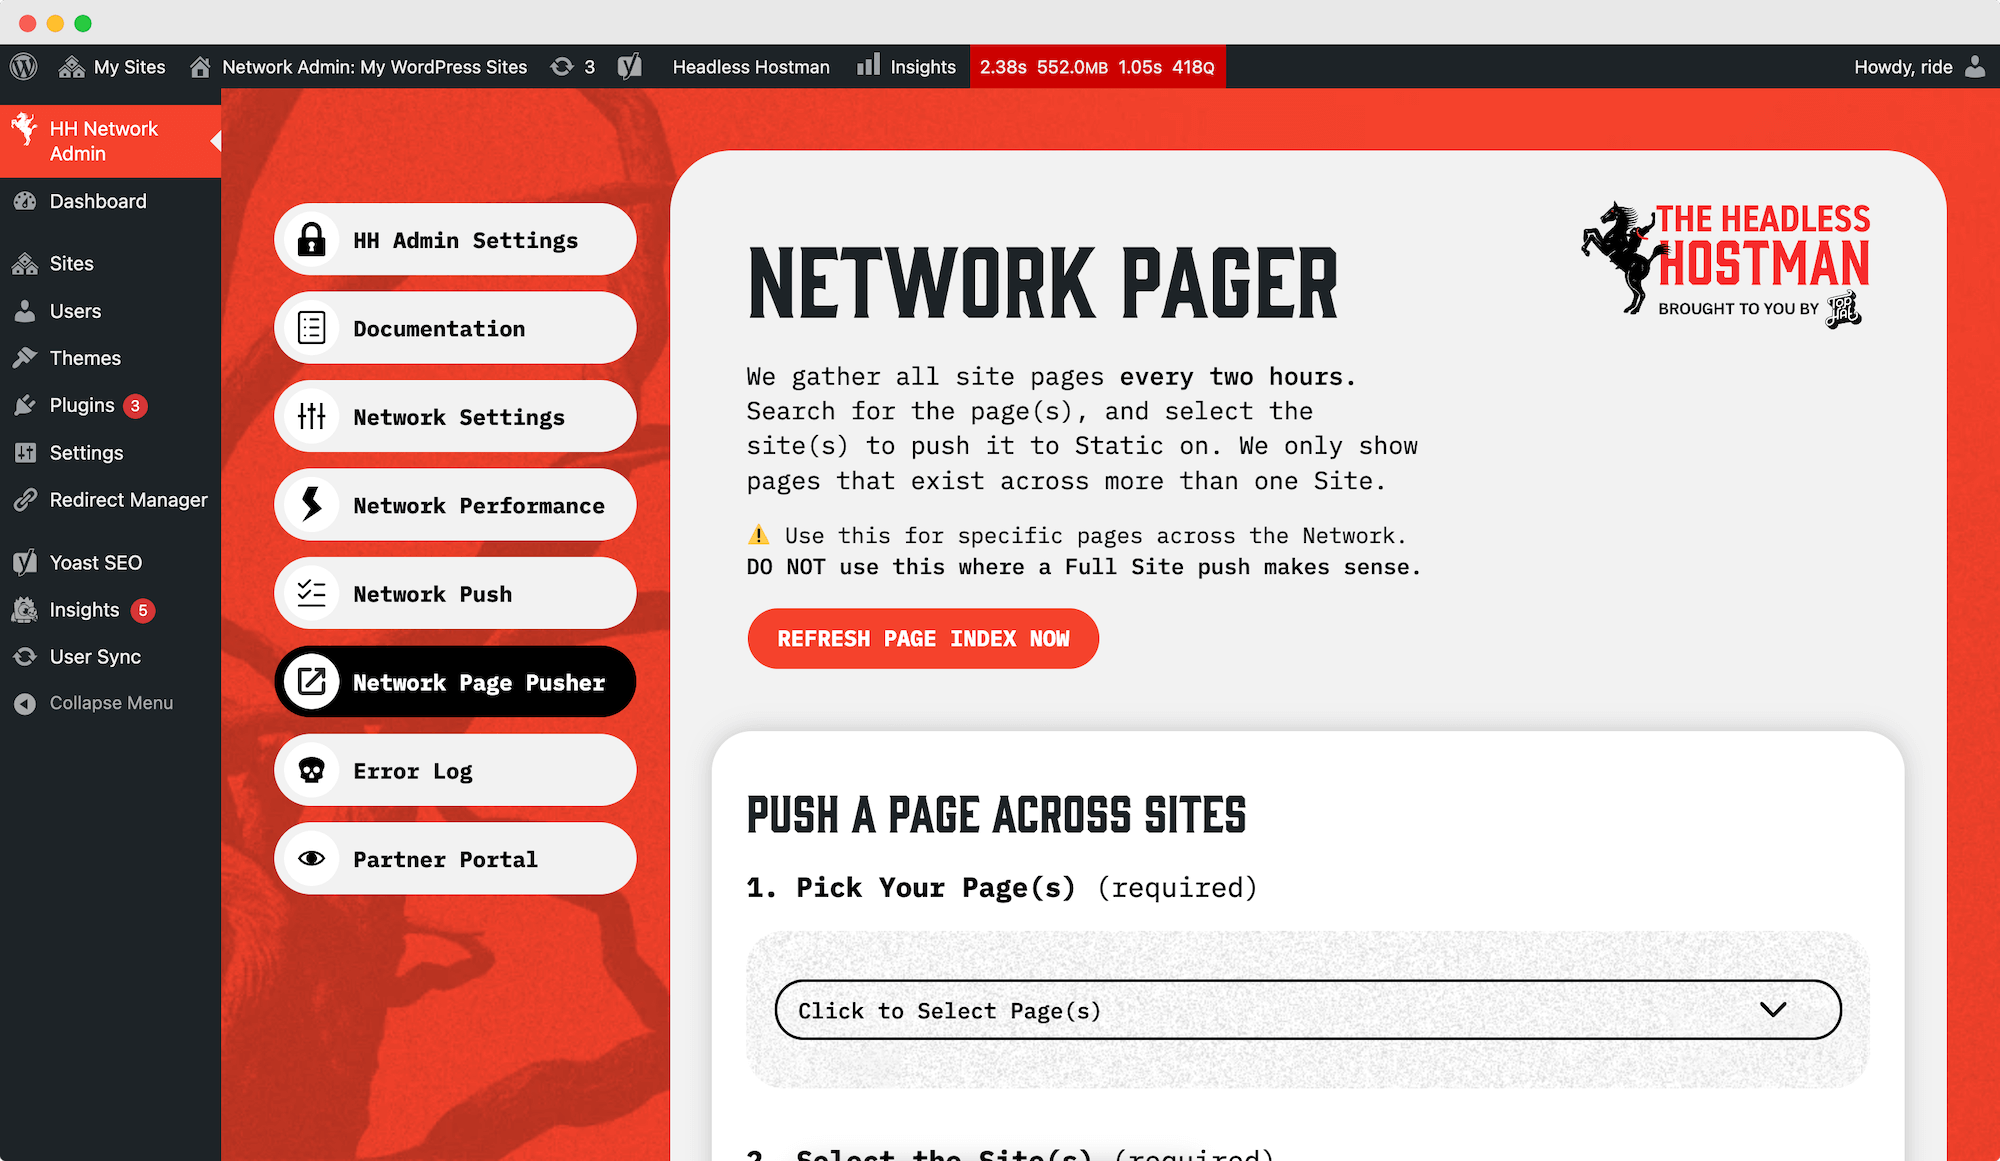
Push All Pages Across the Network by Page Name
If you’re using Multisite as a staging, duplication, and management area for businesses with the same pages, you can pick page(s) and which sites to update only those page(s).
To do so:
- Head to the Network Admin
- Navigate to Headless Hostman
- And then Network Pager
- Make your selections
- All pages across all selected subsites will be update
And the Rest of Normal Headless Hostman Features Work within Each Subsite
Beyond the Network Admin specialized menu options, all subsites use Headless Hostman like any normal single site per the docs covered here.
Common Troubleshooting
[Insert thing here] Doesn't Work on the Static Site. What Do I Do?
The first thing to check: does it work on your Staging WordPress site?
Whatever it is — a missing image, file, broken script, load delay — if it’s not working on your Staging WordPress website it’s not going to work on your Static Site. Our tool takes what you have, as it is.
For troubleshooting your Staging WordPress website, use inspect element and the Network tab to see if anything is pulling an error.
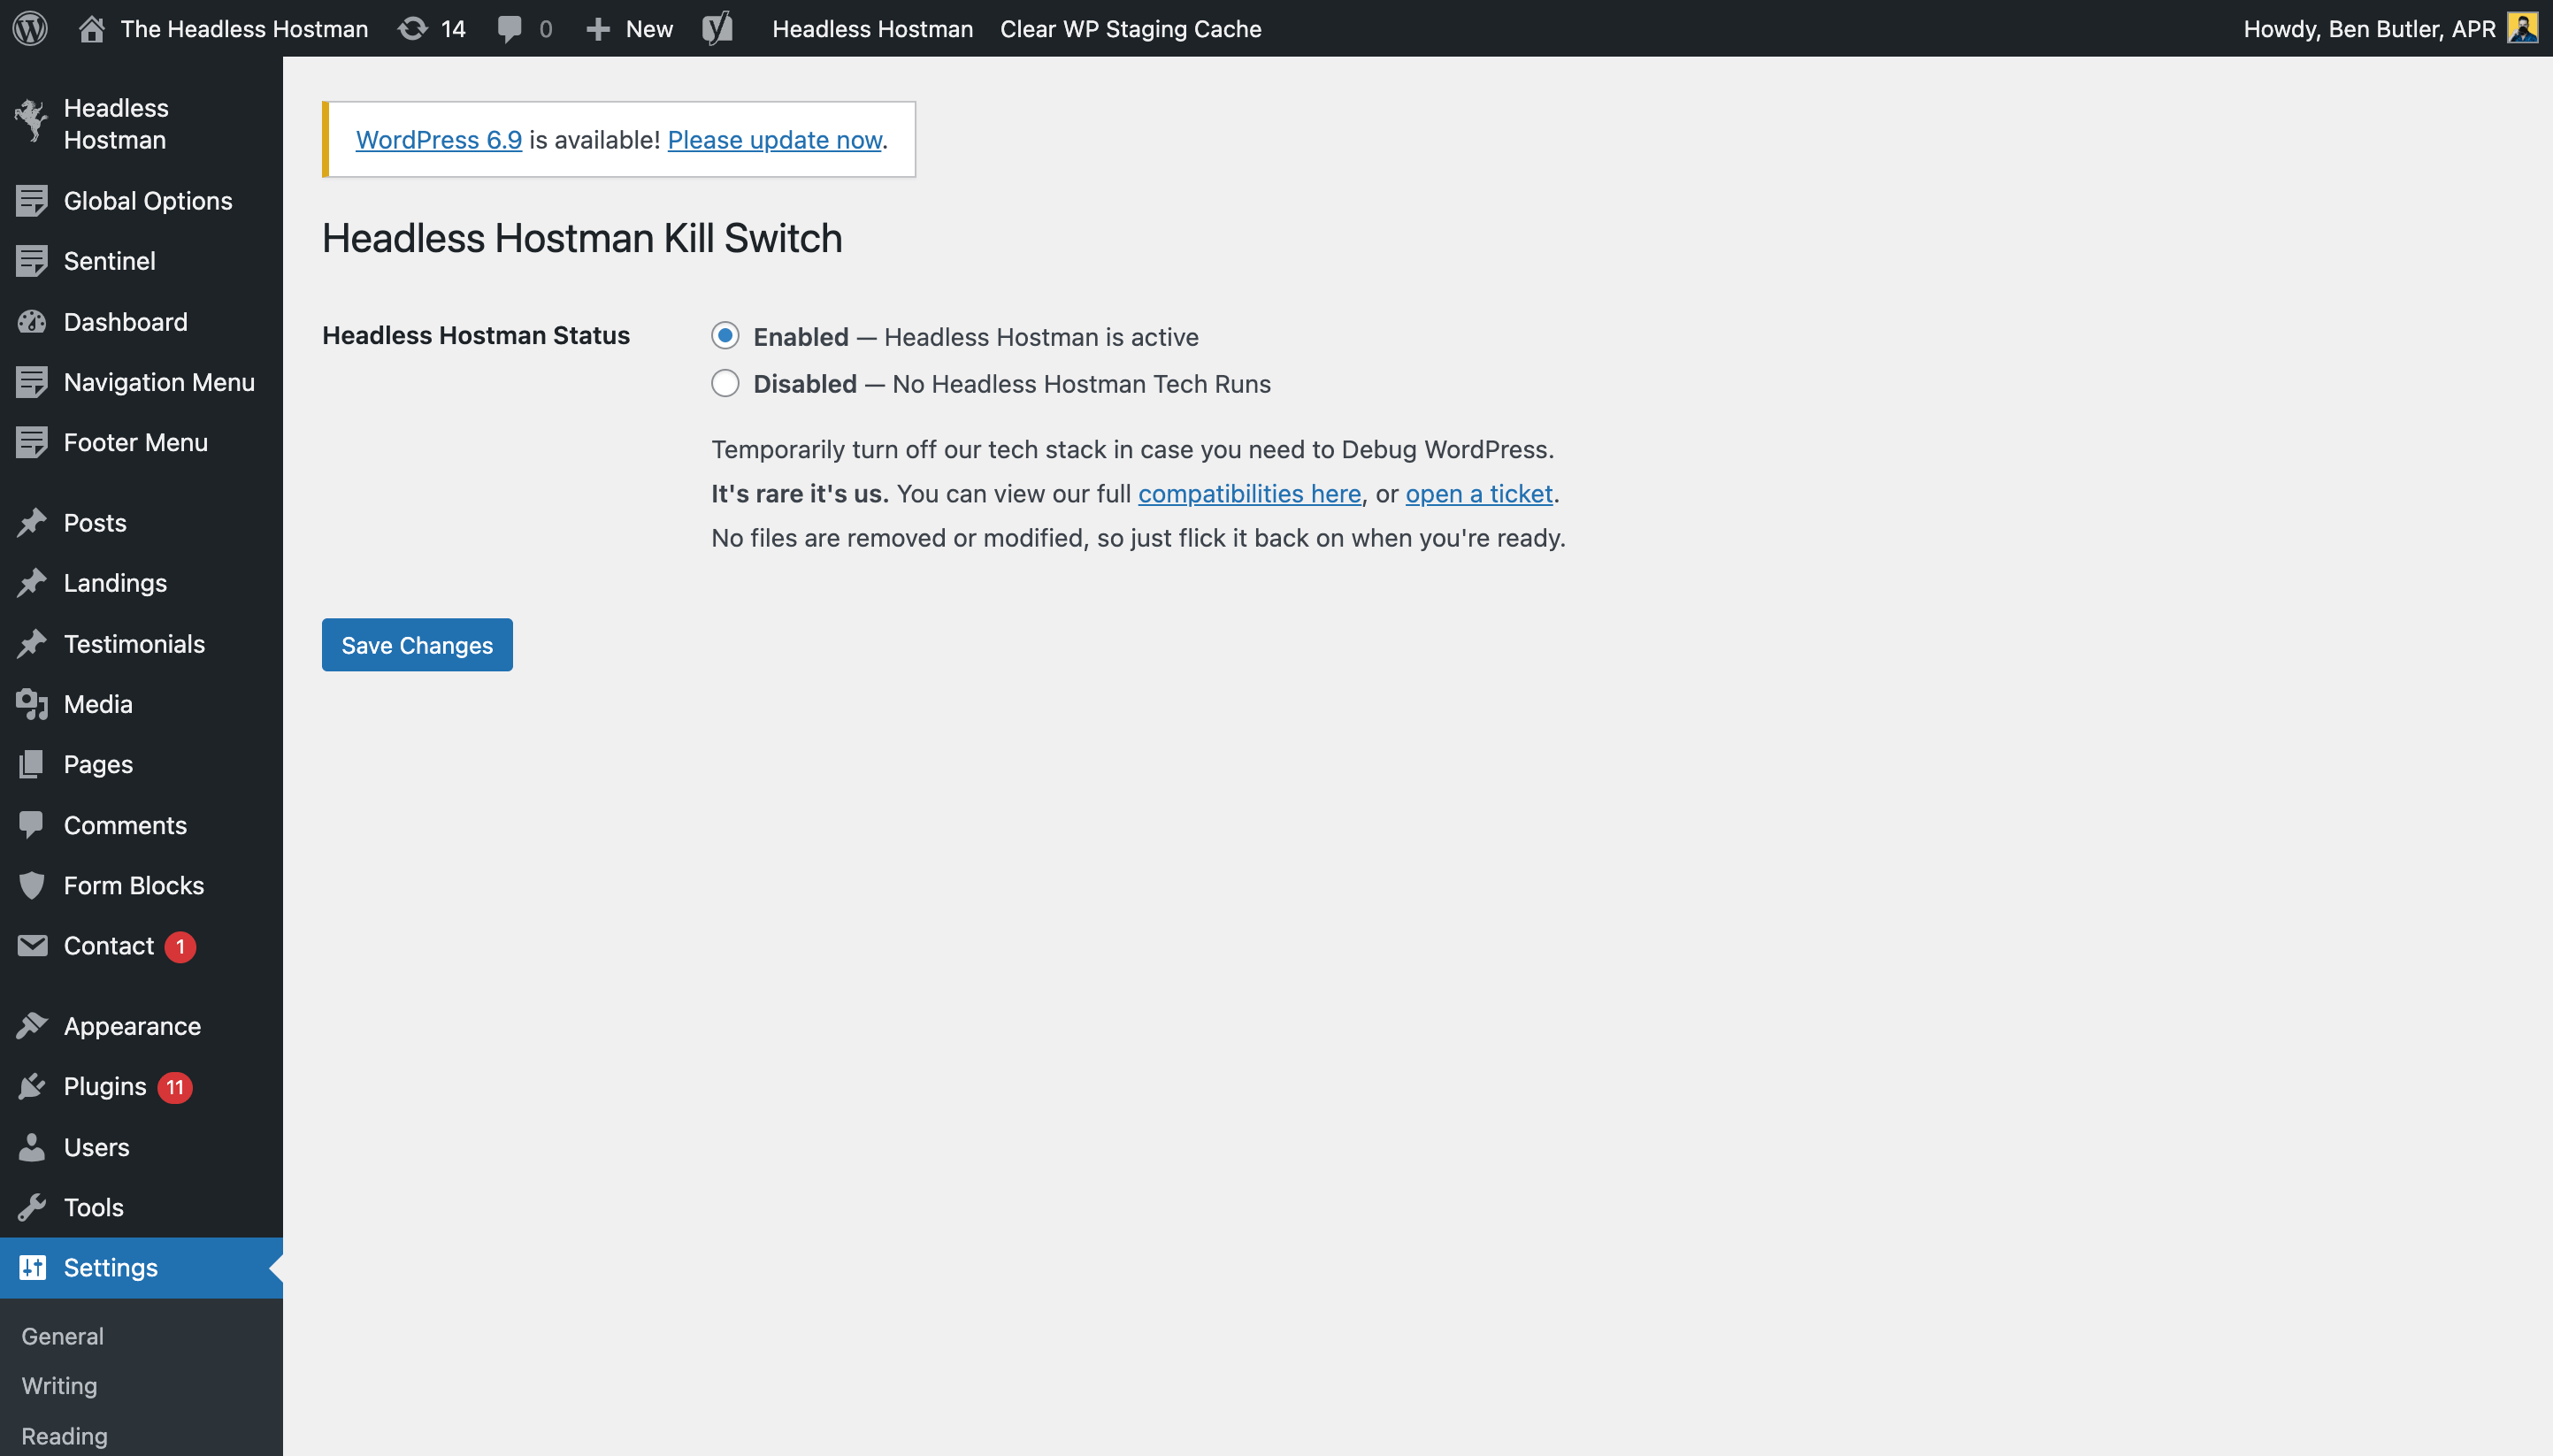
Turn Headless Hostman Off
We have a kill switch you can utilize. Hover over Settings and look for “Headless Hostman Kill Switch.”
On the page, you can enable/disable Headless Hostman’s tech stack safely.
Do this if you’re wondering if whatever issue you’re facing may have to do with us. In 99% of cases, it’s likely not, but the developer motto is to turn things off/on slowly to find your error.
Just be sure to turn it back on when you’re done.
Some Assets Are Missing on the Static Site
First, Check WordPress. Are they there?
- Make sure they’re visible on your WordPress site
- Open Inspect Element or the Network tab to make sure they’re actually loading from a URL on your site — not the previously migrated site, or somewhere else.
If they’re present on WordPress, but not your Live Static Site:
- Head into the individual page/post
- Click the “Clear File Cache” option
- Re-push the entire page/post
Alternatively, you can totally nuke any file cache we have by heading to Performance > Static Caching and click the “Clear File Cache” button.
- Afterwards, re-run a full site push
- Please note: we cache files to prevent ingesting them unnecessarily.
- This cleared push will take extra time to re-ingest all of your images, files, and assets.
If they’re still missing:
- Click the “Files We See” button and see if it appears in the listing
If they’re still missing:
- Contact us via Live Support or email
When to Turn Off Critical CSS "Save Generation"
If you’re using any functions or Plugins to trigger wp_update_post, it is mission critical to click the exclusion option under Performance > Critical CSS.
Our native Critical CSS generator looks for you to save/update a post. When it does, it auto regenerates the Critical CSS via a Cron Job in the background.
Triggering the wp_update_post hook will cause this to fire, and to schedule many corresponding Crons that will slow down the functionality of our Conversion mechanisms.
Can I Test Changes Before Sending It Headless?
Yes, you can.
Within each individual post/page is the ability to test a conversion and view it before pushing to Headless.
Run the test, click the link, and verify all is well.
How Can I Push My 301 Redirects?
Your on-site 301 redirect plugins will not function by themselves because your site lives on the Headless Hostman Static environment.
301s are server-based, not WordPress-based. This is no longer your live site server — it’s your staging site.
It’s easy to push them, though.
- Download Redirection, Rank Math, or Yoast SEO Premium — if you don’t already use one of them
- Enter them there, if they don’t exist.
- If you’re using another Plugin, export from there and then import into Redirection. It’s super easy.
- Any time you make edits, head to Full Site Push and click “Push 301 Redirects”
- That’s it.
We Do Not Support .htaccess Redirects
They must be entered using one of the three Plugins mentioned above.
Want us to add a Plugin? Drop us a line at [email protected]
Do Cookies Work?
In short, yes. But a big caveat.
PHP cookies do not work because your live site is Static and disconnected from a database.
However, just make your cookies run with Javascript/jQuery and they’ll be ready to rock.
If you need developer assistance making these changes, reach out.
How Can I Make Sure a Page Doesn't Get Sent Headless?
Simply mark it as “Draft” in WordPress.
We only push Publish-status pages.
If you do a Full Site push, all Draft-status pages/posts are ignored. If they were already sent, they will then be deleted during the Full Push.
You can also head to the post/page and hit the “Delete from Headless” button to remove it without a Full Site Push.
I've Activated a New Plugin. Why Doesn't It Work?
First, check our Compatibilities here.
If the Plugin makes site-wide changes, you need to do a Full Site Push for those to fully reflect.
Contact us to get a diagnosis if you’re continuing to see issues.
I'm Getting a Robots.txt Issue in the Notifications Center. What Do I Do?
SEO Plugins are notorious for not writing robots.txt to the public root folder.
You can Google how to do so with your SEO Plugin, or just copy the contents from the Plugin, create your own file, and use FTP to upload it to the root folder (public_html).
After you do so, be sure to head to Full Push > Push Sitemaps & Robots.txt, and verify it on your live site.
Common (Non-Hostman) Issues with Elementor
Elementor is famous post-migration for not updating Stylesheets with the new domain.
If you see missing assets on your Elementor site, it’s likely this.
Click their “Regenerate CSS,” or manually update offending Stylesheets to be relative links.